- Home
- Core Coloured Pencil Techniques
- Coloured Pencil Strokes
Basic Coloured Pencil Strokes and Control
What you'll learn
How grip, pressure and pencil sharpness change every mark you make, plus the two stroke families (hatching and scumbling) that do most of the work in coloured pencil drawing.
Strokes are the foundation that nobody quite teaches properly. People reach for a coloured pencil expecting it to behave like a writing pen, then wonder why the colour goes patchy or muddy or refuses to layer.
The shape of the marks you make, and the pressure behind them, controls everything that follows. Once you have a handful of stroke types under your hand and a feel for what changes when you press lighter or harder, you can build any other technique on top of that foundation.
This page covers the small set of basics worth practising properly: the way you hold the pencil, the pressure you use, the difference a sharp point makes, and the two stroke families that do most of the heavy lifting (hatching and circular scumbling).
Gaining Control: Sharpness, Grip, and Pressure
Does pencil sharpness really matter?
Yes, it changes everything about the mark you can make. A sharp point gets pigment down into the deeper valleys of the paper's tooth and gives you the crisp edges fine detail needs.
Fur, feathers, tiny highlights, the edges of leaves: all the small precise work depends on a sharp point. I keep a helical sharpener within reach when I am working on details like animal eyes or whiskers, and I sharpen often.
A slightly duller tip does the opposite, and that is useful too. Where the sharp point digs in, a blunt point skims, laying colour broadly and softly across the surface of the tooth. This is what you want for early layers, soft gradients, distant backgrounds, anywhere you do not want a sharply defined mark.
Holding your pencil
How you hold the pencil matters more than most people expect. Holding it close to the tip, the way you hold a writing pen, gives you the precise control fine work needs.
Holding it further back, more slanted in an underhand grip, naturally encourages lighter pressure and broader strokes, which is the right approach for putting down initial layers.
Close to the tip for precise control
Further back for lighter pressure and broader strokes
Experiment with both. Different jobs want different grips, and you will quickly find which feels right for each.
Finding your pressure sweet spot
Pressure is the single most important variable in coloured pencil work, especially once you start layering.
Light pressure should be your default for early layers, almost always. A light touch leaves the paper's tooth open so you can add more layers on top. It also creates translucent colour, which is what makes optical mixing work, the trick where two layered colours blend in the viewer's eye rather than on the page.
Medium pressure comes in once you have a few layers down and you want to build colour more solidly, or pull out a sharper area within a softer surrounding.
Heavy pressure is reserved for the final stages: burnishing the surface to a polish, or pushing the very darkest accents into the picture. Pressing hard early flattens the paper's tooth and shuts the door on any further layering, which is one of the most common reasons drawings get stuck.
Try this
Pick a single pencil and draw a value scale from the lightest mark you can make to the darkest, just by varying pressure. Five minutes, every few days, is enough to build real control. It is one of those exercises that feels too simple to matter, until you notice your layers behaving themselves a few weeks in.
Essential Stroke Techniques
With control over your pencil's point and pressure in place, here are the two stroke families that do most of the work.
Hatching and cross-hatching
In hatching you build texture using parallel strokes, all going in one direction.
Cross-hatching adds a second layer of strokes in the opposite or diagonal direction, deepening shadow where the lines overlap. The technique gives drawings a lively, woven feel, almost like threads of colour stitched across the page.
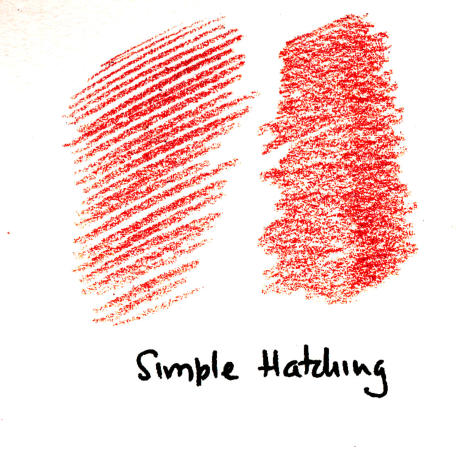
Basic hatching in one direction
You are not limited to straight lines. Try horizontal, vertical, diagonal, or gently curved strokes, and notice how each one changes the feeling of the drawing.
Ann Kullberg, in her book Texture in Colored Pencil, often used vertical hatching for delicate surface texture, especially in her early work.
When cross-hatching, your second set of strokes can criss-cross at right angles or slant in at a gentler angle. Both are useful. The right answer depends on the texture you are after.
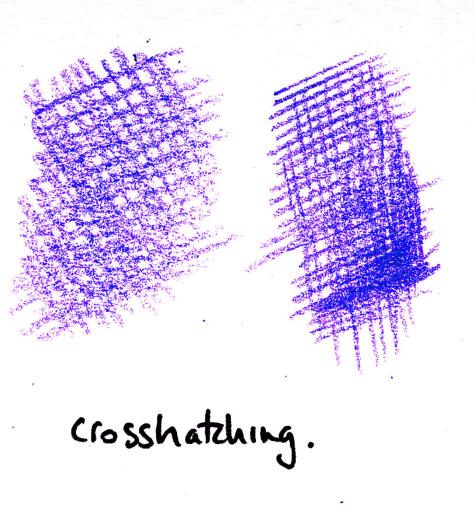
Cross-hatching adds a second layer of lines, deepening shadow where they overlap
Packing your strokes close together darkens the area; wider gaps let more of the paper show through and create a lighter, airier feel. Keep your pencil tip sharp throughout, especially when you are layering several directions, otherwise the lines start to blur into each other.
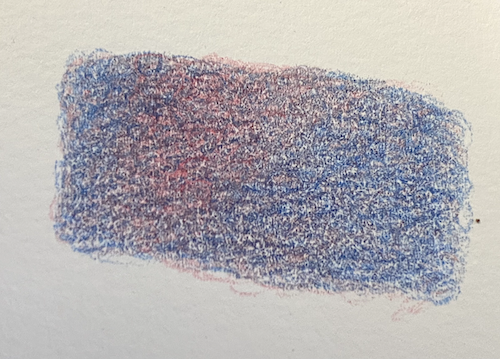
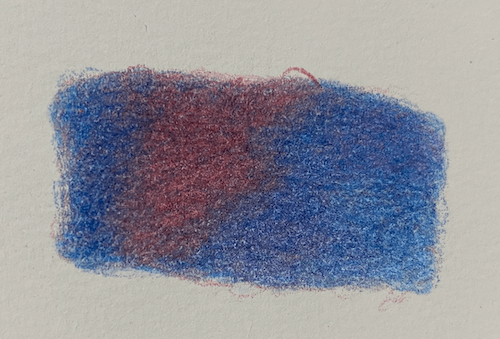
Colour mixing through hatching is one of the joys of the technique. In the example below I started with Lyra Olive Green, added True Blue over it, and softened the centre with a final layer of Light Grey. The colours work together without turning to mud.
Olive Green, True Blue and Light Grey layered through cross-hatching
Cross-hatching is one of those deceptively simple techniques that improves the more you do it. At first your lines might look as if a startled spider has scurried across the page, which is perfectly normal.
Start small. Draw a cube or a simple sphere, build up tone with lines in just one direction, then layer a second direction, then add a colour. Little by little you build a feel for how angles, spacing and pressure interact.
Every artist's cross-hatching has its own rhythm. Yours will too. The wonky lines are often more charming than the careful ones.
Scumbling
If hatching is neat handwriting, scumbling is small, circular, overlapping strokes, like doodling while you are on hold during a phone call, except this time you are doing it with intent.
It is wonderfully forgiving and especially good for soft textures, gentle shading, and layering colour in a way that feels organic and free.
Start with light pressure and make small, continuous loops. The loops do not need to be perfect circles. Think of them more as meandering paths that overlap and fill the space gradually. Vary the size as you go: tight spirals for detail, looser circles for broader areas. Let them overlap generously to build a textured, almost velvety surface.
Scumbling is at its best on natural textures, anywhere you do not want hard lines or obvious patterns. Distant foliage, background grass, pottery, soft shadows, out-of-focus areas, all sit easily under a scumbled layer.
Building intensity with added colours and slightly more pressure
Once you have a base layer down, you can build more colours on top. Try a deeper tone in the shadowed areas, or a complementary colour for visual richness. Keep the motion loose and the pressure gentle at first, since you can always darken later but you cannot easily lighten what is already heavily worked in.
Mix colours freely as you scumble. Layering different hues produces subtle, luminous effects that are hard to get any other way. A white pencil scumbled over a coloured base softens the marks while preserving the texture, which is useful when an area is starting to look too busy.
First scumbling layer
Same area after burnishing with a white pencil
Building Your Foundation
None of this lands the first time you try it. Or the second. The point is to keep the basics alive: a few minutes of practice every day or two will move you forward faster than a long session every fortnight. Get comfortable with light pressure. Spend time noticing how hatching and scumbling each feel in your hand.
Every artist develops their own handwriting with these strokes. Yours will too. Once you trust your control over the basics, you are ready to build on top of them, which is what layering coloured pencils is about: putting these strokes to work to build depth, colour and form on the page.
You might like
How to Layer Coloured Pencils Without Mud
The natural next step once your strokes feel reliable. How layering builds depth and colour without turning the surface to mud.
How to Burnish Coloured Pencils
The technique for that smooth, polished, enamel-like finish, plus the common mistakes that flatten a drawing too soon.
Blending Coloured Pencils Smoothly
All the ways to soften the boundary between two layers, from light pressure to solvents, blenders and white-pencil burnish.
The parent hub, where strokes, layering, blending and burnishing all sit together as one coherent skill set.
Copyright © 2009- pencil-topics.co.uk All rights reserved
Home | About Us | Contact Us | Privacy Policy