- Home
- Core Coloured Pencil Techniques
- Burnishing
How to Burnish Coloured Pencils for That Professional Polish
You've spent hours carefully layering colours on what should be your best drawing yet—a realistic apple that's finally starting to look three-dimensional.
But something's still not right.
Despite all your effort, it looks... amateur. Flat. You can see every individual pencil stroke, and it lacks that smooth, polished finish you see in professional coloured pencil work.
"If I could just make it look smoother," you think, "people would actually be impressed."
I know that frustration intimately.
For years, I created coloured pencil drawings that were technically sound but lacked that final professional polish.
They looked like coloured pencil drawings—and not in a good way.
The individual strokes were visible, the colours looked separated rather than unified, and they definitely didn't have that luminous, almost photographic quality I admired in other artists' work.
Then I discovered burnishing—but more importantly, I learned how to do it properly without destroying hours of careful layering work.
Burnishing is the technique that transforms good coloured pencil work into genuinely impressive art.
It's what creates that smooth, professional finish that makes people stop and say "Wow, you drew that?"
It's the difference between work that looks like hobby art and work that looks gallery-worthy.
In this guide, I'll show you exactly how to achieve that coveted professional polish without the common disasters that ruin drawings—accidentally lightening colours, creating streaky finishes, or dealing with the dreaded wax bloom that seems to appear from nowhere.
What is Burnishing Coloured Pencil?
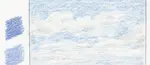
 Layering only
 Left side burnished
 Fully burnished
At its core, burnishing coloured pencil is an advanced blending technique.
It involves applying layers of coloured pencil pigment and then using a specialized tool, a hard-point colourless blender, or even a light-coloured pencil with firm pressure to meld these layers together.
Think of it like polishing a surface. You're essentially grinding and compressing the wax or oil-based pigment from your pencils down into the tooth (the texture) of the paper. This process achieves several key things:
- Eliminates Paper Texture: The firm pressure fills the valleys of the paper's texture, creating a unified, smooth surface.
- Intensifies Colour: Compressing the pigment layers makes the colours appear richer, deeper, and more saturated.
- Creates a Sheen: The compressed wax or oil creates a characteristic polished, slightly glossy or waxy finish.
- Blends Colours Seamlessly: It merges different colours applied in layers, creating smooth transitions and gradients without visible pencil strokes.
This technique is particularly effective for rendering smooth, non-porous surfaces like glass, polished metal, ripe fruit skins, or ceramics.
It signifies a 'finished' look, sealing the layers and giving the artwork a professional polish.
However, it's important to note that once an area is heavily burnished, it becomes difficult (sometimes impossible) to add more layers of colour on top, as the paper's tooth is filled and the pigment will no longer stick.
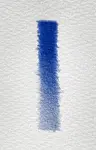
 Burnishing effectively creates the smooth, reflective surface seen on subjects like these cherries
Is Burnishing Right for Your Drawing Goals?
Before diving into technique, let's make sure you understand when burnishing creates that professional look you're after—and when it might sabotage your efforts.
Use Burnishing When You Want To
- Create a smooth, professional finish that eliminates visible pencil strokes
- Achieve realistic smooth surfaces like polished apples, glass, metal, or ceramic
- Unify your colours into seamless, luminous blends
- Add that final "wow factor" that separates amateur from professional-looking work
- Create depth and richness that makes colours appear to glow from within
- Eliminate the "coloured pencil look" for subjects that should appear smooth
Perfect for: Realistic still life, reflective objects, anything requiring a polished, unified appearance.
Don't Use Burnishing When You Want
- Visible texture like animal fur, rough bark, fabric weave, or hair strands
- To add more layers later - burnishing seals the surface, preventing additional colour
- On areas you're not satisfied with - burnishing makes corrections nearly impossible
- Quick sketches or studies where the polished finish isn't the goal
The Honest Reality Check
Burnishing is often the final step in a drawing -it's a commitment.
Once you've burnished an area heavily, you can't easily change it. T
his isn't a technique to rush into or use everywhere. But when used thoughtfully on the right subjects, it's what transforms good coloured pencil work into genuinely impressive art that draws admiration.
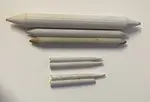
Tools for Burnishing Coloured Pencil
The tool you choose for burnishing can subtly alter the final effect. While you don't necessarily need expensive specialty items to start, understanding the options helps you achieve your desired look.
, colorless wax blenders (Prismacolor, Lyra), Caran d'Ache stick and a Derwent blender.") From hard burnishers (like the Derwent) to softer blenders (Prismacolor, Lyra), various tools can be used to achieve a polished finish
From hard burnishers (like the Derwent) to softer blenders (Prismacolor, Lyra), various tools can be used to achieve a polished finishWhite or Pale-Coloured Wax Pencil
- How it works: Using a white or very light pencil (like cream or pale gray) from your regular set, you apply firm pressure over the coloured layers.
- Pros: Readily available, inexpensive.
- Cons: It will slightly tint and lighten the underlying colours due to the added white/pale pigment. This can be desirable for highlights but may dull richer colours. Requires significant pressure.
- Best for: Achieving subtle blends, creating highlights, artists on a budget.
Specialty Colourless Blender Pencils
- Examples: Prismacolour Colourless Blender, Lyra Rembrandt Splender Blender, Derwent Blender Pencil.
- How it works: These are pencils made primarily of wax binder without pigment. They blend existing colours using firm pressure without adding colour.
- Pros: Don't alter the hue of your underlying colours significantly. Designed specifically for blending and burnishing.
- Cons: Can sometimes create a slightly waxy look depending on the brand and paper. Quality varies between brands (some are harder, some softer).
- Lyra Splender Blender: Known for being softer and offering gentle, smooth transitions.
- Prismacolour Colourless Blender: Matches the soft, waxy core of Prismacolor Premier pencils, good for burnishing those specifically.
Specialty Burnisher Pencils
- Examples: Derwent Burnisher Pencil, Caran d'Ache Full Blender Bright (Wax Stick).
- How it works: These are typically harder points made of clear binder or wax. They are designed less for gentle blending and more for heavy pressure polishing.
- Pros: Create a very smooth, almost glass-like finish. Excellent at compressing layers and intensifying colour. Can create a resist effect if used before colouring.
- Cons: Can make it very difficult to add colour afterward. Require significant pressure, which might not suit all paper types.
- Derwent Burnisher: A hard pencil point that adds a transparent wax layer, sealing the surface effectively. Great for final polishing.
- Caran d’Ache Full Blender Bright: A solid stick of colourless wax, excellent for covering and blending larger areas smoothly, especially compatible with their Luminance pencils.
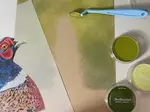
Tool Test Insights
In a test comparing the Derwent Burnisher and Lyra Splender on Faber Castell Polychromos (oil-based) and Derwent Artist (wax-based) pencils over Hot Pressed watercolour paper we found:
 Visual comparison: Testing the effects of different burnishing tools (Derwent, Lyra, white pencil) on coloured pencil layers.
Resist Effect:
Both tools, when applied before colour, created a resist by indenting the paper and applying clear wax, letting underlying marks show through a single colour layer.
Burnishing:
- On Polychromos, the Derwent Burnisher produced a noticeably softer, more thoroughly blended result compared to the Lyra Splender under consistent pressure.
- On Derwent Artist pencils, both performed well, demonstrating their effectiveness on wax-based leads.
White Pencil Comparison:
Using a white pencil for burnishing resulted in a distinctly lighter, less intense colour compared to the dedicated colourless tools, confirming its tinting effect.
Which tool is best? It depends on your pencils (wax vs. oil), your paper, the desired effect (subtle blend vs. high gloss), and personal preference. Experimentation is key! Starting with a colourless blender pencil is often a good middle ground.
What UK Artists Need for Successful Burnishing
Let's talk about the practical realities of getting burnishing tools and suitable materials in the UK.
Essential Burnishing Tools Available in the UK
Derwent Burnisher
- Where to buy: Jackson's Art Supplies, Amazon UK, Hobbycraft
- Price range: £3-5 individual pencil
- My experience: Reliable, widely available, works well on most papers
- Best for: UK artists wanting a dedicated burnishing tool without import costs
Lyra Splender (Colourless Blender)
- Where to buy: Jackson's Art Supplies, online art retailer
- Price range: £4-6 individual pencil
- My experience: Slightly softer than Derwent, good for gentle burnishing
- Best for: Artists wanting more control over pressure
Budget Alternative: Light-Coloured Pencils
- What to use: Cream, pale yellow, or white pencils from your existing set
- Cost: No additional expense
- Trade-off: Will slightly lighten the area but still creates smooth finish
- Best for: Learning burnishing before investing in dedicated tools
What Paper Works Best for Burnishing?
Burnishing works best on sturdy paper with a moderate amount of tooth.
Too smooth: Papers like Bristol Board (smooth plate finish) have less tooth to grip the initial layers, making it harder to build up enough pigment before burnishing. Burnishing might just smear the pigment around.
Too Rough: Very textured paper (like rough watercolour paper) requires a lot of pigment and pressure to fill the deep valleys, which can be tiring and lead to a less uniform finish.
Good Choices: Hot-pressed watercolour paper, Stonehenge paper, good quality drawing or cartridge paper (like in the example) often strike a good balance. Experiment to find your favorite!
Now that you understand what makes good burnishing paper, here are the specific options I recommend for UK artists.
Best Papers for Burnishing (UK Available)
Strathmore 400 Series (Hot Press)
- Where to buy: Jackson's Art Supplies, Amazon UK
- Price range: £20-30 for pad
- Why it works: Enough tooth to hold layers, smooth enough for even burnishing
Fabriano Artistico (Hot Press)
- Where to buy: Most UK art suppliers
- Price range: £25-40 for pad
- Why it works: Premium paper, excellent for detailed burnishing work
What About Cheaper Options?
Honestly, burnishing demands good paper.
Cheaper cartridge paper often doesn't have enough tooth to hold the pigment layers needed before burnishing, or it's too rough to achieve a smooth finish.
This is one area where investing in better materials makes a dramatic difference in your results.
How Do You Burnish Coloured Pencils Without Disasters?
Here's the systematic approach that prevents the most common burnishing mistakes:
Step 1: Build a Solid Foundation (Don't Skip This)
Before even considering burnishing:
- Apply at least 3-4 layers of colour with light to medium pressure
- Ensure your colours are already close to your final desired hue
- Have enough pigment built up—burnishing weak layers just creates streaky disasters
- Plan your highlights—you can't easily add them after burnishing
Step 2: Test Your Approach First
Never burnish directly on your final artwork without testing:
- Use scrap paper with the same pencils and similar colours
- Test your burnishing tool pressure and effect
- Confirm the colours don't get too light or muddy
- Practice the motion—smooth, consistent strokes work best
Step 3: Burnish Strategically
When you're ready for the real thing:
- Work in small sections—you can always burnish more areas
- Use smooth, overlapping strokes, not erratic scribbling
- Apply firm, consistent pressure (but not so hard you damage the paper)
- Work in one direction initially, then cross-hatch lightly if needed
Step 4: Know When to Stop
The biggest mistake is over-burnishing:
- Stop when you achieve smoothness—more isn't always better
- If colours start looking chalky or washed out, you've gone too far
- Remember: you can't easily undo heavy burnishing
What Are the Critical Burnishing Guidelines
Let's visualize the process. I used:
- Paper: Cartridge Paper (has a slight texture)
- Pencils: Caran d’Ache Luminance (a high-quality, soft wax-based pencil range, excellent for burnishing)
Initial Light Layers: Starting with your lightest value, light strokes establish the sphere's shape and basic shading. The paper grain is clearly visible. This maps out the form.
 Step 1: Begin with light layers to establish the basic shape and initial shading.
Building Colour and Form: More layers are added, to enhance the 3D effect. Still applied relatively lightly, but building pigment. I used light ochres and browns here.
 Step 2: Build colour and form by adding more light layers, ensuring good pigment coverage
Introducing More Colours: New hues (oranges and yellows in my example) are layered using a blunt pencil, adding complexity and richness while reinforcing existing layers. There's now a solid foundation of wax pigment.
 Step 3: Introduce additional colours and apply a final colour layer (here, yellow/orange) ready for burnishing
The Burnishing Magic: A strong yellow/orange layer is applied over the entire shape with heavy pressure using a blunt pencil tip. This acts as both a colour layer and the burnishing agent. Notice how:
- Paper grain largely disappears.
- Colours intensify significantly.
- The surface looks smooth and unified.
- The underlying shading still shows through the transparent orange layer.
Final touches are added to define the deepest shadows and perhaps subtle highlights.
 Step 4: The completed burnished sphere, showing smooth, intensified colour and minimal paper texture.
Refinement: Resist the temptation to overwork it - a common challenge once you start burnishing.
Why This Sphere Example Matters for Your Art
Look at the transformation in my sphere example above—this demonstrates exactly what burnishing does for your realistic subjects:
Before Burnishing (Early Stages)
- Visible paper texture - You can see individual paper grain through the colour
- Separate colour layers - Each pencil stroke exists independently
- Matte appearance - Looks flat, lacks luminosity
- Obviously "coloured pencil" - Screams amateur work
After Burnishing (Final Stage)
- Smooth, unified surface - Paper grain disappears
- Integrated colours - Layers blend into cohesive hues
- Luminous depth - Colours appear to glow from within
- Professional polish - Could easily be mistaken for other media
This is the difference burnishing makes. It's not just a technique—it's what raises your work from hobby-level to genuinely impressive art that draws those "Wow, you drew that?" reactions you're after.
Why Does My Burnishing Always Go Wrong?
Successful burnishing involves navigating a few potential challenges:
Disaster 1: "My Colours Turned Muddy and Dull"
What happened: You tried to burnish over too many different colours or incompatible hues
Prevention: Plan your colour scheme—burnish analogous colours (neighbors on colour wheel) together
Fix: If caught early, add a dominant colour over the muddy area with firm pressure
Disaster 2: "Everything Became Too Light and Washed Out"
What happened: Used a white pencil for burnishing or didn't build enough colour first
Prevention: Use a colourless blender, or ensure very rich colour layers before burnishing
Fix: Try adding darker colours with very firm pressure—sometimes they'll stick
Disaster 3: "Weird White Film Appeared Everywhere"
What this is: Wax bloom—completely normal with heavy burnishing
Why it happens: Wax from pencils rises to surface under pressure
Simple solution: Gently wipe with soft cloth or tissue—it comes right off
Prevention: Light spray of workable fixative before final burnishing
Disaster 4: "My Burnishing Looks Streaky and Uneven"
What happened: Inconsistent pressure or not enough base colour
Prevention: Build substantial colour layers first, maintain steady pressure
Fix: More base colour usually helps—add another layer, then re-burnish gently
Disaster 5: "I Can't Add Any More Colour After Burnishing"
What happened: This is normal—burnishing seals the paper surface
Reality check: Burnishing is typically a final step, not a middle stage
Planning tip: Make sure you're happy with colours before burnishing
How Do I Avoid These Problems?
"I'm afraid to try burnishing on my good drawings"
- Practice on identical paper with similar colours first
- Start with small, less critical areas
- Remember: confidence comes from practice, not perfection
"I don't know when my drawing is ready for burnishing"
- You should have rich, saturated colour built up
- The drawing should look nearly finished without burnishing
- Think of burnishing as polish, not a way to fix weak colour
"My burnishing never looks as good as examples online"
Those examples likely have many more colour layers than you think
Professional artists often photograph under ideal lighting
Your work may be better than you realize—self-criticism is harsh
Choosing the Right Pencils
While you can burnish with most coloured pencils, softer wax-based pencils generally burnish more easily and effectively due to their higher wax content and binder softness.
Excellent Choices: Prismacolour Premier, Derwent Coloursoft, Caran d'Ache Luminance.
Oil-Based Pencils (e.g., Faber-Castell Polychromos, Lyra Rembrandt Polycolour): Can still be burnished, but may require more layers and pressure. The finish might be slightly less glossy and more satin. A harder burnisher tool often works well with these.
When NOT to Burnish
Don't burnish if you want to retain a textured look (like animal fur, rough wood, fabric weaves) or if you anticipate adding many more layers or details later. Burnishing is often one of the final steps.
How Do You Know When You're Ready to Burnish?
Burnishing isn't for beginners, but you don't need to be an expert either. Here are the skills you should have first:
Master These First
Pressure control - Burnishing requires firm, consistent pressure
Colour planning - Know your final colours before you start burnishing
Basic colour theory - Understand which colours work together
Signs You're Ready
- Your layered work already looks good—burnishing will make it great
- You're comfortable with pressure control and don't accidentally gouge paper
- You can plan a drawing from start to finish
- You're not constantly surprised by how your colours turn out
Start With These Subjects
- Simple fruits - Apples, oranges (smooth, forgiving surfaces)
- Basic geometric forms - Spheres, cubes (practice control)
- Single objects - Don't attempt complex compositions initially
Avoid These Until You're Confident
- Portraits (too important to risk ruining)
- Complex multi-object compositions
- Subjects requiring mixed textures (some burnished, some not)
- Anything you can't bear to potentially mess up
Common Questions about Burnishing Coloured Pencil (FAQ)
Let's address some frequent queries:
Question: Will burnishing make my art look professional?
Question: Will burnishing make my art look professional?
Answer: Burnishing is one tool that can create a professional appearance, but it's not magic.
Professional-looking art comes from good drawing skills, solid colour choices, and appropriate technique application.
Burnishing helps achieve smooth, polished finishes that can definitely elevate realistic subjects—but only when the underlying drawing and colour work are already strong.
Question: I'm scared I'll ruin my drawing—should I try burnishing?
Question: I'm scared I'll ruin my drawing—should I try burnishing?
Answer: That fear is completely understandable and actually wise.
Never practice burnishing on a drawing you can't bear to potentially damage.
Instead, create small studies on the same paper with similar colours to test your approach. Build your confidence on practice pieces first.
Remember: every professional artist has "ruined" drawings while learning—it's part of the process.
Question: How do I know if my colours are too light after burnishing?
Question: How do I know if my colours are too light after burnishing?
Answer: If your burnished area looks significantly paler than the surrounding unburnished areas, you've likely lightened too much.
This usually happens when using white pencils for burnishing or not building enough colour first. The key is having rich, saturated layers before burnishing—the technique should enhance what's already there, not drastically change it.
Question: Can I burnish just part of a drawing?
Question: Can I burnish just part of a drawing?
Answer: Absolutely—and often you should! Burnishing everything can make a drawing look artificially smooth.
Use it strategically for smooth surfaces (like polished apples, glass, skin) while leaving textured areas (like hair, fabric, rough bark) unburnished.
This contrast between smooth and textured areas actually makes both more convincing.
Question: What exactly is burnishing in coloured pencil?
Question: What exactly is burnishing in coloured pencil?
Answer: It's a technique using firm pressure with a blending tool or light pencil to smooth, blend, and compress coloured pencil layers, creating a seamless, polished, often glossy finish by filling the paper's tooth.
Question: Can I burnish without special tools like colourless blenders?
Question: Can I burnish without special tools like colourless blenders?
Answer: Yes! You can use a white or very pale-coloured pencil from your set. Be mindful it will slightly lighten the area. You can also sometimes burnish by applying heavy pressure with a light-coloured pencil that's already part of your desired blend (like the yellow/orange in the sphere example). Even a tortillon or paper stump can achieve some blending, though it's technically not burnishing in the same way (it smooths by rubbing, not compressing wax).
Question: How do I avoid lightening my colours too much when burnishing?
Question: How do I avoid lightening my colours too much when burnishing?
Answer: Use a dedicated colourless blender or burnisher pencil instead of a white/pale pencil. These are made of binder without pigment. Alternatively, ensure you have very rich, saturated layers of colour down before burnishing, so any slight lightening from a white pencil is less noticeable.
Question: How can I fix mistakes after burnishing?
Question: How can I fix mistakes after burnishing?
Answer: Fixing mistakes post-burnishing is difficult because the paper tooth is filled and sealed. Minor adjustments might be possible with a very sharp pencil of a darker colour applied with heavy pressure. Sometimes, carefully lifting pigment with sticky tack/poster putty might work slightly, but don't expect miracles. Major changes usually aren't feasible. Prevention (careful layering before burnishing) is the best strategy.
What Should You Practice This Week?
Choose a simple subject that would benefit from a smooth, polished finish—maybe a red apple or orange. Work through your normal layering process, building up rich, saturated colour. Then, on a small area first, try burnishing with whatever tool you have available (even a white pencil to start).
Don't aim for perfection—aim for understanding how the technique feels and what it does to your colours. This small experiment will teach you more than reading could ever do.
What Comes After Mastering Burnishing?
- Learn when NOT to burnish - Understanding texture contrast makes your smooth areas more impressive
- Master other blending methods - Burnishing is just one tool in your finishing arsenal
- Study light and reflection - Burnished surfaces show light differently than matte ones
Still Feeling Intimidated by Burnishing?
You're not alone—this technique feels high-stakes because it's often irreversible.
But here's the truth: every impressive coloured pencil drawing you've ever admired likely used burnishing strategically. The artists who created them felt the same nervousness you're feeling now.
The difference between admiring others' polished work and creating your own isn't talent—it's practice and courage to try the techniques that elevate art from good to genuinely impressive.
What's holding you back from trying burnishing? Is it fear of ruining work, uncertainty about tools, or something else? I'd love to hear about your specific concerns—I read every email and often turn common questions into helpful tutorials.
Remember: that professional polish you admire in others' work isn't magic. It's technique applied thoughtfully with practice. Your next drawing could be the one where everything clicks.

I'm Carol Leather, a coloured pencil artist for over 15 years. Most of my teaching comes back to the same idea: realistic coloured pencil starts with structure, light and observation long before the colour goes down.
My work has featured in Ann Kullberg's Color Magazine, CP Magic and Color Pencil Treasures (vol 7). I'm a member of the UKCPS and was a prize winner in the Nature section of their Annual Open Exhibition in 2020.
You might like these
Paper Blending Stumps And Tortillons For Colored Pencil Art
The use of paper blending stumps in colored pencil art, providing a comprehensive guide to their application, benefits, and maintenance.
How to Layer Coloured Pencils Without Mud: Techniques That Work
Master coloured pencil layering with proven techniques. Build rich, deep colours without muddy mistakes. Step-by-step tips for smooth, realistic results.
Copyright © 2009- pencil-topics.co.uk All rights reserved
Home | About Us | Contact Us | Privacy Policy