- Home
- Core Coloured Pencil Techniques
- Blending coloured pencil
Your Guide to Blending Coloured Pencils
You've learned how crucial layering is for building rich colour in the previous page in this core techniques hub.
Now, let's tackle the next step many artists find tricky: blending.
Blending is simply the process of smoothing the transitions between colours or values to create a seamless look. When done well, it raises your work, making textures look softer and forms appear more realistically rounded.
If you've ever struggled with unwanted pencil lines, patchiness, or harsh edges, understanding blending techniques can make a huge difference.
It's important to remember two things first:
- Blending works best when you have enough light layers of pencil pigment already on the paper for the tool to work with. Don't try to blend a single, sparse layer!
- You don't have to blend everything! Sometimes the texture of pencil strokes is desirable. Blending is a tool to use purposefully where you want a smoother effect.
Let's explore some of the most common and effective blending methods.
Method 1: Paper Stumps and Tortillons - The Artist's Secret Weapon?
These simple tools, made from tightly rolled or compressed paper, are invaluable for coloured pencil artists.
Stumps: Denser, usually pointed at both ends, available in various sizes. Good for larger areas and smooth blends.
Tortillons: Tightly rolled paper, pointed at one end. Often better for smaller areas and more subtle blending.
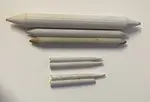
 and thinner rolled paper tortillons (bottom) in various sizes.") Examples of paper blending stumps (top row, denser feel) and tortillons (bottom row, visibly rolled paper). Both come in various sizes.
Examples of paper blending stumps (top row, denser feel) and tortillons (bottom row, visibly rolled paper). Both come in various sizes.How to Use Them: Stumps and tortillons allow you to gently move pencil pigment, softening edges and creating smooth transitions without adding more colour.
- Gentle Touch: Use a light hand! Gently rub the tool over the layered pencil area. Rubbing too hard can lift pigment or even damage the paper or the tortillon tip.
- Suitable Pencils: They work particularly well with softer core pencils (like Prismacolor Premier or Derwent Coloursoft) but can also be effective with harder pencils (like Polychromos) if enough layers are applied.
Before Blending
 The puffin drawing after initial colour layering, before any blending techniques have been applied.
After Blending
 Notice how blending has smoothed the pencil strokes on the puffin's breast and background, creating a softer, more unified look compared to the previous image.
Alternative Use (Palette Transfer): You can create a small palette of colour on scrap paper, lift the pigment with your stump, and then apply it gently to your artwork for very smooth base layers or subtle tints.
 to colour a leaf drawing (bottom).") You can create a 'palette' on scrap paper (top swatch), lift the colour with your blending stump, and use it to gently lay down smooth base tones, as shown being applied to the leaf here.
You can create a 'palette' on scrap paper (top swatch), lift the colour with your blending stump, and use it to gently lay down smooth base tones, as shown being applied to the leaf here.Tips and Maintenance
- Keep them Clean: Wipe tips on scrap paper or fine sandpaper often to avoid muddying colours.
- Separate Stumps: It's wise to keep separate stumps for different colour families (e.g., blues/greens, reds/yellows) and especially separate ones for graphite/charcoal vs. coloured pencil.
- Cleaning: For deeper cleaning, gently rub the dirty tip on fine sandpaper or an emery board. You can sometimes refine the point carefully with a craft knife if needed (adult supervision recommended!). Don't use a pencil sharpener.
- Avoid Sanded Paper: Using these tools directly on very abrasive sanded art papers can fray them quickly.
Want to Make Your Own?
Creating your own tortillons is easy and cost-effective! Find detailed instructions here.
Method 2: Speciality Colourless Blender Pencils
These look like regular pencils but are made primarily of wax or oil binder without any pigment. Popular examples include the Prismacolor Colorless Blender, Lyra Rembrandt Splender Blender, and Derwent Blender Pencil.
- How they work: They physically blend and merge the existing coloured pencil layers using pressure, without adding colour themselves.
- Technique: Apply the blender pencil over your layered colours using medium to firm pressure. Work in small circles or follow the contours.
- Pros: Don't alter the hue of your underlying colors significantly. Designed specifically for blending. A dry method offering good control.
- Cons: Can sometimes create a slightly waxy look depending on the brand and paper.
Quality and hardness vary between brands (e.g., Lyra Splender is known for being softer, Prismacolor matches their pencil softness). Importantly, using firm pressure with these can start to flatten the paper tooth, similar to burnishing, making further layering difficult.
Method 3: Using Light Coloured Pencils
You can also blend colours by layering a white or very light-coloured pencil (like cream, ivory, or a pale grey) over your existing layers with increasing pressure.
- How it works: The light pencil physically mixes with the layers beneath and helps to smooth them together.
- Technique: Apply the light pencil with medium to heavy pressure over the area you want to blend.
- Heads Up: When you use heavy pressure with a light pencil like this, you are essentially burnishing. This creates a very smooth, polished look but also seals the paper tooth, making it hard to add more layers.
- We cover this technique in detail on the very next page - Burnishing Explained.
Method 4: Solvents (Use with Care)
Solvents are liquids used to dissolve the binder in coloured pencils, allowing the pigment to flow and blend, often creating painterly effects.
While they can be very effective, this is a method that requires significant caution, thorough testing, and a good understanding of safety practices.
!! Test First, Always !!
Before ever applying any solvent to your precious artwork, it's crucial to test it on scrap paper with the exact same pencils and paper you plan to use for your piece. Different solvents can react differently with various pencil brands and papers, sometimes even changing colours. This step is non-negotiable!
A Beginner-Friendly Option: Zest-It Pencil Blend
If you're new to solvents, a product like Zest-It Pencil Blend is often recommended as a starting point.
It's a citrus-based solvent (derived from orange terpenes) designed for artists, and it's non-toxic, non-flammable, biodegradable, and generally leaves no residue. Its primary function is to dissolve the wax or oil binder in your pencils.
 Zest-It Pencil Blend (bottle, right) is a popular citrus-based solvent for coloured pencils. They also offer a pre-impregnated Blending Sponge (tin, left) for convenience.
Another Accessible Option: Solvent Pens
For a more controlled application, you might consider pre-packed solvent pens (e.g., from Tombow, Derwent, or Finesse).
These fibre-tipped pens contain a small amount of solvent (often alcohol-based) and allow for more precise application, which can be less intimidating for beginners.
How to Apply (General Technique)
- Apply solvents sparingly. A little goes a long way.
- Use a cotton bud, a small, stiff brush, or even a dedicated paper blending stump to apply the solvent to your layered pencil work.
- Gently move the pigment to blend colours and smooth transitions.
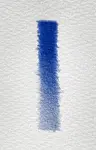
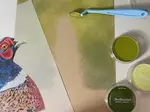
 and blended (bottom) areas") Using a small brush lightly dampened with a solvent (Zest-It in this case) to blend coloured pencil layers. Notice how the strokes are smoothed and the colour intensified in the lower swatch where the solvent has been applied
Using a small brush lightly dampened with a solvent (Zest-It in this case) to blend coloured pencil layers. Notice how the strokes are smoothed and the colour intensified in the lower swatch where the solvent has been appliedKey Things to Know
- Pros: Can create beautiful, smooth, painterly blends, especially effective for large areas or heavily layered pencil.
- Cons and Cautions: This is a wet method, so it can affect your paper (test for buckling!). Solvents can sometimes alter the colour balance of pigments. The blended area might dry to a matte finish. Ensure the area is completely dry before adding more pencil layers.
Safety is Paramount
- ALWAYS work in a well-ventilated area, even with low-odour or non-toxic solvents.
- Avoid skin contact: consider wearing gloves.
- Follow all manufacturer instructions and dispose of used materials (like cotton buds or paper towels soaked in solvent) safely, according to product guidelines.
Recommendation
Given the precautions needed, I generally advise artists to become comfortable with dry blending methods (like stumps and blender pencils) first.
Solvents offer unique effects but come with a greater need for careful practice and safety awareness.
Want to Learn Much More About Solvents?
This has been a brief introduction.
For a very detailed guide on different types of solvents (including mineral spirits, Gamsol, and others), in-depth safety information, product comparisons, and troubleshooting, please see our comprehensive page on coloured pencil solvents.
Other Tools (Brief Mention)
- Cotton Swabs/Buds: Can be used for very soft, gentle blending, but be careful as they can lift colour unevenly. Best for light applications.
- Felt/Chamois: Small pieces can be used for soft, gentle rubbing to blend colours subtly.
Which Blending Method Should You Use?
The best method often depends on the effect you want, the pencils you're using, and your paper:
- For subtle smoothing and control: Stumps/Tortillons are great.
- For dry integration and richer colour: Colourless Blender Pencil works well.
- For a final, polished look (seals paper): Burnishing with a light pencil (see next page!).
- For painterly effects or heavy layers: Solvents (used carefully).
Remember: Successful blending always starts with good layering. If you're experiencing issues like patchiness, check out the Troubleshooting Common Issues page.
Ready to add that final polish?

I'm Carol Leather, a coloured pencil artist for over 15 years. Most of my teaching comes back to the same idea: realistic coloured pencil starts with structure, light and observation long before the colour goes down.
My work has featured in Ann Kullberg's Color Magazine, CP Magic and Color Pencil Treasures (vol 7). I'm a member of the UKCPS and was a prize winner in the Nature section of their Annual Open Exhibition in 2020.
You might like these
How to Burnish Coloured Pencils: Tools, Technique & Common Mistakes
Burnish coloured pencils for smooth, intense colour without wrecking your layers. The right tools, timing, technique, and how to fix common mistakes.
Coloured Pencil Strokes: Hatching, Scumbling & Pressure Control
Master hatching, cross-hatching, scumbling and circular strokes. How grip, pressure and sharpness affect your marks. Practical exercises to build control
Limited Palette & Optical Mixing Tutorial froom Peter | Pencil Topics
Take Peter Weatherill's 6-pencil challenge! Master core coloured pencil techniques like layering for optical mixing, value creation & burnishing

Copyright © 2009- pencil-topics.co.uk All rights reserved
Home | About Us | Contact Us | Privacy Policy