- Home
- Pastel Pencils
- Pan pastels
Using pan pastels in coloured pencil art
Pan Pastels are often incorporated into coloured pencil paintings that are not destined to be entered into pure coloured pencil exhibitions or competitions.
Pan Pastels, a product from the USA, are small lidded plastic containers that contain very fine compressed powdered pastel pigment. This is applied to the painting surface with small sponges or Sofft Tools. It will 'take' on cartridge paper and also on coloured papers with a non glossy surface. On most art papers it can also be erased with a standard plastic eraser.
This product has excellent lightfast ratings, and produces lower amounts of dust than regular stick pastels.
There are 92 colours available ranging from very light to extra dark. They can be bought individually or in sets of 5, 10, 20 or 80 colours. A number of mediums are also available including a colourless blender (more on that further down the page).
Pan Pastels for backgrounds
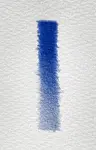
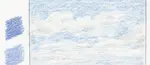
 Creating a pan pastel background on backing paper which will show through the Polydraw film on which the subject is drawn
Although it can be used alone, for our purposes we will look at its use in conjunction with coloured pencils.
A popular use is for backgrounds, giving a faster result than using just a pencil point to fill a large area. Because it blends beautifully it is ideal for soft, 'bokeh' backgrounds with out of focus circles of light - similar to what a photographer would achieve with a camera and a wide open lens aperture.
As you can work on top of the Pan Pastels (if you have used a light layer) it makes sense to complete the background of a drawing in this manner first, and then continue with your coloured pencils rather than leaving the background till last.
Alternatively if you have drawn on drafting film you can apply the pan pastels to a separate peice of paper, which is then placed behind the drawing, such as with the pheasant drawing shown above and below.

Pan Pastels for dark papers
Another use is to enable us to get good coverage of light pencil tones on coloured or black paper. Three examples are shown below. In each image...
- the first sample on the left show just the Pan Pastel on the paper surface
- the second shows how easy it is to erase with a simple eraser
- the third sample shows a light blue Polychromos coloured pencil applied to the white area and over the erased area
- the last sample shows red Polychromos deeply applied to the white area, and also less deeply with a further layer of Pan Pastel over the top.
As you will see using a thin layer of Pan Pastel offers opportunities for extending techniques on coloured papers.
This sample on Somerset Velvet (old Formula) shows the extreme blackness of the 280gsm velvet surfaced paper.
Heavy application of coloured pencil can result in the soft surface lifting as seen with the red sample.

You will see here that the Seawhite paper is harder and less black.
The surface has a shine and while it takes the Pan Pastel (and erases) equally well, it also takes the coloured pencil without lifting the paper surface. Looking at the samples side by side,however, the Seawhite is the less attractive and the Somerset and Stonehenge (below) look better.

The third sample has been done on the identical basis and photographed in identical light.
You can see that the Stonehenge 250 gsm paper sample has a good black surface which is soft enough to take good colour, smoother than the Somerset, but not as soft so pencil colour tends not to lift as easily. The Pan Pastel still erases well.

Stonehenge paper is manufactured by Legion Paper in the USA where it is also known as ‘Rising Stonehenge’ after the old mill that used to produce it. When the mill ceased to exist, Legion Paper spent a long time finding an alternative manufacturer who could produce the paper to the original standard. This is an expensive print making paper but well loved by coloured pencil enthusiasts. It is available in the UK from Jacksons Art.
Pan pastels for blending
The Pan Pastels range of products includes a colourless blending powder, which can be applied to colour on the paper to make it easier to blend.
Whilst developed for the pastels it has been found to be effective with wax type coloured pencil, as it breaks down the grip of the colour on the paper and converts the pigment to something more like pastel. This can then be blended and smoothed using foam tools or a protected finger. You would then need to fix the drawing in the same way as you would for pastels, to enable further layers of normal wax pencils to be added.
Although this works well on a dedicated pastel paper (like Pastelmat) when using it on smoother papers the surface will first need to be primed with a layer of fixative.
Deb Stanley's use of Pan Pastel blender
A coloured pencil artist correspondent in the UK, Deb Stanley, looked at the Pan Pastel blender and reported the following...


I've been trying out Pan Pastels for a few weeks now, I find that there is no problem using them on Pastelmat and then applying pencils over the top, paper is not so forgiving.
The blender worked so well with the pastels on Pastelmat, I tried it with pencils and found that it worked with them too. However, the results on paper aren't as good, which is the same issue Alyona has.... she sells a fixative to use as a base when using her blender on paper. The fixatives I tried, a Winsor and Newton one and one called Spectrafix didn't give brilliant results as the pencils stayed on the surface and looked shiny. These were very quick tests and only on Stonehenge. When I get chance I will try out different ways of testing them again.
On Pastelmat the blender worked well. I used a couple of coats of Winsor and Newton to fix the blended pencil and it sealed it well. I could continue to work over the top once the fixative dried.
I think it would be very useful for blurred backgrounds and soft edges eg clouds and also for large smooth areas of skin, I am still going to use other liquid solvents but I think this will be better for the larger expanses where you don't want to risk a 'tide mark' from a liquid. Obviously it will also be extremely useful to lay in a base colour quickly and smoothly."
Brush and Pencil Blender
Alyona Nickelsen, in the USA, now markets her own brand of blending powder under the 'Brush & Pencil' name along with a pair of dedicated fixatives which are made for using with this process. This may seem to be a very similar product to the Pan Pastels colorless blender, but Alyona tells us that the process of using and handling is different.
Alyona writes...
Powder Blender has very little similarity in its content or presentation with the products from Pan Pastel.
Colored pencil application done with the Brush & Pencil branded Powder Blender does not require being fixed with a fixative, though it does not prevent it.
Powder Blender does not “break up the colour”. It only lubricates the surface for subsequent colored pencil application, which prevents waxes from the pencil core to tightly grab protrusions from the paper, also known as “surface tooth”. This is similar to a cook using flour on the kitchen counter to prevent cookie dough from sticking to it.
During the drawing process we shave off particles of the pencil core onto the drawing surface. The pressure from our hand pushes them deeper into the tooth and allows them to stick to the surface. Powder Blender keeps these particles from adhering to the surface and allows us to move the shaved particles from one point to another more freely.
The tooth of sanded papers and acrylic gessoes is stronger and makes shaving of the core easier.
The tooth of cotton fiber is weaker and very absorbent, which allows wax from the pencil core to really “become one” with it, and thus, making the movement of particles around on the surface (blending) more difficult. Therefore, I advise artists who prefer working on cotton-based papers, to make the surface more cooperative and less absorbent by spraying our ACP Final or Textured Fixative first, then follow with Powder Blender. This allows us to simulate the surface of sanded papers without actually using them.
Alyona's products are available in the UK from a few mail order companies on the Internet.
You might like these
How to Layer Coloured Pencils Without Mud: Techniques That Work
Master coloured pencil layering with proven techniques. Build rich, deep colours without muddy mistakes. Step-by-step tips for smooth, realistic results.
Paper Blending Stumps And Tortillons For Colored Pencil Art
The use of paper blending stumps in colored pencil art, providing a comprehensive guide to their application, benefits, and maintenance.
Coloured Pencil Strokes: Hatching, Scumbling & Pressure Control
Master hatching, cross-hatching, scumbling and circular strokes. How grip, pressure and sharpness affect your marks. Practical exercises to build control

I'm Carol Leather, a coloured pencil artist for over 15 years. Most of my teaching comes back to the same idea: realistic coloured pencil starts with structure, light and observation long before the colour goes down.
My work has featured in Ann Kullberg's Color Magazine, CP Magic and Color Pencil Treasures (vol 7). I'm a member of the UKCPS and was a prize winner in the Nature section of their Annual Open Exhibition in 2020.
You might like these
Limited Palette & Optical Mixing Tutorial froom Peter | Pencil Topics
Take Peter Weatherill's 6-pencil challenge! Master core coloured pencil techniques like layering for optical mixing, value creation & burnishing
Coloured Pencil Backgrounds Without Ruining Your Drawing
Adding a background is where most coloured pencil drawings go wrong. Learn which techniques work, how to protect your subject, and when to skip it entirely.
How to Layer Coloured Pencils Without Mud: Techniques That Work
Master coloured pencil layering with proven techniques. Build rich, deep colours without muddy mistakes. Step-by-step tips for smooth, realistic results.
Copyright © 2009- pencil-topics.co.uk All rights reserved
Home | About Us | Contact Us | Privacy Policy