- Home
- Tools/Accessories
- Paper blending stumps
Your In-Depth Guide to Paper Blending Stumps and Tortillons
Welcome to your in-depth guide to one of a coloured pencil artist's most versatile tools: the paper blending stump and its close cousin, the tortillon!
While often associated with graphite or charcoal, these simple paper implements are fantastic for creating smooth, subtle transitions and beautifully blended effects in your coloured pencil artwork, helping you achieve greater realism and a polished finish.
This guide will take you through everything you need to know – from what they are and how to use them effectively, to essential maintenance, and even how to make your very own tortillons. We'll focus specifically on these paper blending tools.
If you're looking for an overview of various blending methods, including colourless blender pencils and solvents, you can find that on our main blending methods page in the Core Techniques Hub.
What are paper blending stumps and tortillons?
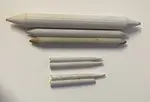
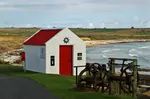
 Paper blending stumps and tortillons. The tip of the lowest tortillon has been pushed in because too much pressure was used.
Paper blending stumps have a rich history that dates back to the 19th century.
Initially, these tools were crafted by the artists themselves, who rolled paper into cylinders with two pointed ends to help them achieve smoother blending.
As the popularity of blending stumps grew, the transition from homemade to commercially produced versions marked a significant evolution in their availability and quality.
Blending stumps, now made from compressed paper and available in multiple sizes, have evolved into a staple for artists and are readily available in art supply stores.
This simple tool can greatly enhance your drawing experience, giving you more control over shading and blending without dirtying your fingers. Plus, by making them yourself, you have the freedom to create various sizes and shapes to suit different purposes in your artwork.
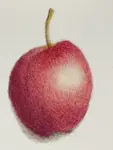
 Sample using Prismacolor pencils and a homemde tortillon for blending
Creating your own tortillons
Creating your own tortillons, can be a rewarding and cost-effective way to add a professional touch to your pencil drawings. Here's a detailed guide on how to make them:
Materials needed
1. Paper: A heavy-weight paper like sketch or drawing paper works best. You can also use recycled paper, but ensure it’s clean and free from oils or residues.
2. Cutting tool: A craft knife or scissors will do the job for cutting your paper.
3. Adhesive: A glue stick or double-sided tape can be used to secure the paper.
4. Dowel or thin rod: This will be used to help roll the paper tightly.
5. Ruler and pencil: For marking and measuring your paper.
Step 1: Prepare your paper
Start by cutting your paper into a right-angled triangle.
For a standard-sized tortillon, you might begin with a rectangle that is about 4 to 6 inches long and then cut it diagonally from one corner to the opposite side.
The longer the base of your triangle, the bigger the diameter of your tortillon will be.
Step 2: Begin Rolling
Place the dowel or rod at the wide end of the triangle with the paper's point facing away from you. Start to roll the paper tightly around the dowel. The aim is to keep the roll as tight as possible to give the tortillon structural integrity.
Step 3: Continue Rolling
As you roll, slowly work the dowel out of the roll just enough so that you can keep the paper tight but still slide the dowel along. Continue rolling until you reach the pointed end of the paper.
Step 4: Secure the Tip
When you get to the tip of the triangle, you'll want to ensure it's as sharp as possible, as this will be the working end of the tortillon.
If the tip is not tight or sharp enough, you can trim it with scissors or a craft knife.
Step 5: Glue the Edge
Use a glue stick or double-sided tape along the final edge to secure the paper and prevent it from unrolling. Wrap this edge tightly around the body of the tortillon and hold it in place for a few seconds to ensure that it adheres properly.
Step 6: Remove the Dowel
Carefully slide the dowel out from the center of your newly created tortillon. If the dowel was used correctly, it should slide out easily, leaving you with a tightly rolled paper stump.
Step 7: Finishing Touches
If necessary, you can trim the end of the tortillon to create a flat base, which can be useful for shading broad areas in your artwork.
Step 8: Use Your Tortillon
Your DIY tortillon is now ready to use. You can use it to smudge and blend pencil, charcoal, or pastels for a smooth and refined finish in your drawings.
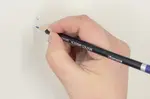
How to use paper blending stumps
Blending stumps are a valuable tool for artists, allowing you to gently move the pencil pigment into the color next to it, softening the edges and creating smooth transitions.
With a gentle approach, blending stumps move pigment smoothly without damaging the paper's tooth. A light touch prevents tortillons from collapsing.
Soft core pencils, like those from Prismacolor or Holbein, are ideally suited for these tools, ensuring a superior blending experience. However, as demonstrated in the example below, it's also feasible to achieve effective blending with harder pencils, even several years after the quick holiday sketch was completed.

Unblended - you can see the lines and cross-hatching

Blended breast, wings and background with homemade tortillon
Alternative way of using blending stumps
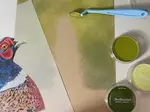
Typically, artists lay down color before blending.
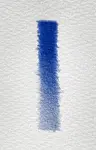
Alternatively, create a palette on spare paper by layering pencil pigment, then use the stump to transfer color to your artwork, as shown in the photograph. This technique lays a smooth base for further pencil layering.

In the photograph above, first the blue pigment was picked up on the paper stump and then laid into the top half of the shape. Then the yellow/brown colour was scribbled beside the blue, and both colours picked up together to create a greenish hue in the bottom of the shape.
Blending with a paper stump in this manner can create a smooth base layer. You can then work over this with your coloured pencils to build up the values and colour depth.
Tips and precautions for using blending stumps
Pro tips: Keep a separate stump for each color family to prevent unwanted color mixing.
Also, keep your charcoal and colored pencil stumps separate
Avoid using these tools on sanded paper, which can make them rough and unsuitable for smooth finishes. If that happens, repurpose the rough stump for textured effects.
Cleaning and maintenance of blending stumps

Over time, your stumps will acquire vibrant, dyed tips. Occasionally, you may feel compelled to give them a thorough cleansing.
Clean your stumps by rubbing them on fine sandpaper to remove pigment residue, using different sandpaper for charcoal/graphite and colored pencils. For a smooth finish, refine with a craft knife and fine glass paper or an emery board.
The stump in the photo above is the same one I used for the two colour blending further up the page. It cleaned up nicely!
Lastly, don’t use a pencil sharpener to repoint your stumps or tortillons.
Summing up
Paper blending stumps and tortillons are truly versatile and affordable tools that can significantly refine your coloured pencil techniques.
By understanding how to use them gently, keep them clean, and even make your own, you'll be able to achieve smoother blends, subtle shading, and a more polished, professional look in your artwork.
Remember that mastering these tools, like any art skill, comes with practice. So, experiment with different pressures and techniques on scrap paper, and soon you'll find them an indispensable part of your creative process.
For an overview of other blending tools and techniques for coloured pencils, don't forget to visit our main blending methods page in the Core Techniques Hub.
Happy blending!

I'm Carol Leather, a coloured pencil artist for over 15 years. Most of my teaching comes back to the same idea: realistic coloured pencil starts with structure, light and observation long before the colour goes down.
My work has featured in Ann Kullberg's Color Magazine, CP Magic and Color Pencil Treasures (vol 7). I'm a member of the UKCPS and was a prize winner in the Nature section of their Annual Open Exhibition in 2020.
You might like these
Coloured Pencil Backgrounds Without Ruining Your Drawing
Adding a background is where most coloured pencil drawings go wrong. Learn which techniques work, how to protect your subject, and when to skip it entirely.
Coloured Pencil Strokes: Hatching, Scumbling & Pressure Control
Master hatching, cross-hatching, scumbling and circular strokes. How grip, pressure and sharpness affect your marks. Practical exercises to build control

Copyright © 2009- pencil-topics.co.uk All rights reserved
Home | About Us | Contact Us | Privacy Policy