- Home
- Pastel Pencils
Pastel Pencils: The Clean Answer to Messy Pastel Problems
Have you ever found yourself captivated by those stunning pastel artworks you see online – the soft, luminous colours, the beautiful blending effects, the way light seems to glow from within the artwork?
But every time you've tried traditional soft pastels, you've ended up frustrated. Dust everywhere, colours muddying together, and forget about any fine detail work!
Your fingers look like you've been finger painting, and your workspace needs a complete cleanup after every session.
You've heard about pastel pencils, but you wonder: Are they just a watered-down compromise? Will they actually let you create those impressive, realistic effects you're after, or are you better off sticking with what you know?
Here's what I've discovered after years of working with both traditional pastels and pastel pencils: Pastel pencils aren't a compromise – they're often the better solution for artists who want pastel effects with precision and control.
Let me share why this matters for your artistic goals and exactly how to determine if pastel pencils belong in your toolkit.
 From large scenes...
 ...to intimate details
What Makes Pastel Pencils Different - The Basics
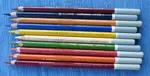
Simply put, pastel pencils are compressed pastel pigment encased in wood, just like a regular pencil.
But here's where it gets interesting: unlike traditional coloured pencils that use wax or oil binders, pastel pencils contain the same pure pigment as soft pastels – just in a more manageable form.
 Thornborough Bridge, near Buckingham, by Peter Weatherill
What this means for your artwork:
- You get the vibrant, light-reflecting qualities of traditional pastels
- But with the precision and cleanliness of pencil work
- No drying time (unlike oils) – what you put down stays workable
- Years later, you can still blend and adjust areas
I used to think this was too good to be true until I tried creating a detailed bird study.
With traditional pastels, I couldn't get the fine feather details I wanted. Pastel pencils gave me both the luminous colour and the detail control I needed.
Good to Know Before You Start
Dust Management: Pastel pencils are much cleaner than soft pastels but do produce some dust. If you are asthmatic, like me, you might want to consider wearing a mask.
Paper is Key: Your choice of paper is absolutely critical for success with pastel pencils – more so than with regular coloured pencils. Using the wrong paper is a common source of initial frustration.
Distinct Feel: They feel different to use than wax or oil-based pencils, often requiring a lighter touch to start.
Should You Focus on Pastel Pencils? A Quick Self-Assessment
Pastel pencils could be your ideal medium when you want to:
- Create realistic artwork with soft, luminous colour effects
- Work with fine details while maintaining vibrant colours
- Avoid the mess and dust of traditional pastels
- Blend and layer colours without long drying times
- Combine precise line work with soft, painterly areas
- Work faster than traditional coloured pencil techniques allow
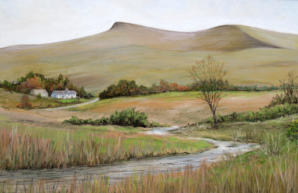 Pen y fan (Brecon Beacons) by Peter Weatherill
Stick with traditional coloured pencils when:
- Your main goal is ultra-smooth, highly controlled rendering
- You prefer working in very small formats with intricate detail
- You want to avoid any texture or dust considerations entirely
- You're primarily focused on monochromatic or limited colour work
- You are still mastering the foundational skills of layering and blending with your wax or oil-based coloured pencils (it's often best to build confidence with one medium first).
Consider soft pastels instead, when:
- You're working large-scale and want to cover areas quickly
- You enjoy the tactile, hands-on blending process
- Fine detail isn't a priority for your artistic style
- You have a dedicated pastel workspace setup
Getting Started with Pastel Pencils: Your Core Guides
You're in the right place to begin your pastel pencil adventure!
Now that you have a clear idea of what makes pastel pencils such a unique and appealing medium – offering those beautiful soft pastel qualities with much of the control and cleanliness of a pencil (as we explored in 'What Makes Pastel Pencils Different') – this section will direct you to all the core resources you'll need.
Below, you’ll find your essential guides for choosing the right supplies and learning the fundamental techniques to get you creating with confidence.
Choosing Your Key Supplies:
- There are many different pastel pencil brands available and I'll help you work out which are best for you.
- Discover the best papers for pastel pencils - understanding how different surfaces affect layering and blending is crucial for avoiding early frustrations and achieving the soft effects you desire.
- Blending tools, paper blending stumps or even your fingers can be used to blend, but be aware that the sanded papers can cause damage!
- Find out all about fixative sprays and decide whether to use them or not on your precious artwork
Essential Pastel Pencil Techniques:
- Pastel pencil techniques - Learn essential methods for applying, layering, and blending your pastel pencils to create a range of beautiful effects.
- Sharpending your pastel pencils gently so they don't break just when you are adding tiny details to your work
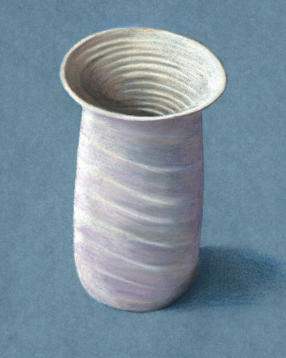
Try this tutorial:
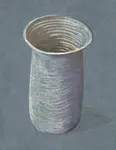
- Beginner Tutorial: Vase - A perfect simple first project to practice basic application, layering, and blending.
More Tutorials to Expand Your Skills
Once you're comfortable with the basics, you can explore more complex projects and even combine pastel pencils with other media.
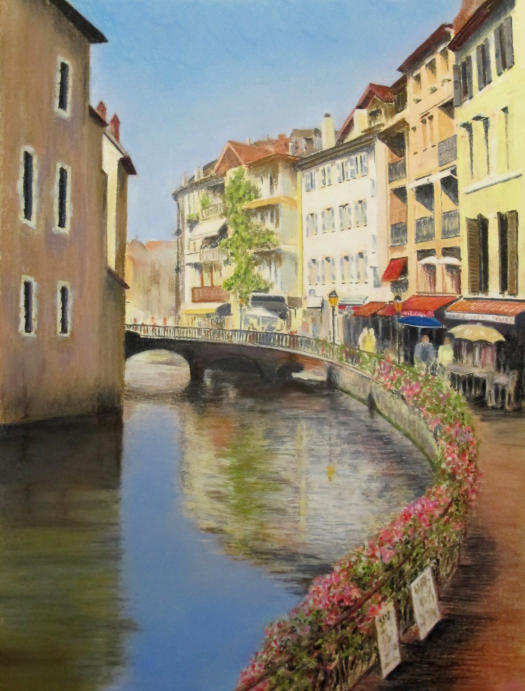
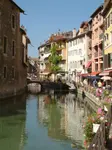
- Tutorial: Annecy Reflections – Tackle a more advanced scene involving reflections and a broader range of techniques.
- Combining Pastel Pencils and Coloured Pencils - See how pastel pencils can work beautifully with your traditional coloured pencils.
- English Lake District cottage doorway - Pick up tips on using pastel and coloured pencils on black paper
Common Pastel Pencil Pitfalls (And How to Avoid Them)
Picking up a new medium always comes with a few learning curves! Here are some common hiccups with pastel pencils and how to sidestep them:
Mistake #1: Expecting them to behave like regular coloured pencils
The pigment is much softer and more powdery. Use a lighter touch initially until you understand how they respond.
Mistake #2: Using Paper with Too Little Tooth
The Problem: The pencil slides, pigment doesn't adhere well, you can’t build up layers, and blending is difficult. It’s incredibly frustrating and can make you think the pencils (or you!) are the problem.
The Fix: Always choose paper specifically designed for pastels or with a noticeable texture. Refer to my Pastel Paper Guide for recommendations like Pastelmat or Canson Mi-Teintes (on the correct side!).
Mistake #3: Trying to Sharpen Them Like Regular Coloured Pencils
The Problem: The soft core of pastel pencils can easily break in standard sharpeners, leading to wasted pencil and lots of aggravation
The Fix: Use a craft knife, a specialised pastel pencil sharpener, or sandpaper to shape the point. My Guide to Sharpening Pastel Pencils shows you exactly how.
Mistake #4: Applying Too Much Pressure Too Soon
The Problem: You can quickly fill the paper tooth, making further layering or blending difficult. It can also lead to a heavy, overworked look.
The Fix: Work with light layers, gradually building up colour and depth. Save heavier pressure for final accents or specific blending techniques. You’ll learn more on the Pastel Pencils Techniques page.
Ready to Explore the Softer Side of Pencils?
Learning to use pastel pencils is a fantastic way to add new textures, quicker coverage, and a wonderful softness to your artistic toolkit. Don't be afraid to experiment with different papers and techniques once you understand the basics!
Your Next Steps
Ready to explore pastel pencils? Here's what I recommend:
- Start small: Get a basic set of 12-24 pastel pencils and some textured paper
- Master the fundamentals: Work through my sharpening and basic technique guides
- Practice regularly: Even 15-20 minutes of practice helps build familiarity
- Experiment with subjects: Try simple still life objects before moving to complex subjects
- Document your progress: Keep notes about what works for your style
Which pastel pencil adventure calls to you? Each linked guide includes step-by-step instructions, pitfall warnings, and everything you need to start creating with confidence.
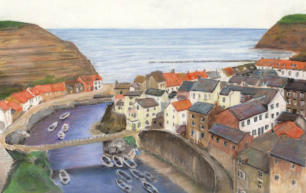 A view of Staithes, Yorkshire by Peter Weatherill
I'm Carol Leather, a coloured pencil artist for over 15 years. Most of my teaching comes back to the same idea: realistic coloured pencil starts with structure, light and observation long before the colour goes down.
My work has featured in Ann Kullberg's Color Magazine, CP Magic and Color Pencil Treasures (vol 7). I'm a member of the UKCPS and was a prize winner in the Nature section of their Annual Open Exhibition in 2020.
You might like these
Annecy Reflections: Step-by-Step Pastel Pencil Drawing
Boost your pastel pencil drawing skills with "Annecy Reflections"! This tutorial teaches perspective, blending & how to capture a true sense of place.
Pastel Pencil Tutorial for Beginners: How to Draw a Simple Vase
Try this pastel pencil tutorial with our beginner-friendly vase drawing tutorial. Learn layering, blending, and shading to create a simple still life drawing.
Copyright © 2009- pencil-topics.co.uk All rights reserved
Home | About Us | Contact Us | Privacy Policy