- Home
- Pastel Pencils
- Sharpening pastel pencils
Pastel pencil sharpening
If you've spent any time in online art communities, you've probably seen discussions about pastel pencil sharpening. It's one of those topics that can feel overwhelming at first, but once you understand the basics, it becomes second nature.
Let me share what I've learned about keeping your pastel pencils in perfect working condition.
Why Sharp Matters (More Than You Think)
Here's something I'd love you to consider: the difference between a blunt pastel pencil and a properly sharpened one is like the difference between painting with a house brush versus a fine detail brush.

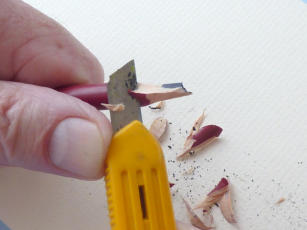
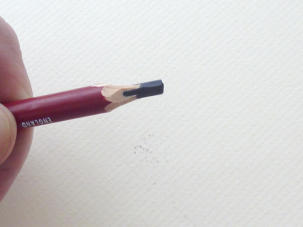
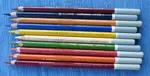
What a sharp pastel pencil does NOT look like!
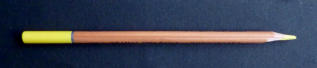
What a sharp pastel pencil DOES look like!
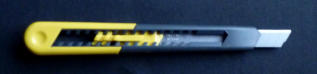
What to use to get from picture 1 to picture 2.
Both have their place, but when you need precision, you really need precision.
When your pencil has a good point, you have complete control over every mark you make. You'll know exactly where that mark is going and how it will look.
While it's true that you don't always need pin-sharp points (especially when you're laying down background colors or base coats), developing the habit of maintaining good points will serve you well throughout your artistic journey.
A Simple Technique That Makes All the Difference
Here's a little tip that can transform how your pencils perform: as you work, give your pencil a gentle turn every few strokes. This simple rotation introduces a fresh edge to the point and keeps your pigment working at its best.
It's such a small thing, but the difference it makes in your mark-making is remarkable.
Oh, and here's a practical suggestion – keep a small container nearby for shavings and dust. I like to put a bit of blu-tac on the bottom of mine so it doesn't tip over easily. Trust me on this one!
The Hand-Sharpening Method (My Personal Favorite)
I'd like to walk you through a method that has served me beautifully over the years. It might seem detailed at first, but once you get comfortable with it, you'll find it gives you the most control and the best results.
What you'll need:
- A sharp craft knife (much safer than the old-school razor blades)
- A steady surface
- A bit of patience as you learn
The process:
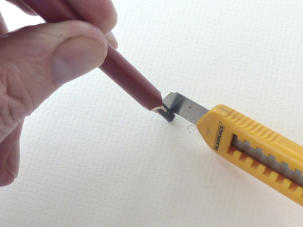
Step 1: Getting Your Grip Right.
Hold your pencil firmly in one hand, positioning your thumb so it can guide the craft knife. What you're looking for is a comfortable balance between the thumb and your other hand holding the knife – this gives you controlled, careful movement.
Here's something really important: avoid putting sideways pressure on that pastel core. Pastel pencils are much more delicate than graphite or regular colored pencils, and too much sideways pressure will snap your point before you even get started.
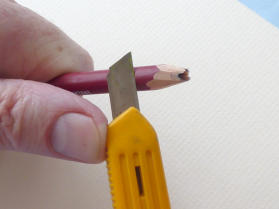
Step 2: Making the Initial Cuts.
Let your knife blade slice into the wood using a curved motion. Your goal here is to cut away the wood without removing too much of that precious pastel core. Work gradually – there's no need to rush this part.

Step 3: Exposing the Core.
Once you've made your initial cuts, you should have a clear section of core exposed. Now you can start thinking about bringing this up to a point.
A quick note: sometimes you might want to use your pencil with a flat surface rather than a sharp point, and in those cases, sharpening to a fine point would be quite wasteful.
I tend to keep good points on most of my pencils since I often use them for detail work after laying down initial colors with woodless pastel sticks. But you might find a different approach works better for your style.
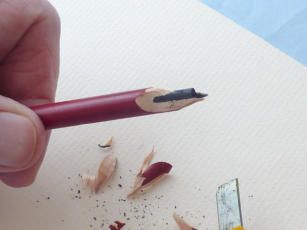
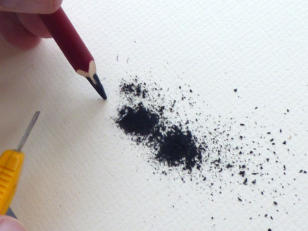
Step 4: Creating the Final Point.
Here's where we need to be extra careful. To avoid putting sideways pressure on your new point (which could break it), rest the tip of the pencil on a hard surface that has some grip to it. I like using a piece of scrap mount board for this.
Now, using careful downward strokes, gently remove the pigment powder while turning the pencil as you work. This rotation is key – it helps you create a fine, even point with much less risk of breakage.
Step 5: Dealing with the Powder.
You'll notice this final stage creates quite a bit of pastel powder – that's completely normal. Some artists like to save this powder in small containers and use it for initial washes by rubbing it into clean pastel paper.
Personally, I don't bother with this since I already have plenty of pastel bits and pieces saved up, but you might find it useful.
Just be aware that this final sharpening stage does remove a fair amount of pastel, so factor that into your decision about how sharp to make each pencil.
If Hand-Sharpening Feels Challenging
I completely understand that not everyone finds knife sharpening comfortable or easy.
If you have arthritis or simply prefer other methods, there are alternatives worth considering.
The Derwent Pencil Sharpening stand and knife set can be helpful – it provides a stable base while you work with the blade, which many of my online students have found makes the process much more manageable.
What I'd Suggest Avoiding
While I want to give you options, I also want to share what I've found works less well with pastel pencils:
- Electric sharpeners tend to create problems – the vibration can be too harsh for delicate pastel cores, and they often get clogged with pastel dust. When a point breaks inside, cleaning them out can be quite frustrating.
- Hand-crank sharpeners with single blades can work initially, but they tend to dull quickly against the abrasive nature of pastels, and a dull blade often leads to broken points.
Finding Your Own Way
Here's what I hope you'll take from all this: there isn't just one "right" way to sharpen pastel pencils.
What matters most is finding a method that works for you, gives you the control you need, and helps you create the art you envision.
I encourage you to try the hand-sharpening method I've described – many artists find it becomes quite meditative once they get comfortable with it. But if another approach serves you better, that's perfectly fine too.
The most important thing is that you're getting good, usable points that help you make the marks you intend. Everything else is just technique in service of your creativity.
What questions do you have about sharpening? I'd love to help you find the approach that works best for your artistic practice.

I'm Carol Leather, a coloured pencil artist for over 15 years. Most of my teaching comes back to the same idea: realistic coloured pencil starts with structure, light and observation long before the colour goes down.
My work has featured in Ann Kullberg's Color Magazine, CP Magic and Color Pencil Treasures (vol 7). I'm a member of the UKCPS and was a prize winner in the Nature section of their Annual Open Exhibition in 2020.
You might like these
Are Pastel Pencils Good for Realistic Drawing? Complete Artist Guide
Discover if pastel pencils suit your realistic art goals. Complete UK guide covering techniques, supplies, common mistakes, and getting started tips.
Choosing Pastel Pencil Brands: A UK Guide for Beginners
Overwhelmed by pastel pencil choices? Our complete guide helps UK beginners understand types, compare brands & make confident decisions for realistic art.
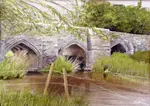
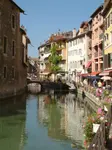
Annecy Reflections: Step-by-Step Pastel Pencil Drawing
Boost your pastel pencil drawing skills with "Annecy Reflections"! This tutorial teaches perspective, blending & how to capture a true sense of place.
Copyright © 2009- pencil-topics.co.uk All rights reserved
Home | About Us | Contact Us | Privacy Policy