Drawing on black paper
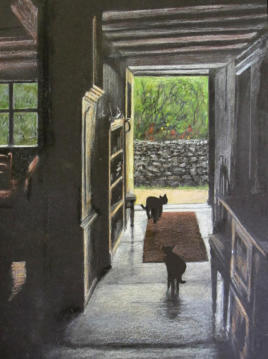
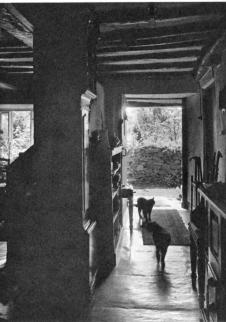 Lake District Cottage Doorway by Edwin Smith
This step by step drawing on black paper will show the techniques for using pastel pencil as the starting point with traditional coloured pencil for finishing layers.
The black and white reference photo was taken by a major architectural photographer, Edwin Smith, who died in 1971. Most of his work was done in the 1950s and 60s, including several books. You can still get Edwin Smith: Photographs 1935-1971 from Amazon. There is also a book about him, Evocations of Place: The Photography of Edwin Smith by Robert Elwall.
The photo we are working from was taken in the 1950s and features a cottage doorway at Underhowe, near Grasmere, in the English Lake District. The image is copyright but I have not been able to trace any details of the current copyright owner. You are not in reach of copyright using the image for study purposes, but may not sell any copy of the drawing on black paper that you create. As no fee is taken for the providing of this exercise, I am unable to see that any breach of copyright has been made in making this image more widely known. If you are the copyright owner, please contact me and I will be happy to discuss.
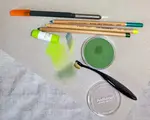
Materials used
For the exercise, I am using a sheet of black Hahnemuhle Lana pastel paper, a small selection of pastel pencils, a can of spray fixative and a set of Faber Castell Polychromos pencils.
The major pastel colour used will be white, with some tones of grey and brown, along with cream and green. An essential component will be black in both pastel pencil and Polychromos.
Starting the drawing on black paper
After establishing the centre line of the picture (both height and width) I have drawn in the blocks of light with a white pastel pencil and adjusted where necessary using the black.
If you get a line wrong and need to remove any of your white lines, lift off the powder white first with blue or white tac, or alternatively a kneadable eraser.
Once the base lines are in position, you can build up the blocks of light. The major area is the polished floor and you need to establish the correct positions and shapes for the two black cats while trying to keep the 'cat' areas clean of any pastel.
Perhaps a bit trickier are the lines of perspective that you see from the dresser on the extreme right hand side, the bookcase shelves on the left and the nearer left hand side shape of the grandfather clock. I think it is the front edge of a chair on the left, sticking out a bit near the door.
Going to the extreme left of the picture there is a window that could perhaps be made a little smaller, and what I believe to be the slope of a bureau or writing desk front just behind the clock. I will probably change this shape.
There is also a small piece of floor showing light which helps establish the overall composition.
Outside the door is a stone wall (dry stone wall, as is common in Northern UK) and some mixed vegetation which I guess will need to be greens and browns. The colour coming in through the door and window openings will be virtually the only colour in the picture. I will be working the light and shadow areas inside the cottage in white, cream, grey and browns - with black to establish edges and correct where necessary
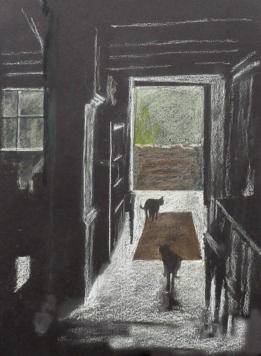
Having worked the base of the picture, I have blended (pressed) the pastel into the paper and then sprayed the picture with fixative. This first fix kills most of the light tones, but this is not a problem. We can carry on building up a stronger base coat and then do a final fix of the pastel before starting with the wax pencils.
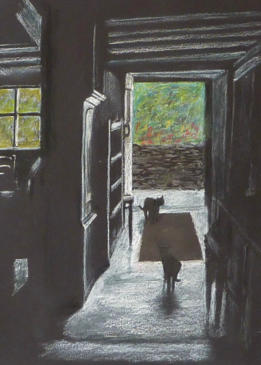
Drawing freehand, You finish up with your own version of the scene. The cats are not identical, the clock is different, and you can see I have made the window smaller. The effect is similar to the photo though. I may change to outline of the mat on the floor as we do the next stage.
After the spray with fixative, the picture looks like this (left). You can see how the pastel has been ‘washed’ into the paper, and the brown colour of the mat and the stone wall outside has disappeared. The next layers of pastel pencil will bring this back and we will fix, again, leaving a better result.
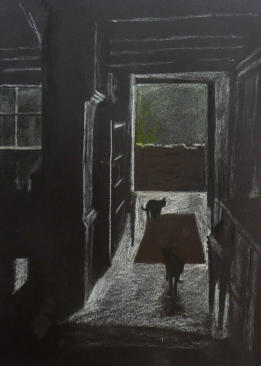
The next image shows the drawing on black paper after more pastel has been added over the fixative.
This time the pastel goes down with a much denser layer and forms a solid base for future work.
Some of the light areas have been simplified, but the detail will go in later - at the moment we are just building up the foundation. The relative roughness of the black paper show up the floor surface nicely.
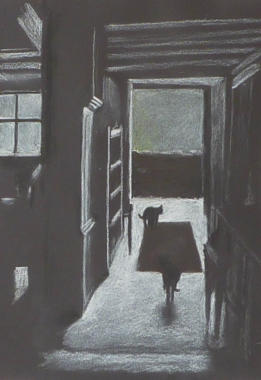
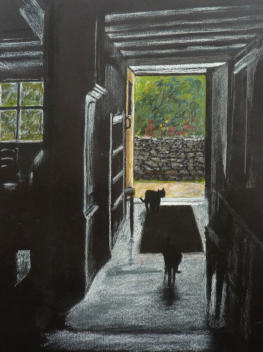
Image 4 shows the drawing on black paper after a further spray of fixative has reduced the lightness again - though not nearly as far as the first time.
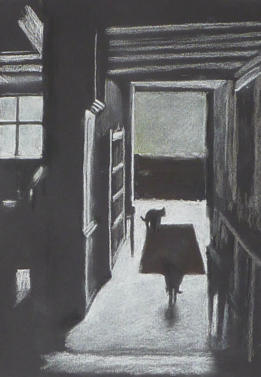
Adding colour to the drawing on black paper
You will see that I have added a chair in the window of the room to the left, and put some shadow into the light floor of the hallway to show the uneven nature of the polished surface.
We can now start applying some base colour to the scene outside the door.
Stonework has been included in the wall and also there has been some foliage added along with red and yellow spots to represent flowers in a small garden.
Moving back inside, the mat in the hallway has had a layer of warm grey to help outline the two cats. Shadow has been applied to the clock to show the door to the case.
A front door has now been added, with a catch and a small window.
The image is now about ready for a final fixative spray before we start work with the traditional coloured pencils, which will give us more controlled detail. Our aim will be to keep colour to outside the cottage, and less inside - mainly white, cream, greys and browns.
We will now start adding detail to our drawing on black paper using the Polychromos pencils. This particular brand was chosen as it has a good choice of greys, which will be the colour of choice for the interior.
I have started on the scene outside the door to establish the main focus of the picture - and as it will be used as a demonstration piece for a college open day, the picture needs to have a fully completed section to show up most of the stages and make a discussion point I tend not to get a lot of work done on these occasions as most of the time is spent talking!
With a protective sheet of clear plastic over the bottom half of the drawing, I first worked over the beams above the doorway and defined the door opening. I then put in some colour on the door, using a lighter brown for the area nearest the light and a darker brown for the area in shadow.
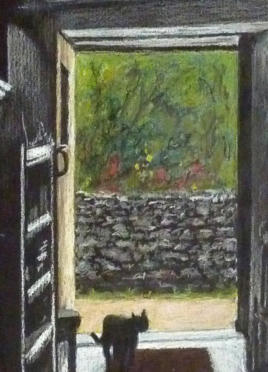
I sharpened up the edges of the cat in the doorway with black. Then I steadily built up the wall from the ground level, working in layers, stone by stone using a mid grey pencil.
I added a strip of light across the top of the wall and picked out spots of light catching protruding stones, as shown in the close up photo. Darker shading was added nearer the wall base and some grey/greens and mid browns were introduced to the stones to give more warmth.
Random scribbles in green and gold were added to the area of foliage. The bright touches of red and orange were re-worked to better represent flowers.
The path outside was worked in grey, cinnamon and white. A green strip of weed was put in at the wall base.
I will leave the area of foliage outside the door for the moment and see if I need to add anything later once the rest of the picture has been done.
It may not look as though much extra has been done, but I spent a whole day demonstrating (and talking) about drawing on black paper using this on the drawing board.
As you can see there was more talking than doing!
However I have added light outlines to the cats and worked on the entrance hall furniture in Polychromos.
Some fo the white areas will go darker as I add more details with greys on the top and the floor will have further treatment.
You probably can't see it in the image, but there s also a slight pattern in the mat.
The bookcase to the left has also had some attention.
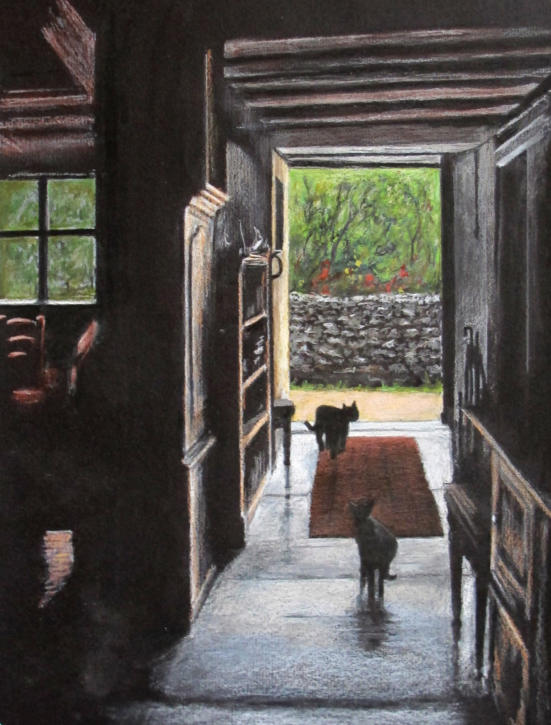 Lake Distict Cottage Entrance by Peter Weatherill
The image above shows the drawing on black paper virtually completed.
The white furniture has now had a touch of colour, the outside view has been built up further using Caran d'Ache Luminance soft wax pencils, and edge have been sharped up with a sharp pointed white and a sharp black from the black Luminance. Because these pencils are softer and more waxy, we can get fine detail on top of the Polychromos colour.
There may be some final ouches to the picture when it is about to be mounted and framed, but for now this is the finished picture.
It shows how drawing on black paper with a pastel underpainting, followed by oil and wax based coloured pencils can achieve a glowing effect of light and shadow.
The effect of the polished floor is down to the surface of the Lana black paper. Drawing the perspective of the furniture may need some final amendments but the principle of using this combination of materials worked well and I am happy to go with the finished picture.

I'm Carol Leather, a coloured pencil artist for over 15 years. Most of my teaching comes back to the same idea: realistic coloured pencil starts with structure, light and observation long before the colour goes down.
My work has featured in Ann Kullberg's Color Magazine, CP Magic and Color Pencil Treasures (vol 7). I'm a member of the UKCPS and was a prize winner in the Nature section of their Annual Open Exhibition in 2020.
You might like these
Try Mixed Media: Combining Pastel Drawing with Coloured Pencils
Discover how to combine pastel drawing with coloured pencils. Learn techniques, tips, and materials to push your creativity in this comprehensive guide.
Mixed Media with Coloured Pencil: Six Combinations That Work
Six ways to combine coloured pencil with another medium: watercolour, pastel, ink, acrylic, gouache and graphite. With the common mistakes to avoid.
Copyright © 2009- pencil-topics.co.uk All rights reserved
Home | About Us | Contact Us | Privacy Policy