- Home
- Mixed media
Welcome to the Mixed Media Techniques Hub!
If you've built a solid foundation with coloured pencils and are ready to expand your creative possibilities, read on!
Mixed media techniques—combining coloured pencils with other art materials—can solve problems that may feel challenging using pure pencil alone.
You love the precision of your coloured pencils, but you're dreaming of creating richer, more painterly backgrounds quickly, or perhaps you want to add impactful highlights.
You've seen other artists combine mediums, but you're not sure where to start or which combinations will actually improve your realistic style.
I discovered this when I first experimented with watercolour pencil underpaintings. I was amazed at how it sped up the initial layers for a complex landscape and gave a beautiful luminous base for my dry pencil work.
Exploring mixed media isn't about abandoning your love for coloured pencils. Its about choosing the right tool for each job, and finding smart ways to achieve those 'wow' results you're aiming for, often more efficiently.
Good to Know Before You Start
- Competition Considerations: If you're thinking of entering competitions run by coloured pencil societies, be aware of specific rules about the percentage of mixed media allowed, or if any is permitted at all.
For example, The UKCPS (UK Coloured Pencil Society) accepts mixed media provided at least 50% of the surface is completed with dry colour.
Always check the entry requirements carefully if you plan to exhibit your work.
- Coloured Pencils on Top: In most mixed media combinations, you'll use coloured pencil over the top of your chosen base medium for the finest details and finishing touches.
This gives you the precision and control coloured pencils are known for while benefiting from the unique properties of other materials.
- Paper Matters: Combining media, especially wet media like watercolour or inks, means your paper choice becomes even more important.
Ensure your paper can handle the chosen media without buckling or deteriorating. You might need to consider my Stretching Watercolour Paper Guide if significant water is involved.
Is Exploring Mixed Media Right for Your Current Goals?
Focus on Mixed Media When You Want To:
- Create atmospheric backgrounds without overworking the paper
- Speed up coverage of large areas, like skies or distant landscapes
- Achieve effects impossible with coloured pencils alone (soft washes, bold textures)
- Add variety and visual interest to your work
- Solve specific technical challenges (working on black paper, creating glass effects)
- Create vibrant underpaintings that make your coloured pencil layers glow.
Stick to Pure Coloured Pencil When:
- You're still learning fundamental layering and blending techniques
- You prefer the predictability and control of working with one medium
- You're preparing work for a competition that requires 100% pure coloured pencil
Exploring Key Mixed Media Combinations
Here are some popular and effective ways to combine coloured pencils with other media. Each section provides a brief overview and links to more detailed guides and tutorials on this site.
Coloured Pencil with Watercolour Pencils
Watercolour pencils offer one of the most accessible entry points into mixed media.
They're perfect for creating soft backgrounds and establishing colour areas quickly, then refining with traditional coloured pencils.
Learn More:
- Painting with watercolour pencils - background washes and foundation techniques
- Watercolour pencil techniques - various ways to get the colour on the paper
- Underpainting a country lane - See how a watercolour pencil base can bring a landscape to life
- Choosing brushes for watercolour pencil work
Try this Complete Project:
Discover how a vibrant watercolour pencil underpainting can create a rich foundation for your detailed coloured pencil landscapes.
This three-part series takes you step-by-step through Peter Weatherill's process of developing a complex canal scene, from the initial washes to the final layers of dry coloured pencil that bring out stunning depth, detail, and richness.
It’s a fantastic insight into managing a larger mixed-media piece and achieving a polished, professional finish.
Part 1 - Beginning the Journey: Underpainting and Initial Layers
Part 2 - Developing Form and Mid-Tones
Part 3 - Building Richness and Finish with Dry Coloured Pencils
Colour Matching Advantage:
Faber-Castell (Polychromos and Albrecht Dürer) and Caran d'Ache (Pablo and Supracolor) use similar pigments across their dry and watercolour pencil lines.
This allows seamless colour matching between your wet foundation and dry detail work—something I rely on regularly.
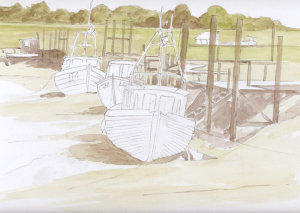
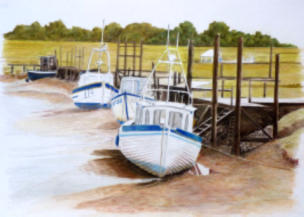
The drawing above, by Peter Weatherill, was created using Caran d'Ache Supracolor pencils, first wet for the initial washes and then dry for the finishing details.
Coloured Pencil with Pastels (including PanPastels)
Combining pastels with coloured pencils creates rich, painterly effects while maintaining the precision coloured pencils offer.
The soft, blendable nature of pastels makes them excellent for atmospheric backgrounds.
Learn More:
- Blending Pastels and Coloured Pencils: A Complete Guide - Learn how to seamlessly layer sharp pencil details over a soft pastel base without creating muddy colours.
- Using Pan Pastels with Coloured Pencils: A Practical Guide – Explore the unique benefits of this versatile medium for creating smooth, broad areas of colour in your work.
Try This Tutorial:
- Combine Pastels and Coloured Pencils for Atmospheric Scenes – Put your skills into practice with this step-by-step tutorial that teaches you how to create an atmospheric abbey scene.
Why This Works: Pastels excel at covering large areas quickly with rich colour, while coloured pencils provide the detail and precision for finishing touches. The combination gives you the best of both worlds.
Technique-Specific Note: Remember that pastel is dusty; consider using a fixative strategically between layers or ensure your workspace is prepared.
Coloured Pencil with Ink
Ink techniques offer wonderful opportunities for crisp definition, expressive sketching, and strong compositional elements. This combination is particularly effective for outdoor sketching and illustration-style work.
Key Approaches:
- Traditional Line and Wash: Draw outlines with permanent ink, then add coloured pencil "washes" over top
- Selective Line Softening: Use water-soluble inks that can be softened with a wet brush for varied effects
- Outdoor Sketching: The combination of quick ink lines with coloured pencil colour makes this ideal for location work
Learn More:
Inks come in permanent, alcohol, and water-soluble forms. For fine art, bottled inks with traditional pens or ink-filled fountain pens offer great flexibility.
Paper Recommendation:
Hot-pressed watercolour paper works far better than cartridge paper, giving you much more ability to correct, blend, and lift ink lines when necessary.
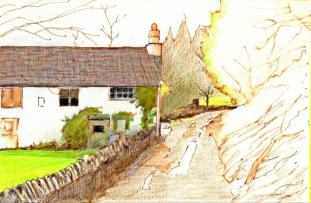
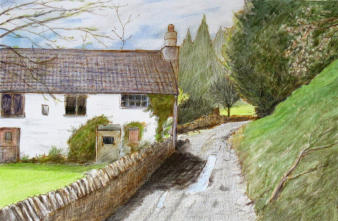
Specific Notes on The Paintings Shown Here
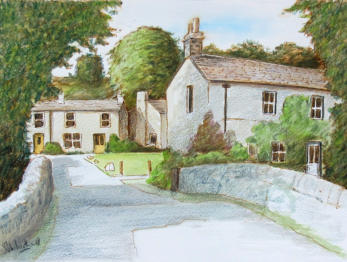
Peter worked the Welsh cottage scene on Fabriano Hot Pressed paper (300gsm) using Waterman Brown ink. The pencils used were Derwent Coloursoft and Procolour. There are five layers of different greens on the sunlit grass.
Below is another ink and coloured pencil study, of a Yorkshire village, where the brown ink under the coloured pencil makes a useful stone coloured link which holds the picture together.
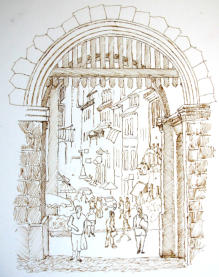
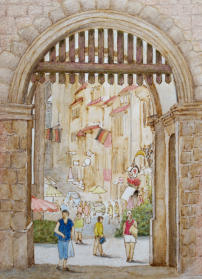
A more widely ink based picture which relies on the ink wash to provide an out of focus background is this scene of an old city gate in Germany.

Coloured Pencil with Acrylics
Acrylics can provide opaque, flat base colours or even textured grounds for your coloured pencil work.
Acrylic paint typically has a gloss finish, too polished for pencils. However, matte finish acrylics or mixing shiny acrylics with a matte medium can create a surface with enough tooth.
Acrylics dry very quickly!
A great option is acrylic gouache (like Turner or Procolour brands) which is permanent once dry and can be thinned for washes.
 The base painting in acrylic
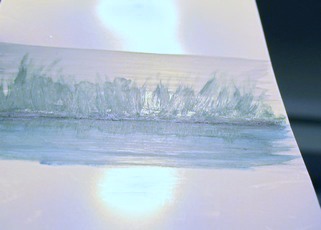 Showing the gloss surface and reflections
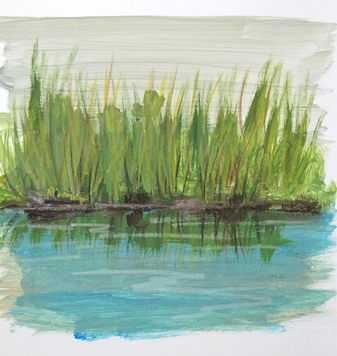 With coloured pencil worked on top
Learn More about Acrylics:
Colourfix Primer: An excellent acrylic-based product from Art Spectrum. It creates a hard, sanded finish ideal for coloured pencil and can be tinted to provide a coloured ground.
Technique Specific Notes:
When using acrylics, keep brushes moist. For coloured pencil over acrylic, ensure the acrylic surface is matte and fully dry.
Heavyweight hot-pressed watercolour paper or prepared boards are good surfaces; standard acrylic canvas is often too rough for detailed pencil work.
Coloured Pencil and Gouache
Learn More about Gouache:
Gouache offers opaque, chalky coverage that dries to a surface similar to fixed pastel—perfect for coloured pencil work. However, it requires careful handling to avoid problems.
Key Characteristics:
- Water-based with high body colour content
- Dries to a matte, slightly textured surface
- Can be reactivated with water even when dry
Important Warning:
Layers of dark colours over light (and vice versa) can bleed if earlier layers are still damp. Always ensure complete drying between stages.
Lightfastness Note:
Designer gouache often has poor lightfastness but works fine as a foundation since it'll be largely covered by coloured pencil.
Coloured Pencil with Graphite
Subtle use of graphite can be effective.
Graphite provides subtle foundations and linear elements that complement coloured pencil work beautifully, especially for initial sketches and tonal groundwork.
You can learn more about graphite pencils here.
Best Practices:
Use hard graphite pencils (2H or harder) to avoid smudging under coloured pencil layers
The fine line work from hard graphite contrasts well with soft colour shading
Consider Derwent Graphitint for added interest—it's water-soluble graphite with subtle colour pigments.
Common Mixed Media Pitfalls (And How to Avoid Them)
Mistake 1: Wrong Paper Choice
The Problem: Using standard drawing paper not suited for wet media when applying washes can lead to buckling, pilling, or even tearing.
The Fix: Choose your paper based on ALL the media you intend to use. If wet media is involved, opt for a heavier watercolour paper (Hot Pressed if you want a smoother finish for coloured pencil detail) and consider my Stretching Watercolour Paper Guide.
Mistake 2: Coloured Pencils Won't Stick!
The Problem: Applying coloured pencils over a slick, non-absorbent acrylic layer or a very waxy soluble pencil layer can lead to poor adhesion – the pencil just slides off.
The Fix: Ensure your base layers (especially acrylics or gouache) have a matte finish with enough 'tooth' for pencils to grip. Test your base on a scrap piece first. Consider using products like Colourfix primer if needed.
Mistake 3: Ignoring Drying Times
The Problem: Rushing to add coloured pencil before underlying media is completely dry can lift the base colour, disturb layers, and create muddy, uncontrolled results.
The Fix: Plan your sessions with proper drying time between stages. Use a hairdryer carefully if you're impatient, but never rush wet techniques.
Mistake 4: Starting Too Complex
The Problem: Jumping into advanced combinations before understanding how individual media behave leads to disappointing results and lost confidence.
The Fix: Master each medium separately on small studies first, then combine gradually.
Essential Mixed Media Supplies (UK Sources)
For Watercolour Pencil Underpaintings: Faber-Castell Albrecht Durer or Caran d'Ache Supracolor Soft either as individual pencils or small sets from Jackson's Art. Cult Pens or Amazon UK.
For Pastel Underlayers: PanPastels (starter sets from UK art suppliers) or good quality soft pastels like Unison Colour (often found at local art shops or online).
Drawing Inks: Winsor & Newton, Waterman, Dr. Ph. Martin's (Jacksons Art, online specialists)
Specialist Primers: Art Spectrum Colourfix Primer (specialist suppliers)
Fixatives for Mixed Media: Winsor & Newton Professional Fixative (check suitability for all media used) from most UK art stores.
Budget-Friendly Alternative for Washes: Derwent Academy Watercolour Pencils can be a good starting point for experimenting with washes.
Ready to Expand Your Creative Toolkit?
Exploring mixed media is a fantastic way to break new creative ground and add unique effects to your coloured pencil pieces. Don't be afraid to experiment!
The key is choosing the right combination for your specific goals rather than using mixed media just to be different.
Your Next Step:
Choose one technique above that addresses a specific challenge you've faced in your work. Try it on a small study (no larger than 6" x 8") first—this lets you learn the technique without the pressure of creating a major piece.
Which mixed media approach calls to you? Each linked guide includes detailed instructions, common pitfall warnings, and UK supplier information.
Remember, the goal isn't to abandon pure coloured pencil work, but to add tools that make certain effects easier and more effective. Start with one technique, master it, then gradually expand your toolkit as your confidence grows.

I'm Carol Leather, a coloured pencil artist for over 15 years. Most of my teaching comes back to the same idea: realistic coloured pencil starts with structure, light and observation long before the colour goes down.
My work has featured in Ann Kullberg's Color Magazine, CP Magic and Color Pencil Treasures (vol 7). I'm a member of the UKCPS and was a prize winner in the Nature section of their Annual Open Exhibition in 2020.
You might like these
Try Mixed Media: Combining Pastel Drawing with Coloured Pencils
Discover how to combine pastel drawing with coloured pencils. Learn techniques, tips, and materials to push your creativity in this comprehensive guide.
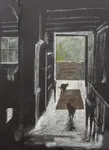
Drawing on black paper using pastels and coloured pencil
This drawing on black paper shows a Lake District cottage doorway - step by step in pastels and coloured pencils
Copyright © 2009- pencil-topics.co.uk All rights reserved
Home | About Us | Contact Us | Privacy Policy