Watercolour Pencil Landscape Tutorial – Brokken Bridge
Welcome! In this watercolour pencil landscape tutorial, I'll show you how I painted Brokken Bridge, a charming old packhorse bridge in Yorkshire.
We’ll cover the full process — from the first light sketch to the finishing shadows — with a few laughs, a scribble technique or two, and a handy reminder to keep your pencil sharpened (you’ll see why).
Whether you’re new to watercolour pencils or just after a fresh approach, this guide includes:
- How to stretch paper and sketch your outline
- Mixing delicate washes from dry pencil
- Using texture and scribbles for foliage and stonework
- Working in layers — without making mud!
You’ll find plenty of photos, tips, and even a downloadable outline drawing if you’d rather skip the freehand bit (I won’t tell).
For a broader overview of materials, techniques and beginner-friendly projects see my complete guide to watercolour pencils.
Let’s get started.
Materials and Reference
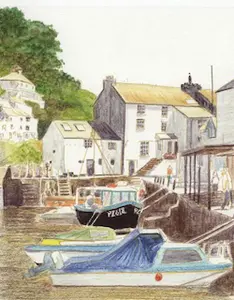
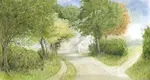
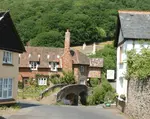
 Reference photo: Brokken Bridge in summer.
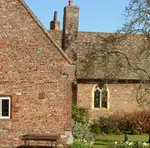
 Reference photo: Same view in winter, revealing structure
Before we jump into the painting, here’s what I used for this piece — though feel free to adapt with what you’ve got at home.
The Subject: Brokken Bridge
The painting is based on Brokken Bridge, a narrow old packhorse bridge in Clapham, Ingleborough — Yorkshire countryside at its best. The bridge has been restored, but it’s still only wide enough for a single walker, or a well-balanced horse with panniers.
I used two reference photos:
- One taken in summer, when the foliage is lush and casts deep shadows.
- One from winter, which helped me see behind the trees and work out the lay of the land.
You can download a sheet of the reference photos here:
Clapham Bridge Photo Reference PDF
 The outline sketch, available to download and trace if you’d prefer to skip freehand drawing
Tools and materials I used
Paper
Cold pressed watercolour paper (300gsm) — fairly smooth.
This surface holds the pencil beautifully, and lets the pigment sit just right when activated with water. I wouldn’t swap it for anything else on this project.
Pencils
Caran d’Ache Museum Aquarelle pencils
These are highly pigmented and blend well, but any good-quality watercolour pencils will do. Just make sure you have:
- A cool blue (like cobalt)
- A few earthy browns
- Some greens in both warm and cool tones (I used Light Olive, Raw Umber, and Cobalt Blue often)
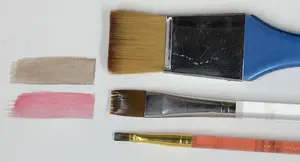
Brushes
- Small, soft watercolour brushes for activating pigment
- A bit of kitchen roll for blotting (essential for those soft clouds)
Optional - but handy
- A sharp H graphite pencil for your outline
- A kneadable eraser
- Your favourite daylight lamp if you’re working in the evening (mine’s a permanent fixture on my desk)
Want to skip the drawing?
If you’d rather not draw it out from scratch, I’ve got you covered.
You can download the outline drawing here:
📎 Clapham Bridge Line Drawing PDF
I started with this as a demo piece at an open day, so the earliest stages aren’t photographed — but we’ll pick up right from where the paper’s stretched and the outlines are done.
Step 1: The Sketch and First Washes
With the paper stretched and taped down, I began by sketching the scene with a sharp H pencil.
I always include a bit more than I think I’ll need — a few extra branches, the row of cottages at the back, and space above the treetops for some sky to peek through.
You can always crop later, but it’s tricky to add bits once you’ve started painting (as I’ve learned the hard way).
The pencil lines are kept light — just enough to guide the washes. Once the first layer of colour is down, we’ll lift the graphite gently to let the painting take over.
Washes in the Sky
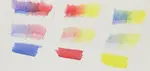
 The first layer of watercolour pencil washes establishing sky colour and underpainting
Let’s start with the sky. I gave the paper a quick wetting in that area and let it settle back to a soft dampness. Then I mixed a pale wash using Cobalt Blue (662) — nice and cool — and gently brushed it across the sky area.
While the paper was still damp, I blotted out a few clouds with some scrunched kitchen roll. Nothing too perfect — skies are never symmetrical, and each time they’ll come out a little different (which is half the fun).
To give the sky a bit of depth, I dabbed in some slightly stronger blue here and there, keeping it subtle. The idea isn’t to make it look stormy — just to hint at some movement in the air.
Shadow tones and pale beginnings
Next, I mixed up a few more washes using the pencils:
- Raw Umber (049) — for warm shadows
- Light Olive (245) — for underpainting foliage and grass
These three colours (blue, brown, green) give you a surprising range of tints when mixed — including a beautiful soft grey when blue and brown blend together.
Everything at this stage is light. Think whispers of colour — barely-there layers. There’ll be time later to build depth, but too much too soon, and you’ll end up scrubbing. I speak from experience.
A tip for the water
When you paint the river, run your pencil strokes (and later your washes) horizontally to echo the water’s flow. It’s a small thing, but it adds realism — and helps the eye read it as water, not just a patch of blue-green.
Don’t worry if it looks bland now. This is just the underpainting — like the ghost of what’s to come.
A note on the tree branches...
I used a small brush and a pale brown wash to sketch in the main tree branches. This helps me remember where they go later, especially after the pencil lines have been erased. It also prevents me from accidentally painting right over them with leaves or grass.
If in doubt, mark them early. Future-you will be grateful.
Step 2: Building Texture & Depth
(Grass, water, and soft layering – the satisfying part)
Now that we’ve got the first whispers of colour in place, it’s time to start building texture. We’re not talking anything drastic yet — just soft additions and early decisions about tone.
Working on the grass (bottom left)
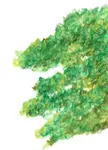
 The three stages of grass development – from light wash to textured scribbles and deeper shadows.
Let’s start in the bottom left where the grasses live.
Stage 1: Underpainting
I laid down a soft green wash (using Light Olive again), then dropped in hints of blue for shadowed areas. Still very pale — this is just the suggestion of grass.
Stage 2: Dry pencil scribbles
Once dry, I came in with dry pencil. Not just one green, but a whole garden of them: some from the Caran d’Ache tin, a few rogue Derwents I had lying about.
Scribble in small, upward strokes — enough texture to suggest grassy tufts, but loose enough to keep it natural.
Stage 3: Softening
A damp brush turns those scribbles into soft shading. Blend gently — you don’t want to flatten it all. Let the paper texture poke through here and there.
I also layered in a few browns and greys for grassy shadows.
Stage 4: Depth in the water
While we’re down here, I added a very diluted wash to the river — a mix of Dark Blue and Raw Umber, lifted from a paper palette.
This soft grey-blue adds just enough murk to suggest reflections and depth. Keep the wash thin — think “breath on a window,” not “slosh in a puddle.”
Shading on the riverbank (bottom right)
Over on the far bank, I scribbled in more dry pencil, but here’s the trick: I didn’t blend all of it. Leaving some of those scribbles untouched lets the paper show through — creating a sparkle effect, like sunlight on rocks.
It’s a little messy, but wonderfully lively.
I’ll come back to deepen the shadows under the trees later — but for now, this hint of contrast keeps things fresh.
Small tip with big impact
Let the paper texture do the work.
When you scribble over cold pressed paper, the pigment naturally “hits and misses,” giving you that barky, leafy, mossy feel — without any effort. It’s one of the loveliest things about this medium. Don’t fight it. Let it show.
At this point, your picture might be starting to look a bit scrappy — and that’s perfect. You’re building the under-layers, the bones of the piece.
From here, we’ll start turning that patchy grass and pale sky into something with structure.
Next up, we move into the trees — scribbles, scribbles everywhere, with some helpful rules about branches, shadows, and why you don’t need to draw every leaf.
 Scribbled foliage and branch shaping — keeping it loose while hinting at depth.
Step 3: Foliage and Trees
(A scribbler’s guide to trees that look alive)
The trees in this piece do a lot of heavy lifting. They frame the cottages, guide the eye, and give us contrast and mood.
But we don’t need to capture every twig. The trick is to suggest detail, not dictate it.
Scribbles with purpose
Start with dry pencil. I used two or three greens — Phthalo Green for shadow, Green Ochre for warmth, and a bright leafy green as a highlight.
Use short, loose, scribbled strokes, layering them in clumps and letting the gaps show through.
I did the same on both the left and right sides of the scene:
- Left: This is where the big oak tree sits. Keep the strokes random and a little wild — the tree’s not prim and proper.
- Right: There’s a branch from the oak tree hanging across, framing the cottages. Let some sky peek through and avoid anything too symmetrical.
Tip: Trees should leave room for birds to fly through.
Don’t fill every gap with green. Let the sky poke in. It adds realism, balance, and gives your eyes somewhere to rest.
 Beginning the foliage on the right side using similar scribbling techniques.
Tree trunks & shadows
Once I’d mapped out the leaves, I went back in with browns and greys for the tree trunks and branches:
- A soft Umber is perfect for shadows and depth.
- Keep one side of each branch darker (usually the side away from the light).
- Let the brush skip over the texture of the paper to give the bark a natural feel — no need to draw it all in.
Over the oak trunk on the left, I also used a light grey to tone down the yellowish-brown from the reference photo. Oaks are greyer than you think — but the camera always adds a warm tint.
Details on the edge
At the far edge of the picture, where the smaller tree leans out of frame, I used darker greens first — then softened them gently with a wet brush. This gives me a lovely edge to work into later when I add more foliage in the foreground.
And don’t forget that crooked little branch coming down from the oak. It breaks up the shape and helps frame the view — a small thing, but compositionally it’s doing a lot of work.
 Using dry pencil strokes and the paper's grain to create bark texture
Keep a sharp point.
Dull pencils make dull marks. You’ll want fine lines for twigs, roof outlines, and fiddly details later — so give that sharpener a spin now and then.
Your scene should now be taking shape: sky, trees, a bit of sparkle on the river, and just enough shadow to make the bridge pop. It’s starting to look lived-in — like a real landscape.
Next, we’ll move in toward the cottages and the bridge itself: stonework, rooftops, and the satisfying joy of making walls look properly weathered.
Step 4: Buildings and Bridgework
Now that the trees are in place and the grasses are starting to look like they belong, let’s wander across the bridge and have a go at the cottages and stonework.
This is the part where structure sneaks in — but you still want to keep your pencil light and your washes gentle.
Laying in the bridge
The bridge is a star of the show, so I treated it with care — but not too much fuss.
I used a thin wash of grey-blue (Cobalt + Raw Umber, very diluted) to give it form without flattening it. Let some white of the paper show through, especially on the sunlit side.
For the arch shadow, I went much lighter than the reference photo. I wanted to keep that sense of light shining through, which I’ll deepen later when I add dry pencil detail.
Stone shadows tip
Layer slowly. I added soft greys, building them up with several passes. It’s easy to go too dark too soon — and much harder to undo it.
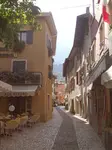
 Establishing the basic forms and colours of the bridge and houses.
Adding the cottages
Moving behind the bridge, I started laying in the cottages and rooftops:
- I left the pencil lines for the windows for now (you can soften or darken them later).
- On the walls, I used soft, even strokes — no scribbles here! Smooth layers will wash down neatly with a damp brush and give you a cleaner finish.
- I darkened the end walls slightly to show where the sun wasn’t hitting.
The foliage behind the cottages got the scribble treatment — loose and layered — to give texture and make the roofs pop by contrast. That little touch of red-brown and dark green around the trees helps frame the buildings nicely.
 Close-up view of applying washes to the stone wall near the steps.
Stone wall details
In the close-up section (by the steps and the bank), I’ve started defining little things — the stone wall edge, the openings under the bridge, that wonky rear wall that still needs straightening.
I’ll fix that when I next swing past with my pencil...
But for now, I’m keeping everything light and “suggested.”
Details should support the painting — not shout over it.
Contrast creates shape
Where the pale roofs meet dark trees, the eye sees form. Let your light areas brush up against the dark ones, and you’ll get depth without needing a ruler or a magnifying glass.
And there we have it — buildings in place, bridge gently aged, and everything starting to feel grounded.
Next we’ll dip back into the water, deepen those river shadows, and build out the final corner of the scene.
Step 5: Water & Reflections
(Layered glazes, sparkling scribbles, and a bit of well-placed restraint)
The water in this scene doesn’t need to be dramatic. It just needs to feel like it’s quietly moving — a trickle, not a torrent. The reflections are there, but they’re soft and broken.
Think: shadowed colours, a few light-catching speckles, and just enough depth to suggest a bank on the far side.
Glazing the river (bottom right)
 Layering washes in the river — notice how the unblended pencil adds sparkle and texture.
In the bottom right, I started layering washes to give the water a bit more presence:
- A base wash of blue-grey (cobalt + a hint of raw umber)
- Once dry, I scribbled on top with dry pencil — letting the rough texture of the paper catch the pigment in places and leave gaps elsewhere
Don’t blend everything.
Leaving some scribbles unblended adds a sparkle — those broken bits of white paper shining through are like little sunlit ripples. Accidental magic.Reflections and depth
Just above the far bank, where shadows deepen, I added extra dry pigment and softened it just enough with a damp brush. You don’t want puddles here — more like a light whisper of colour.
I used:
- Dark Blue
- Raw Umber
- And later, a touch of green for tree reflections
I also let some of the water’s pigment push up toward the far bank using a wet-on-wet approach — it gives a gentle bleed that defines the shoreline.
Where the water meets the foliage
At the water’s edge, you’ll notice the trees and shrubs begin to cast shadows into the river. I suggested this with quick upward strokes of dark pencil (blended in places), then kept the outer edges soft to avoid harsh outlines.
And yes — I left that sparkle on the rocks, courtesy of the untouched paper texture. It gives just enough “crunch” to hint at a pebbled edge without drawing each one. Let the paper do the work!
You don’t have to mirror everything
Instead of fussing with exact upside-down reflections, just use colour echoes — a bit of green here, a muted red from a roof there. Blur the edges, keep it loose, and it’ll read as water without you losing your mind.
That’s it — your water now glimmers, without needing to shout. The eye naturally drifts down the river, notices the light, and moves along. It’s one of those places in a painting where less really is more.
You're a trooper — and I suspect you know the satisfaction of seeing a picture finally come together.
We’re almost at the home stretch now, and it’s time to revisit that faithful oak tree and finish off the foliage that pulls the whole piece together.
This is where your landscape gets its final flourish — a leafy frame and a bit of drama.
Step 6: Framing with Foliage
(Finishing the oak tree, deepening shadows, and adding those last leafy licks)
We’ve sketched, washed, scribbled, and softened — and now we’re back where we started, under the trees. Only this time, we’re adding the depth that makes the whole picture sing.
Oak tree glory (top left + top right)
 Adding darker tones to the background behind the oak tree to create depth
The oak tree on the left is a bit of a scene-stealer, and by this stage, it’s time to give it the attention it deserves.
Here’s how I built up the foliage:
- Scribble in dark green and green ochre in clumps, leaving gaps for the sky
- Blend lightly with a damp brush (you don’t want soup!)
- Then come back in with dry strokes for texture — the curve of the leaves, a few rogue fronds dropping into the sky
Framing branches
The arched branch across the top of the picture is key — it frames the cottages and softens the composition. Keep the underside dark, and let the top catch the light. It creates that “looking through the leaves” feeling we love so much in old-fashioned countryside paintings.
Tree trunk texture
 Continuing work on the oak tree, focusing on texture and leaf definition.
Remember how we scribbled some Umber earlier into the branch? Now’s the time to lean into it:
- Use the paper’s natural grain to your advantage — don’t press too hard
- Add subtle shadow to one side of each branch
- Keep some branches crisp (to define shape) and others blended (to push them into the background)
I also used light grey on the sunlit side of the trunk to tone down any overly yellow bits and create that weathered bark effect. The oak tree in real life looked warm — but I found a cooler palette worked better for contrast.
The tree on the right
This one’s simpler — mostly background, a bit of scribbled green, and some open spaces left for light and air. Resist the urge to overwork it. This tree plays a supporting role — it’s the gentle balance to the heavy left side.
Pro tip: Keep a finger clean!
Use it to softly blend tiny patches of dry pencil without a brush — it gives you subtle control over texture and tone.
Leaves love variety.
Use three greens, not one. Vary your stroke length. Leave holes. Scribble boldly, then blend with restraint. Real trees are untidy — and that’s what makes them beautiful.
You should now be looking at a scene that feels complete: a bridge nestled between trees, softened by scribbled leaves and gently glowing with the last washes of colour. But don’t reach for the frame just yet...
Next, we’ll take a final pass over the whole picture — refining shadows, adjusting contrast, and adding just enough detail to bring it to life without tipping into fussiness.
Right then — let’s put the kettle on and take one last stroll around the painting.
This final step is all about stepping back, squinting a little, and asking:
Does anything need a nudge?
It’s where we fix the wobbly bits, deepen a shadow or two, and — most importantly — resist the urge to over-polish until it squeaks.
Step 7: Finishing Touches and Knowing When to Stop
(Final shadows, sneaky tweaks, and the art of leaving well alone)
This is the part where the painting finds its voice. Everything’s in place — the sky, the water, the foliage, the cottages — and now it’s just a matter of guiding the viewer’s eye.
Deepen the darks, gently
A few areas may still feel a touch flat — often it’s because the shadows aren’t quite deep enough. Here's where I added subtle weight:
- Under the bridge arch: a mix of grey and a tiny bit of black, just at the top curve — don’t fill the whole arch
- Behind the trees and around roof edges: soft dry scribbles of dark green or brown, lightly blended
- Along the riverbank, especially near the far edge: a narrow shadow pushed up to meet the bank
Watch how the picture reacts. Add a bit. Step back. Add a little more. This isn’t grout — you don’t need to fill every gap.
Sharpen edges sparingly
Some lines might need a little crisping up — just to pop the focal point:
- The roof of the main cottage: I gave it a cleaner edge and straightened it slightly (it was leaning like a sleepy sheep shed)
- Stonework details: a few defined lines where light meets dark — but I kept them soft enough not to distract
Remember, the bridge is the hero here. Keep contrast highest around it, and let the rest hum quietly in the background.
Colour harmony & final scribbles
 The watercolour pencil painting nearing completion, focusing on overall balance and integration.
To tie everything together, I scattered just a few touches of the same colours across the scene:
- A bit of saffron yellow in the trees and grasses
- A few dashes of green ochre on the far riverbank
- A repeat of the dark phthalo green used in shadowed leaves, echoed in the grass below
This quiet repetition pulls the picture together — like rhyming words at the end of a stanza.
When to stop (and mean it)
Obviously, more work could be done… but that, I think, would spoil the overall effect."
I wrote that — and I meant it. It’s tempting to keep tweaking, but part of the charm here is that soft, unfinished energy. Let the paper breathe. Let the white show through. Let the imagination fill in what you’ve left undone.
Final size & framing
The finished painting measures about 12.5 x 10.5 inches, and I’ll probably mount it to crop a little off the edges. Framing brings it all together — but even unframed, it feels complete. It tells a story.
So there you have it — Brokken Bridge in all its scribbled, shadowed, softly-lit glory.
If you followed along (or even just read for the pleasure), I hope you found a few tips you can carry into your next painting.
What You’ve Learned (and hopefully enjoyed)
 Final completed watercolour pencil painting of the Brokken Bridge landscape.
Over the course of this watercolour pencil landscape tutorial, you've worked with:
- Stretching watercolour paper and sketching a light outline
- Layering delicate washes for sky, stone, and water
- Dry pencil scribbles and how to soften them just enough
- Using the texture of the paper to add bark, grass, and sparkle
- Blending shadows with restraint to build depth without overworking
- Tying it all together with repeated colour choices and gentle framing elements
More than anything, I hope you’ve seen that watercolour pencils don’t need to be precise to be powerful. They’re playful, forgiving, and full of surprises — much like a countryside walk in unpredictable weather.
Final Thoughts
I hope this watercolour pencil landscape tutorial has given you confidence to try your own countryside scene.
This painting began as a demo on an open day, with curious visitors popping in and out. It’s a bit rough in places, but that’s part of the charm — like well-worn boots or an old garden gate. It taught me (again) that not every picture needs to be perfect. Just expressive.
So whether yours turned out tidy or tangled, remember:
Every layer teaches something. Every scribble counts.
Thanks for joining me under the oak tree.
Now — go sharpen those pencils, take your cuppa to the window, and have a scribble.

I'm Carol Leather, a coloured pencil artist for over 15 years. Most of my teaching comes back to the same idea: realistic coloured pencil starts with structure, light and observation long before the colour goes down.
My work has featured in Ann Kullberg's Color Magazine, CP Magic and Color Pencil Treasures (vol 7). I'm a member of the UKCPS and was a prize winner in the Nature section of their Annual Open Exhibition in 2020.
You might like these
Watercolour Pencil Techniques | Beginner Guides & Tutorials
New to watercolour pencils? Start here with beginner guides, tutorials, and practical tips to build confidence and explore this versatile medium.
How to Use Watercolour Pencils: Creative Art Techniques
How to Use Watercolour Pencils to their full potential with expert tips and detailed how-to instructions for creative techniques beyond the basics
Draw Trees with Watercolour Pencils (No Green Blobs)
Draw realistic trees with watercolour pencils: sketch structure, scribble foliage masses, add a light wash, then glaze dry layers for texture


Copyright © 2009- pencil-topics.co.uk All rights reserved
Home | About Us | Contact Us | Privacy Policy