- Home
- Pastel Pencils
- Using Pastel Pencils
How to use pastel pencils for fine art
Let's start by introducing the basics: pastel pigments and suitable papers.
Pastel pencils
Pastel pigments have been used by artists for centuries, but their pencil form offers unique benefits. The harder pastel core in pencils provides more control and sharper edges, ideal for smaller artworks.
In contrast, soft pastel sticks are perfect for larger pieces, allowing for broad, sweeping strokes of color.
To illustrate the difference, take a look at the photo below. On the left, you'll see a trio of soft pastel sticks, still mostly in their original wrappers. In the middle, there's a trio of hard pastel sticks, and on the right, a trio of Caran d'Ache pastel pencils.
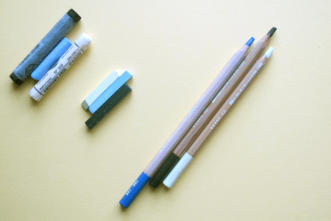
NOTE: When using sticks and pencils together make sure the sticks are labelled as soft pastels and not oil pastels, which are an entirely different medium.
Pastel paper
When creating art with pastel pencils, your paper choice is crucial. It's not just a backdrop, but a key player that can make or break your piece.
The paper's texture determines how well the pigment adheres to the surface, and the wrong texture can be distracting.
Some pastel papers have a prominent honeycomb pattern or ridges that can show through even after completion.
Try flipping the paper over to reveal a smoother side and minimize distractions.
Don't limit yourself to white paper.
Coloured papers provide an instant background, tying together the elements of your composition. Consider purchasing packs with assorted colours for an economical start.
For the samples below, I used Fabriano's Tiziano paper, which features a slightly ribbed surface. You can use an alternative paper with a similar texture. I chose Tiziano simply because it was readily available in my art supply cupboard.
We have a page all about pastel paper here.
Building a base
To set your artwork up for success, start with an initial pastel layer or foundation, in a colour that complements your subject matter.
For darker shades, a dark base makes them pop, while a crisp white base protects the paper and keeps colours vibrant in lighter areas, helping to prevent specks of paper colour showing through.
Blending colours
Like coloured pencils, pastels blend on the paper, not in a palette. To blend, place colours side by side and merge them with your finger or build up layers and blend with tools.
Let's see this in action.
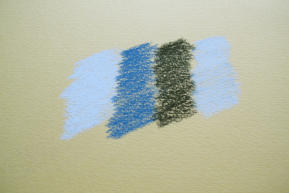
The first photo shows four blocks of thinly applied colour side by side but not overlapping.
Next we see the effect of roughly blending with a dry finger where they meet. For a more refined look, use tissue paper or blending stumps.
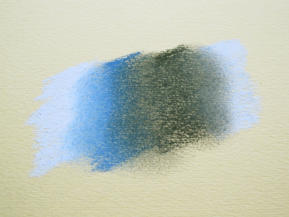
In the next photo, lines of the same colours are drawn on top of the sample. Notice how the colours intensify.
- The black appears solid, even over white.
- The blue lightens over the white base, but darkens and dulls when layered over black.
- The white mixes with the blue, lightening the previous layer no longer appearing to be bright white.
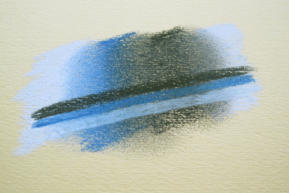
Now, let's use a firm pressure to add three more vertical lines in the same colours, at right angles to the original lines. What happens?
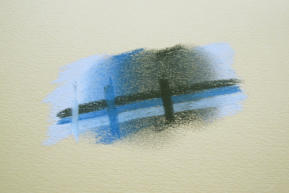
1. The white line:
- It covers the black line, but picks up some grey tone.
- The dense black underneath remains hidden.
2. The blue line in the middle:
- It restores the blue colour to that area.
- It also absorbs some of the black, creating a darker shade.
3. The last black line:
- This one becomes even denser.
- The paper's texture is almost completely obscured.
Notice how each layer transforms the colours? We're building them up step by step.
The experiments above showcase the opaque nature of pastels, which means they:
- Blend easily
- Cover other colours effectively
This opacity is characteristic of all pastels, including harder ones like pastel pencils, setting them apart from more translucent mediums like wax and watercolour pencils.
Correcting mistakes when using pastel pencils
Before starting your pastel artwork, it's crucial to know how to correct mistakes. As pastel layers build up, corrections become increasingly difficult, so make changes early while the paper still has some texture.
Experiment with the tools below to find the one that works best for you.
Blue Tac/White Tac
Blue Tac and White Tac (also known as mounting putty) are versatile lifting mediums. Store them in a lidded container to prevent dust, breaking off a small piece to use as needed.
The putty is malleable, allowing you to shape it and lift pastel from precise areas. To clean it, simply squeeze and pull the putty to work dirty areas towards the centre. Replace it when it turns grey, but expect years of use from one packet.
Kneaded eraser
Consider the Faber-Castell kneaded eraser, a more expensive but easily accessible alternative to the Blu Tac mixture. It's less sticky, removing pastel pigment more gently.
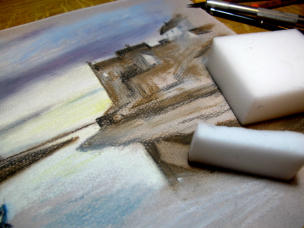
Magic eraser (sponge)
Another effective pastel remover is the 'Magic sponge', a dense white foam sponge sold at stores like Aldi. It's inexpensive and can be easily cut into strips to remove pastel and even watercolour from paper.
Craft Knife (Ceramic blade)
You can use a craft knife to scrape away pigment, but be careful not to damage the paper's surface or ruin its grain.
Bristle brush
I keep a short-bristled brush handy to remove excess pigment when the pastel builds up.
Bread?
Some books recommend using a ball of kneaded fresh bread to lift colour from the surface, but I haven't tested this method.

