- Home
- Tools/Accessories
- Pencil solvent
Coloured Pencil Solvents Explained: Techniques, Safety and Options
If you've explored blending coloured pencils, you might have heard about using solvents to achieve very smooth, almost painterly effects.
Solvents are liquids that can dissolve the wax or oil binder in your coloured pencils, allowing you to move and manipulate the pigment on the paper in ways that dry blending methods can't always achieve.
While solvents can produce beautiful results and help blend large areas or heavy applications of pencil, they also require a greater degree of understanding, care, and safety consciousness than most other coloured pencil techniques.
This guide aims to provide you with clear, practical information about what solvents are, which types are commonly used by artists, how to use them effectively and, most importantly, safely.
We'll cover everything from the essential precautions you must take, to different solvent options (including safer, artist-focused products), application methods, and what to expect.
My goal is to empower you with the knowledge to decide if solvents are a technique you want to explore, and if so, how to do it responsibly.
An Important Note on Solvents and Coloured Pencils: Understanding the Interaction
Before we jump into specific products and techniques, it's crucial to understand a key point: apart from watercolour pencils (which are designed to be used with water), most traditional coloured pencils are not manufactured with the intention of being dissolved by external liquids after they've been applied to paper.
When you introduce a solvent, you're creating a chemical interaction with the pencil's binder (the wax or oil holding the pigment) and the pigment itself, as well as with your paper.
This isn't necessarily a bad thing – it's how the blending effect is achieved!
However, it does mean that:
- Reactions can vary: Different pencil brands (with different binder formulations) can react differently to the same solvent.
- Paper plays a role: The type of paper you use, its sizing, and its absorbency will also influence how the solvent behaves.
- Care and knowledge are paramount: Unlike simply layering or dry blending pencils, using solvents introduces more variables and potential risks if not handled correctly.
This is why the two golden rules when working with any solvent on your coloured pencil art are proceed with caution and always test first.
Test First! (This is Non-Negotiable)
I cannot emphasize this enough: before applying any solvent to a piece of artwork you care about, you absolutely must test it thoroughly. This is a non-negotiable step that can save you from disappointment and potentially irreversible changes to your hard work.
Why test?
- Pencil Compatibility: To see how your specific brand(s) of coloured pencils react to the solvent. Does it dissolve the binder smoothly? Does it cause any unexpected colour shifts or bleeding?
- Paper Interaction: To observe how your chosen paper handles the solvent. Does it buckle, stain, or does the solvent soak through too quickly? Does it affect the paper's surface texture?
- Desired Effect: To practice the application technique and see if you can achieve the blending effect you're hoping for.
- Drying Time and Final Appearance: To understand how long the solvent takes to dry completely and what the area looks like once fully dried (e.g., is there any residue, sheen, or unwanted halo?).
How to test
- Use a scrap piece of the exact same paper you are using for your artwork.
- Apply your coloured pencils to the test paper in a similar way to your main piece – try areas of light layering, heavy layering, and where you've blended colours together
- Apply the solvent to different test patches using the technique you intend to use.
- Label your tests clearly (which solvent, which pencils, which paper).
- Allow the test patches to dry completely (this can sometimes take longer than you think) before evaluating the results.
Taking the time for this preparatory step will give you predictability and control when you eventually work on your actual artwork. Your art deserves this careful approach!
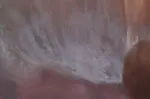
 blended with Zest-It, Spectrum Noir, and De-solv-it solvents") Testing different solvents helps understand how they blend pencil layers. This example shows effective blending using Zest-It, Spectrum Noir, and De-solv-it on both oil-based (Polychromos) and wax-based (Coloursoft) pencils compared to the unblended swatch.
Testing different solvents helps understand how they blend pencil layers. This example shows effective blending using Zest-It, Spectrum Noir, and De-solv-it on both oil-based (Polychromos) and wax-based (Coloursoft) pencils compared to the unblended swatch.Common Types of Solvents Used by Artists
Once you start researching solvents for coloured pencils, you'll likely come across a few different types.
It's helpful to understand the main categories, especially focusing on those readily available and generally considered safer for studio use in the UK and Europe:
1. Citrus-Based Solvents (e.g., Zest-It Pencil Blend)
What they are:
These solvents use natural terpenes (often derived from citrus fruit peels, like d-Limonene) as the active ingredient.
Zest-It is a very popular example designed specifically for artists.
Why artists like them
They are generally considered much safer than traditional petroleum-based solvents.
Zest-It, for instance, is biodegradable, non-toxic, and non-flammable, making it a great choice for home studios.
It effectively dissolves the wax/oil binder in coloured pencils and typically evaporates completely, leaving no residue on the paper.
Things to note
It has a distinct citrus scent which most people find pleasant, although, a very small number of users might find strong scents trigger headaches, so good ventilation is still sensible.
It's widely available from UK art suppliers along with their other product for pencil blending, an sponge imprenagted with the Zest It! solution.
 The Zest-It range for coloured pencil artists includes the Pencil Blend solvent (bottle) and a pre-loaded Blending Sponge (tin), both offering a non-toxic blending solution.
2. Artist-Grade Odorless Mineral Spirits (OMS)
What they are
These are petroleum distillates that have been refined to remove the most harmful aromatic compounds, significantly reducing the strong odour associated with traditional mineral spirits or white spirit found in hardware stores.
Brands like Gamsol (by Gamblin, sometimes available in Europe) or Winsor & Newton's Sansodor are examples often used by oil painters that can be used cautiously with coloured pencils.
Why artists use them
They are effective solvents for both oil and wax-based binders.
Important Cautions
- Even "odorless" varieties still require good ventilation as vapours are present.
- They are flammable.
- They can also potentially leave a slight oily residue or stain on some papers if applied too heavily, sometimes creating a dark "halo" around the blended area.
Careful, sparing application is key (often using a tool like a stump to apply, rather than wetting the paper directly).
Always check product labels for specific warnings.
 Artist-grade Odorless Mineral Spirits (OMS), like this Sennelier Odour Free Mineral Spirits, can be used for blending coloured pencils but require careful application and good ventilation.
3. Solvent Pens / Blender Markers
What they are
These are markers filled with a solvent solution, offering a convenient, controlled application method.
Examples include Tombow Blender Pen, Derwent Blender Pens, Finesse Blender Pen, or the Prismacolor Colorless Blender Marker which is sometimes available in the UK.
Why artists like them
They are very easy to use, offer good control for detailed areas, and reduce exposure to fumes compared to bottled solvents. The solvent is often alcohol-based, which evaporates quickly.
Things to note
- The amount of solvent in a pen is small, so they can be less economical for blending very large areas compared to bottled solvents.
- It's still important to test them with your specific pencils and paper, as the alcohol or other solvents used might interact differently than citrus or mineral spirits.
- Clean the pen tip frequently on scrap paper to avoid colour contamination.
 Solvent pens, like this Tombow ABT N00 Blender, offer a convenient way to apply blending solvent with good control
4. Other Solvents (To Use With Extreme Caution or Generally Avoid)
- Traditional Mineral Spirits / White Spirit (Hardware Store): Generally not recommended for fine artwork on paper. They contain more harmful aromatic solvents, have strong odours, and are more likely to damage paper or affect archival quality.
- Turpentine / Turpenoid: While traditional painting solvents, these have strong odours, significant health warnings (respiratory issues), and are highly flammable. Best avoided for coloured pencil work unless you are very experienced with handling hazardous studio materials and have professional ventilation.
- Rubbing Alcohol (Isopropyl Alcohol): Some artists experiment with high-percentage isopropyl alcohol. It evaporates very quickly and is highly flammable. Its effectiveness in dissolving pencil binders can be variable compared to purpose-made artist solvents. Extreme caution and testing are needed if exploring this route.
5. Definitely AVOID
Baby Oil: While it might technically move pigment around, it is non-drying and will leave a permanent oily stain on your paper. Not recommended!
Hairspray: As mentioned in the Fixatives guide, hairspray is not an art material, can yellow and become sticky, and is not designed for blending.
How to Apply Solvents for Blending
Applying solvents correctly is about control and moderation. The aim is usually to lightly dampen the pencil layers just enough to allow the pigment to move and blend, not to soak the paper.
A: Preparation
Work Area: Ensure good ventilation and protect your work surface.
Artwork: Make sure you have sufficient layers of coloured pencil down first. Solvents need pigment to work with!
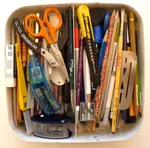
Tools: Have your chosen application tool ready – common choices include:
- Cotton buds (Q-tips): Good for small areas, disposable.
- Paper Blending Stumps or Tortillons: Use stumps dedicated only to solvents (don't reuse them for dry blending). They offer good control.
- Small, Stiff Brushes: Synthetic brushes often hold up better than natural hair. Choose small sizes for control.
- Felt Applicators: Can also be used.
Solvent: Pour a very small amount of your chosen bottled solvent into a stable, non-plastic container (like a small glass jar or ceramic palette well).
Never dip your tools directly into the main solvent bottle, as this contaminates the bottle and usually picks up far too much liquid.
B. Loading the Applicator
- Lightly dip just the very tip of your cotton bud, stump, or brush into the small container of solvent
- Blot Excess: Gently blot the applicator on a piece of clean paper towel to remove excess liquid. You want the applicator to be damp, not dripping wet.
C. Application to Artwork
Use light pressure and gentle strokes to apply the solvent to the coloured pencil area you want to blend. Work in small sections.
Use circular motions or strokes that follow the contours of your subject
You should see the pencil layers start to dissolve and blend. Stop when you achieve the desired effect for that section. Avoid scrubbing.
 and blended (bottom) areas") Using a small brush lightly dampened with a solvent (like Zest-It) to blend coloured pencil layers. Notice how the strokes are smoothed and the colour intensified in the lower swatch where the solvent has been applied.
Using a small brush lightly dampened with a solvent (like Zest-It) to blend coloured pencil layers. Notice how the strokes are smoothed and the colour intensified in the lower swatch where the solvent has been applied.D. Using Solvent Pens
- Application is more direct – simply draw over the coloured pencil area with the pen.
- Control the flow by varying your pressure slightly.
- Clean the pen tip frequently on scrap paper by scribbling until it runs clear to avoid transferring unwanted colour.
E. Drying
Allow the area to dry completely before adding more layers of pencil or solvent. Drying time varies based on the solvent type and how much was applied.
What to Expect After Using Solvents
Using solvents changes the nature of your coloured pencil layers. Here’s what you might observe:
- Blending Effect: You should see a noticeable smoothing of pencil strokes and blending of colours, often creating a more 'painterly' appearance compared to dry blending.
- Colour Appearance: Colours often appear darker and more saturated while the solvent is wet. They may lighten slightly as it dries, but often remain richer than before blending. However, always test, as some solvent/pigment combinations can occasionally cause unexpected permanent colour shifts.
- Surface Texture: The area where solvent was applied may feel different once dry. It might be smoother, and the paper's tooth might feel slightly reduced. Sometimes, depending on the solvent and paper, it can dry with a slightly matte finish.
- Drying Time: Be patient! Ensure the area is completely dry before proceeding. Trapped solvent under new layers can cause issues.
- Potential Staining/Halos: As mentioned, be extra cautious with OMS on absorbent papers, as applying too much can potentially leave a faint oily stain or halo around the blended area once dry. Zest-It is known for not leaving a residue.
- Working Over Dried Solvent: Generally, once an area treated with solvent is thoroughly dry, you can apply more layers of coloured pencil on top. The texture might feel different, so you may need to adjust your touch slightly. Some artists use a workable fixative over a dried solvent area if they need to restore more tooth. You can also often burnish over a solvent-blended area once it's fully dry if desired.
Safety First! Essential Precautions for Using Solvents
Okay, we've talked about what solvents can do, but before you even consider opening a bottle, we need to talk seriously about safety.
Using any solvent, even artist-grade ones, requires careful handling and respect for the product.
Your health and safety are more important than any blending effect! Please read and follow these precautions diligently:
Ventilation is Absolutely Vital
Why?
Solvents evaporate and release fumes (Volatile Organic Compounds or VOCs) into the air. Breathing these in concentrated amounts can be harmful to your health over the short or long term.
What is 'Good Ventilation'?
- Ideal: Working outdoors on a calm day (away from direct sun which might speed evaporation too much).
- Indoors: Only work in a room with excellent air circulation. Open windows and doors fully to create a cross-draught. Using an extractor fan that vents directly outside is highly recommended if working indoors regularly.
- Avoid: NEVER use solvents in a small, closed room with no fresh air supply.
Read the Manufacturer's Label – Always!
Before using any product, read the entire label, including all safety warnings, instructions for use, and first aid advice. Different solvents have different specific risks and requirements.
Protect Your Lungs
Even low-odour solvents release vapours. For anything more than very brief, occasional use in excellent ventilation, consider wearing a respirator mask rated for organic vapours.
This is especially important if you are sensitive to chemicals or working for extended periods
Avoid Skin Contact
- Solvents can dry out and irritate the skin, and some can be absorbed through it.
- Try not to get solvent on your hands. Consider wearing suitable protective gloves (nitrile gloves are often recommended for many solvents, but check compatibility if unsure).
- If you do get solvent on your skin, wash the area thoroughly with soap and water as soon as possible.
Protect Your Eyes
Wearing safety glasses is a sensible precaution to protect against accidental splashes or spray
Know About Flammability
Most artist solvents (including citrus-based, OMS, and alcohols) are FLAMMABLE.
Keep them well away from any potential ignition source – open flames (like pilot lights, candles, gas stoves), sparks (including static electricity), heaters, cigarettes, etc.
Do not smoke while using solvents.
Store Solvents Safely
Keep solvents in their original, tightly sealed containers.
Store them in a cool, dry place, away from direct sunlight, heat sources, and out of the reach of children and pets.
Dispose of Materials Responsibly
Rags & Paper Towels
This is critical!
Rags or paper towels soaked with certain solvents (especially oil/solvent mixtures) can potentially spontaneously combust if crumpled up or stored improperly in a confined space (like a bin).
Always allow solvent-soaked materials to dry completely flat in a safe, very well-ventilated area (preferably outdoors, away from buildings) before disposing of them according to your local council's guidelines for hazardous waste.
NEVER leave soaked rags crumpled in a pile or in a closed bin.
Liquid Solvent & Empty Containers
Never pour excess solvent down the drain or into the environment. Dispose of unwanted solvent and empty containers according to your local council's hazardous waste disposal regulations.
Use Sparingly and Control Application
Pour only a very small amount of solvent needed for your session into a separate, stable container (glass or ceramic is often best).
Apply it sparingly to your artwork using a tool (cotton bud, stump, brush), rather than flooding the paper. This minimizes both fumes and potential paper damage.
No Food or Drink
Avoid eating, drinking, or smoking in your workspace when using solvents
Know Basic First Aid
Check the product label for first aid instructions in case of accidental inhalation, eye contact, skin contact, or ingestion. Seek medical advice promptly if needed.
Taking these safety steps seriously allows you to explore the potential of solvents while minimizing the risks.
Using Solvents Wisely
Solvents can indeed be a useful tool in the coloured pencil artist's repertoire, offering unique ways to blend colours, create smooth transitions, and achieve painterly effects, particularly with wax or oil-based pencils.
However, as we've seen throughout this guide, they are a technique that demands respect, caution, and a commitment to safety.
They are entirely optional; beautiful coloured pencil work is absolutely achievable using only dry blending methods or burnishing.
If you do choose to experiment with solvents:
- Prioritize Safety: Always work with excellent ventilation and follow all safety precautions.
- Test Thoroughly: Never skip testing the solvent with your specific pencils and paper first.
- Start Simple and Safe: Consider beginning with a generally safer option like Zest-It or a solvent pen.
- Apply Sparingly: Remember that a little often goes a long way.
Ultimately, the decision to use solvents depends on your desired artistic effects, your comfort level with the necessary precautions, and your working environment.
By understanding the different types, application methods, potential results, and crucial safety steps, you can make an informed choice and, if you proceed, use solvents responsibly as part of your creative process.
For other ways to blend, please see our blending methods page.
Happy (and safe) creating!

I'm Carol Leather, a coloured pencil artist for over 15 years. Most of my teaching comes back to the same idea: realistic coloured pencil starts with structure, light and observation long before the colour goes down.
My work has featured in Ann Kullberg's Color Magazine, CP Magic and Color Pencil Treasures (vol 7). I'm a member of the UKCPS and was a prize winner in the Nature section of their Annual Open Exhibition in 2020.
You might like these
What Is Lightfastness in Coloured Pencils? Ratings Explained
What do ASTM and Blue Wool ratings mean for your pencils? Compare lightfastness across brands and learn how to protect coloured pencil artwork from fading.
Wax Bloom on Coloured Pencils: How to Fix and Prevent It
Wax bloom is harmless and easy to fix. Learn why it happens, how to remove it in seconds, and how to prevent it. Plus which fixatives actually work.

Copyright © 2009- pencil-topics.co.uk All rights reserved
Home | About Us | Contact Us | Privacy Policy