- Home
- Core Coloured Pencil Techniques
- Coloured Pencil Strokes
Basic Coloured Pencil Strokes and Control
Welcome! Now that you understand why core techniques matter, let's explore the very first building block: controlling your pencil strokes.
Coloured pencils aren’t just for colouring in neatly between the lines — they’re a beautifully versatile medium for fine art, texture, and expression. The secret often lies in the marks you make, sometimes called mark making. From tiny dots to swooping scribbles, every stroke leaves a trail of your hand and intention.
Whether you're aiming for smooth gradients or suggesting texture, it all comes down to how you handle that pencil. Think of these basic controls and strokes as your pencil's essential vocabulary.
Let's explore the fundamentals:
Gaining Control: Sharpness, Grip, and Pressure
Before even thinking about different stroke patterns, let's look at three elements that fundamentally change how your pencil behaves.
Does Pencil Sharpness Really Matter?
The sharpness of your pencil point dramatically changes the marks you make:
- Sharp Point: Essential for crisp lines, fine details (think fur, feathers, tiny highlights), and intricate textures. A sharp point allows pigment to get into the deeper valleys of the paper's tooth, giving clean edges. I keep a good sharpener handy – often a helical one for a long, sharp point – especially when working on details like animal eyes or whiskers.
- Blunt/Rounded Tip: Better for covering broader areas more quickly and softly. A slightly duller tip skims over the paper's tooth, making it ideal for initial layers, soft gradients (like skies or out-of-focus backgrounds), or when you want a less defined texture.
Holding Your Pencil (A Quick Note)
How you hold your pencil also affects control.
Holding it near the tip like a writing pen gives precise control for details.
 Holding the pencil close to the tip, much like a writing pen, provides precise control for detailed strokes
Holding it further back, perhaps more slanted (underhand grip), encourages lighter pressure and broader strokes, ideal for initial layers.
 Holding the pencil further back encourages a lighter touch, perfect for covering larger areas or applying initial soft layers.
Experiment to see what feels comfortable and gives you the desired effect.
Finding Your Pressure Sweet Spot
How hard you press is perhaps the single most crucial element in coloured pencil technique, especially for layering and realism:
- Light Pressure: This should be your default setting for initial layers. Using a light touch allows the paper's tooth to remain open, enabling you to add multiple subsequent layers. It creates translucent colour, perfect for optical mixing (where colours blend in the viewer's eye) and gradual build-up.
- Medium Pressure: Used for building up colour more substantially once initial layers are down, or for defining areas more clearly.
- Heavy Pressure: Reserved for later stages, primarily for burnishing (which we'll cover later) or for achieving the absolute darkest accents. Pressing hard too early flattens the paper tooth, making further layering difficult or impossible.
Pro-Tip: Practice creating value scales with a single pencil, going from the lightest possible mark to the darkest, just by varying pressure. This exercise is invaluable for developing control.
Essential Stroke Techniques
With control over your pencil's point and pressure, let's look at the core ways to apply colour.
Let’s start with a classic.
Hatching and cross-hatching
In hatching, you build texture using parallel strokes — all heading in one direction. Cross-hatching adds a second layer of strokes in the opposite or diagonal direction, creating depth and shadow where the lines overlap.
This method works beautifully with coloured pencils and gives your drawings a lively, woven feel — almost like threads of colour stitched across the page.
 Basic hatching strokes in one direction to create texture and tone.
Direction Matters
You’re not limited to straight lines. Try horizontal, vertical, diagonal, or even gently curved strokes. See how each one brings a different feeling to the drawing.
Ann Kullberg, in her book Texture in Colored Pencil, often used vertical hatching for delicate texture — a technique she leaned on in her early work.
When cross-hatching, your second set of strokes can criss-cross at right angles or slant in at a gentler angle. Both are useful — it just depends on the effect you’re after.
Stroke Density
Packing your strokes closely together darkens the area wheras wider gaps let more of the paper show through, creating a lighter, airier feel.
 Cross-hatching adds a second layer of lines to deepen shadows and create more complexity.
Pressure and Precision
Soft strokes = subtle shades. Heavy pressure = bolder impact.
You can build up your drawing — layer by layer — with light pressure first, deepening as needed.
Keep your pencil tip sharp for crisp, defined lines. It’s especially helpful when layering multiple directions.
Color Mixing
Here’s where it gets fun. Try layering different coloured strokes in each direction.
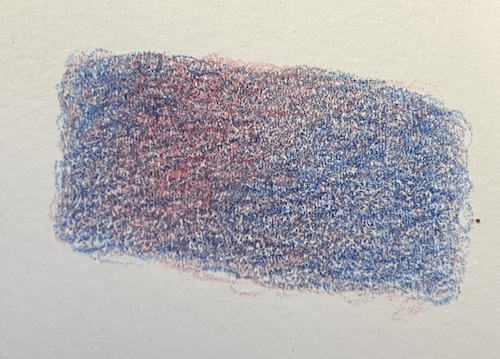
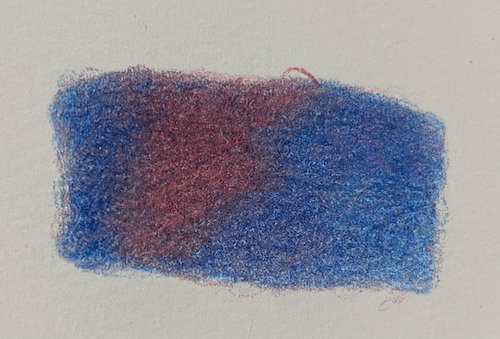
In the example below, I started with Lyra Olive Green, added True Blue over it, then softened the centre with a final layer of Light Grey. The colours worked together without turning to mud.
 Layered cross-hatching using Olive Green, True Blue, and Light Grey for blended colour depth.
Practice Makes Progress
Cross-hatching is one of those deceptively simple techniques that improves the more you do it. At first, your lines might look a bit like a startled spider scurried across the page — that’s perfectly normal.
Start small: draw a cube or a simple sphere, and try building up tone with lines in just one direction. Then layer a second direction. Then try adding colour. Little by little, you’ll get a feel for how different angles, spacing, and pressure interact.
Every artist’s cross-hatching has its own rhythm and personality. Yours will too. So give yourself time, and don’t be afraid of a wonky line or two — they’re often more charming than perfect ones.
Practice building up tone on simple shapes using hatching, then layer cross-hatching. See how changing direction and density affects the look.
Scumbling
If hatching is neat handwriting and stippling is a patient dot-dot-dot, then scumbling is... well, scribbling small, circular, overlapping strokes. It's a bit like doodling while you are sitting on hold during a phone conversation, only this time you are doing it with purpose.
It’s a wonderfully forgiving technique, especially good for soft textures, gentle shading, and layering up colour in a way that feels organic and free.
Little Circles, Big Results
Start by applying light pressure and making small, continuous loops. These don’t need to be perfect circles — think of them more as meandering paths. Let them overlap and fill the space gradually.
Use different sizes and speeds — tight spirals for detail, looser ones for broad areas. Overlap them generously to build a textured, almost velvety surface.
Best Used For...
Scumbling is perfect for natural textures, especially when you don’t want hard lines or obvious patterns. It shines in:
- Distant foliage
- Grass in the background
- Pottery
- Soft shadows
- Out of focus areas
Build Layers Like a Cake (But Don't Eat It)
 Building intensity with added colours and slightly more pressure.
Once you’ve got a base of light scumbling down, you can add more colours on top.
Try adding a deeper tone in shadowed areas, or a complementary colour to create visual richness. Keep the motion loose and the pressure gentle to start — you can always go back and darken later.
The result is a rich, blended area of colour that still shows movement and texture.
Mix It Up
Don’t be afraid to mix colours as you scumble.
Layering different hues can produce subtle, luminous effects that are hard to achieve any other way. Think of it like seasoning a dish — a little unexpected colour can bring everything to life.
Initial scumbling layer using small, overlapping circular strokes.
Scumbled area after burnishing with a white pencil for a smooth, polished effect.
Building Your Foundation
Mastering these basic controls and stroke types is your foundation for everything else in coloured pencil. Practice them regularly, even just for a few minutes. Get comfortable with light pressure. See how hatching versus scumbling feels and looks.
Don't worry if it feels awkward at first! Every artist develops their own 'handwriting' with these strokes. The key is conscious practice.
Ready for the next layer? (Pun intended!)
➡️ Let's Explore The Essential Guide to Layering Coloured Pencils
You might like these
Burnishing Coloured Pencils for a Polished Finish | Pencil Topics
Master burnishing colored pencils to create intense colour, smooth textures & a realistic glossy finish. Step-by-step guide & pro tips for artists.
Practical Techniques for Creating Coloured Pencil Backgrounds
Discover practical techniques for creating smooth, blended coloured pencil backgrounds with step-by-step guides, tips on layering, and alternative methods

Copyright © 2009- pencil-topics.co.uk All rights reserved
Home | About Us | Contact Us | Privacy Policy