- Home
- Beyond Basics
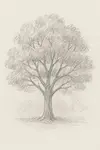
- Watercolour pencils
- Drawing trees in the distance
How to Draw Trees in the Distance (Depth & Atmosphere)
You've been staring at this landscape reference photo for twenty minutes. Rolling hills covered in mixed woodland, atmospheric perspective, beautiful light filtering through the trees.
It should be the perfect subject for a dramatic coloured pencil drawing.
But every time you try to tackle it, the same thing happens: your hillside ends up looking like a flat wall of generic green scribbles.
No depth, no atmosphere, no sense of trees receding into the distance. Just a confusing mess that bears no resemblance to the layered, dimensional landscape you're trying to capture.
I used to think these complex woodland scenes were beyond coloured pencil's capabilities.
Surely you needed oils or watercolours to capture that atmospheric depth?
But then I discovered a mixed-media approach that changes everything: starting with watercolour pencil washes, then building detail with traditional coloured pencils.
This page assumes you're comfortable with basic tree observation and structure. If you find yourself still guessing at tree shapes or struggling with individual tree forms, master tree observation fundamentals first - it'll make everything I'm about to share much more effective.
This technique allows you to establish atmospheric perspective quickly, differentiate between foreground and background vegetation, and build up realistic tree textures without getting lost in overwhelming detail.
Most importantly, it solves the "flat hillside" problem by giving you control over depth and light from the very beginning.
In this tutorial, I'll show you exactly how to use this mixed-media approach to create convincing tree-covered landscapes.
You'll learn how to establish depth with colour temperature, when to use loose washes versus detailed pencil work, and how to make distant trees look genuinely far away rather than just smaller versions of foreground trees.
We'll also explore when to use watercolour pencil techniques for individual trees versus building up detail with traditional coloured pencils.
The best part? This technique works whether you're drawing the rolling hills of the Cotswolds or the rugged landscapes of the Scottish Highlands.

Is This Mixed-Media Approach Right for Your Landscape?
Before we dive into the technique, let's make sure this method matches what you're trying to achieve in your landscape work.
Use This Mixed-Media Technique When You Want To
- Create convincing atmospheric depth with trees that clearly recede into the distance
- Handle complex woodland scenes without getting overwhelmed by detail
- Work efficiently on larger landscapes - this method covers ground quickly
- Achieve rich, layered colours that single-medium approaches struggle with
- Capture dramatic light effects filtering through tree canopies
- Build professional-looking landscapes that show real technical skill
Perfect for: Rolling countryside, wooded hillsides, complex vista drawings, any landscape where trees are a major element but not the sole focus.
When This Approach May Not Be Your Best Choice
- Single tree studies where you want maximum individual detail
- Quick outdoor sketches where you need to work fast with minimal supplies
- Highly detailed botanical work where species accuracy is crucial
- Simple compositions where mixed media might be overkill
- When you're just starting out - master individual tree drawing first
The Reality About Landscape Tree Drawing
Drawing individual trees is one skill.
Drawing convincing tree-covered landscapes is another entirely.
It requires understanding atmospheric perspective, colour temperature changes, and how to suggest complexity without actually drawing every leaf and branch.
This mixed-media approach solves these challenges systematically, but it does require patience and some experience with both watercolour and coloured pencils.
If you're new to either medium, practice the techniques separately before combining them.
What Makes UK Landscapes Challenging to Draw?
British landscapes present unique challenges that this mixed-media technique is perfectly suited to address.
Characteristic UK Landscape Features
Mixed Woodland Composition
- Challenge: Different tree species create complex colour and texture variations
- Solution: Watercolour pencil base lets you establish different colour areas quickly
- Key insight: Don't try to draw each species individually - work in colour families
Atmospheric Weather Effects
- Challenge: British light is often soft and hazy, creating subtle atmospheric perspective
- Solution: Watercolour washes excel at capturing these gentle transitions
- Key insight: Less contrast in distant areas, more blues and cool tones
Rolling Topography
- Challenge: Gentle hills can look flat without proper depth cues
- Solution: Strategic colour temperature shifts create convincing depth
- Key insight: Warm colours advance, cool colours recede
Dense, Layered Vegetation
Challenge: British woodlands often have multiple canopy layers
Solution: Build complexity gradually through multiple layers
Key insight: Suggest detail rather than drawing every element
Essential Supplies for UK Landscape Artists
Watercolour Pencils for Base Layers
Derwent Watercolour Pencils
Where to buy: Hobbycraft, local art suppliers
Price range: £12-115 for sets
Essential colours: Sap Green, Olive Green, Yellow Ochre, Raw Sienna, Ultramarine, Burnt Sienna
Why these work: Good colour range for British woodland, reliable activation with water
Traditional Coloured Pencils for Detail Work
Faber-Castell Polychromos
- Where to buy: Jackson's Art Supplies, Amazon UK
- Price range: £30-70 for landscape sets
- Why essential: Work beautifully over watercolour pencil base, excellent for fine detail
- Key colours: Earth Green, Chrome Green, Naples Yellow, Van Dyke Brown
Paper That Handles Mixed Media
Bockingford NOT watercolour paper - Excellent tooth for both wet and dry work
Saunders Waterford NOT - Premium option, handles multiple layers beautifully
Fabriano Artistico - Italian paper, superb for mixed media landscapes
Size recommendation: At least A3 (11"x17") for landscape work - larger scenes need space to breathe
Additional Equipment for Outdoor UK Work
- Portable water container - Essential for activating watercolour pencils on location
- Natural sponge - Better than synthetic for lifting and blending
- Kitchen roll/tissue - For lifting colour and creating texture effects
How Do You Create Realistic Tree-Covered Hillsides?
Here's my systematic approach that builds depth and atmosphere from the ground up:
Step 1: Analyse Your Reference for Depth Cue
Before making any marks, study your reference photo or scene:
- Identify the depth layers: Foreground, middle ground, background trees
- Notice colour temperature shifts: Are distant trees cooler (bluer) than near ones?
- Study light direction: Where does light hit the tree masses?
- Find the sky holes: These are crucial for creating believable tree shapes
- Observe atmospheric effects: Do distant areas have less contrast?
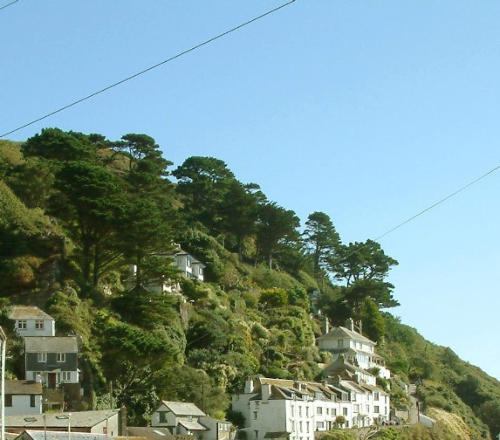 The scene above the harbour in Polperro, Cornwall, UK
Step 2: Plan Your Colour Strategy
This is where success or failure is determined:
- Foreground trees: Warmer greens (yellow-greens, olive tones)
- Middle distance: Neutral greens with moderate warmth
- Background trees: Cooler greens (blue-greens, grey-greens)
- Shadow areas: Always cooler than lit areas in the same depth layer
- Sky holes: Plan these now - you can't add them convincingly later
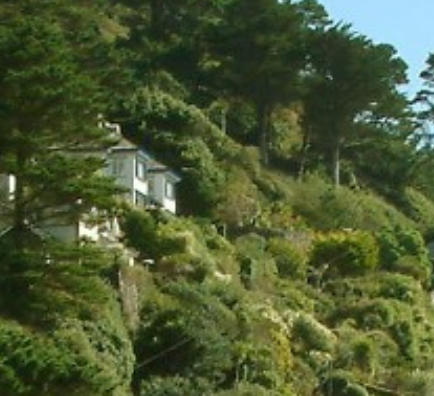 A close up of the hillside
Step 3: Establish the Underpainting with Watercolour Pencils
This is where the magic begins:
- Start with your furthest trees: Use cool, pale colours
- Block in major tree masses: Don't worry about individual trees yet
- Vary the colour temperature: Even within the same distance layer
- Leave sky areas completely untouched - resist the urge to add colour everywhere
- Work light to dark: You can always add more colour later

Step 4: Activate Your Underpainting Strategically
This step creates the atmospheric foundation:
- Use clean water and a clean brush for each colour area
- Work in sections: Complete one area before moving to the next
- Blend colours gently: Let them flow naturally rather than overworking
- Lift colour where needed: Use clean, damp tissue to create lighter areas
- Allow complete drying: This is crucial before adding coloured pencil layers

Step 5: Build Form with Traditional Coloured Pencils
Now we add the convincing detail:
- Start with your darkest shadow areas: This establishes your value range
- Use directional strokes: Follow the natural growth patterns of foliage
- Build up gradually: Multiple light layers rather than heavy pressure
- Maintain your colour temperature plan: Keep distant areas cool
- Add texture selectively: More detail in foreground, less in distance

Step 6: Refine Light and Atmosphere
The finishing touches that make it convincing.
- Enhance your lightest lights: Where sun hits the tree tops
- Deepen your deepest shadows: Usually underneath large tree masses
- Check your atmospheric perspective: Do distant trees look genuinely far away?
- Refine sky holes: These should vary in size and be irregularly shaped
- Add final textural details: Branches, trunk glimpses, but only in foreground

What Are the Critical Success Factors?
- Colour temperature control - This creates depth more than anything else
- Gradual contrast reduction - Distant areas must have less contrast
- Selective detail - Don't try to show everything equally clearly
- Consistent light direction - All tree masses must follow the same light source
- Strategic sky holes - These break up masses and add believability
Why Do My Tree-Covered Hillsides Look Flat and Unconvincing?
Problem 1: No Atmospheric Perspective
Signs: All trees look the same distance away, no sense of depth
Cause: Using the same colours and contrast throughout the scene
Solution: Distant trees must be cooler, paler, and have less contrast than foreground trees
Problem 2: Overworked Watercolour Base
Signs: Muddy colours, lost whites, base layer too dark
Cause: Adding too much pigment or water in the underpainting stage
Solution: Keep watercolour washes light and transparent - they're just establishing colour areas
Problem 3: Inconsistent Light Direction
Signs: Trees seem lit from different directions, confusing shadows
Cause: Not maintaining a clear light source throughout the drawing
Solution: Decide on light direction at the start and stick to it consistently
Problem 4: Too Much Detail in Wrong Places
Signs: Background trees as detailed as foreground ones
Cause: Drawing what you know rather than what you see
Solution: Save detail for foreground only - suggest everything else
How Do I Handle Specific Mixed-Media Challenges?
"My coloured pencil won't stick over the watercolour pencil base"
- Ensure the watercolour layer is completely dry before adding coloured pencil
- Use light pressure initially to establish tooth on the smooth watercolour surface
- Try a different coloured pencil brand - some work better over watercolour than others
- Consider using a fixative spray over the watercolour base (test first)
"Everything looks muddy and overworked"
- You're likely using too many colours in each area
- Stick to 2-3 colour families per tree mass
- Work lighter in the underpainting stage
- Allow more white paper to show through
"I can't create convincing atmospheric perspective"
- Study real landscapes more carefully - notice how much cooler distant areas really are
- Exaggerate the temperature differences more than you think necessary
- Reduce contrast in distant areas significantly
- Add more blue/purple to distant tree colours
"My tree masses look like flat cutouts"
- You need more variation within each tree mass
- Add lighter areas where light hits the canopy
- Include darker pockets where trees overlap
- Remember that tree masses are three-dimensional forms
What About Working Outdoors in the UK?
Managing Changing Light
- British weather changes quickly - take reference photos for colour
- Start with the underpainting on location, finish detail work in the studio
- Overcast days provide more consistent light for extended outdoor sessions
- Early morning and late afternoon offer the most dramatic light for landscapes
Practical Outdoor Considerations
- Bring more water than you think you need for watercolour pencil work
- Pack tissues/kitchen roll for lifting colour and cleaning brushes
- Consider working larger than usual - landscape scenes need space to breathe
How Does This Mixed-Media Approach Fit Into Your Landscape Development?
This hillside tree technique is part of a broader landscape drawing skillset. Here's how it connects to other essential abilities:
Which Foundation Skills Support This Technique?
- Master individual tree drawing first - Understanding single tree structure helps with complex scenes
- Study atmospheric perspective principles - Essential for convincing depth in landscapes
- Understand colour temperature - The key to making distant areas recede
Where Can You Apply This Mixed-Media Approach?
Complex landscape compositions - Perfect for establishing major colour areas quickly
Landscapes with water - Trees reflecting in lakes and rivers
Urban scenes with vegetation - Parks, gardens, tree-lined streets
What Should You Practice First?
Don't attempt a complex hillside scene as your first mixed-media project.
Start with a simple composition: perhaps three trees at different distances, or a single hill with scattered woodland.
Master the colour temperature shifts and atmospheric effects on a manageable scale before tackling complex vistas.
The most important skill to develop is seeing colour temperature differences.
Spend time outdoors just observing how trees change colour as they recede into the distance. This observation is as crucial as the technical execution.
Struggling with Mixed-Media Techniques
Combining watercolour and coloured pencils requires understanding both mediums individually before merging them successfully. If you're finding the technical aspects challenging, there's no shame in stepping back to master each medium separately first.
What specific aspect of this mixed-media approach is giving you trouble?
Whether it's getting the watercolour base right, achieving convincing atmospheric perspective, or managing the transition between wet and dry media, I'd love to help you work through it
Every professional landscape artist you admire had to learn these depth-creation techniques systematically.
The patience you invest in understanding atmospheric perspective and colour temperature will serve you in every landscape you create, regardless of medium.
Ready to Transform Your Landscape Work?
This mixed-media approach opens up possibilities for tackling complex landscape subjects that might have seemed impossible with coloured pencils alone.
Once you've mastered the basic technique, you'll find yourself seeing landscape subjects differently - noticing the subtle colour shifts that create depth, understanding how light unifies complex scenes.
The key is starting with clear intention: know your depth layers, plan your colour temperature strategy, and build systematically from background to foreground.
Trust the process, even when early stages look loose and unfinished.
You might like these
Drawing a landscape in colored pencil - what to include
Drawing a landscape in colored pencil - tips and tutorials for areas such as skies, trees, bricks, stones and tiles
Three tips for drawing clouds and skies with coloured pencils
Tips for drawing clouds and making them look realistic in your coloured pencil artwork. Discover how felt can help you create fluffy clouds
A Beginner's Guide to Drawing Realistic Trees
Step-by-step guide for coloured pencil artists. Learn how to draw trees realistically, from simple shapes to foliage, bark texture and grounded shadows.
Copyright © 2009- pencil-topics.co.uk All rights reserved
Home | About Us | Contact Us | Privacy Policy