- Home
- Landscape drawing
- Drawing clouds
How to Draw Clouds with Colored Pencils
To learn how to draw clouds, build soft shapes and value shifts instead of drawing hard outlines. With coloured pencils, the most effective approaches are felt transfer for fluffy forms, watercolour pencils for quick blended skies, and pastel for a softer base. The best choice depends on your paper, tools, and how much control or speed you want. The guide walks through each method step by step.
What you’ll learn
- How to avoid visible pencil lines in skies
- Three step‑by‑step approaches that build soft edges and depth
- When to choose coloured pencil + felt, watercolour pencils, or pastel
- Simple fixes for paper damage and stray pigment
- Lighting cues that make any sky look real
Quick chooser
- Want fluffy clouds with coloured pencils only? Try Method 1: Felt transfer.
- Need speed and fluid blends? Method 2: Watercolour pencils.
- Prefer a rich, painterly base you can draw over? Method 3: Pastel (including PanPastel).
The key to beautiful cloudscapes lies in subtle shifts of colour, tone, shape and texture. While watercolour and pastel are often used for layered clouds, you can achieve similar results with coloured pencils by adjusting how you put pigment on the paper.
Clouds are one piece of a bigger picture. See how clouds work alongside trees, grass and water in our landscape in coloured pencils page.
1. Fluffy clouds with coloured pencil and felt

Why this works
Pencils make lines; clouds don’t have lines. By moving pigment from a “palette” onto your drawing with felt (or a similar tool), you lay down soft veils of colour rather than strokes. Perfect for airy, fluffy forms.
What You'll Need
- Coloured pencils
- A piece of rough watercolour paper to act as your “paintbox” palette
- White felt, a blending stump or cotton swab
- Kneaded eraser
- Your chosen drawing paper
The Method
- Charge your palette: Use medium‑heavy pressure to lay a thick patch of pigment (e.g., sky blues, greys) onto the rough watercolour paper.
- Pick up colour: Load white felt, a blending stump or a cotton swab from the palette.
- Veil the sky: Gently wipe colour onto your drawing, building values gradually. Keep edges soft; avoid pressing hard
- Clean up: Lift any stray pigment with a kneaded eraser. If needed, shield adjacent areas with a scrap of paper or an eraser shield while you work.
- Reuse wisely: Save the felt for future projects—but don’t mix a “grass” felt with your “sky” felt.
Paper notes and first aid
Softer papers (e.g., Stonehenge, Canaletto Liscio) can lift slightly with rubbing; go gently.
Hot Press watercolour papers like Fabriano have tougher surfaces and are less prone to damage.
If the surface starts to lift, burnish lightly with a white pencil to smooth it.
Extra Use
This transfer approach also works beautifully for distant, grassy fields - just keep tools for sky and ground separate.
2. Clouds and skies with watercolour pencils
Why this works
Water‑soluble pencils such as Derwent Watercolour or Caran d’Ache Museum Aquarelles give you quick, even sky washes with organic flow, then let you adjust light/dark areas easily.
Set up your surface
If you’ll use water anywhere, pick a good watercolour paper.
Papers up to 300gsm should be stretched to prevent buckling. If you’d rather not stretch, choose a heavier sheet of at least 425gsm.
Check out my page on stretching watercolour paper if you haven't done this before.
Palette and colour
As before, use a piece of rough watercolour paper as a palette. Scribble Ultramarine (or a similar blue) generously to create a pigment reservoir.
The Method

- Prepare the sky: Re‑moisten the sky area and let the paper absorb the water for a few seconds.
- Load the brush: Dampen your brush and pick up colour from your palette.
- Let gravity help: Introduce pigment to the damp sky and tilt the board so it flows where you want. You can nudge paths with the brush tip, but embrace a little unpredictability.
- Adjust: Lighten by re‑wetting and lifting colour; deepen by adding more pigment where needed.
- Build form and depth: Keep tops of clouds lighter and suggest soft shadow shapes underneath. Include ground shadows cast by clouds for a sunny‑day feel.
- Don’t panic about trees: If blue drifts into future foliage, it actually adds depth under the greens.
Once your sky is in place, the next step is often the treeline, so this how to draw trees guide will help you build convincing foliage over the top.

In Peter’s sample, he wanted bands of blue between horizontal clouds, so he rotated the board on its side to encourage lateral flow.
Try it for lighting effects too: sunlight, dusk or moonlit skies are all within reach using this method.
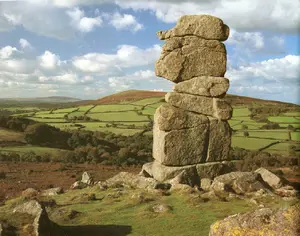
If you'd like to use the same sky approach in a full scene, try this Dartmoor stone landscape tutorial, which shows how soft clouds support a rocky landscape drawing.
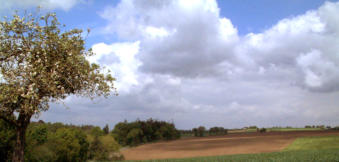
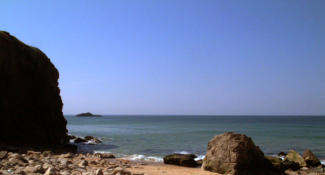
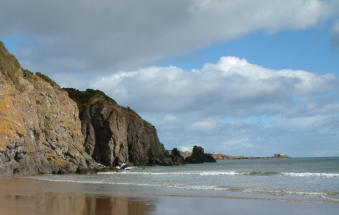
More examples
Below are three further examples of watercolour pencil skies and clouds that explore these ideas in practice.

3. Drawing clouds and skies with pastel
Why This Works
Pastel pencils and PanPastels offer quick coverage, soft blending and a broad colour range. You can lay a pastel base, fix it, and refine with wax‑based coloured pencils on top.
Your options include:
Pastel pencils: Various hardness levels suit different styles and detailing.
PanPastels: Dishes of powdered soft pastel applied with tools/sponges for smooth, even layers.
The Workflow
- Block in the sky with pastel pencils or PanPastel.
- If needed, apply a workable fixative to prevent lift and to add a little tooth.
- Refine cloud edges, accents and details with pastel pencils or wax‑based coloured pencils.
Examples
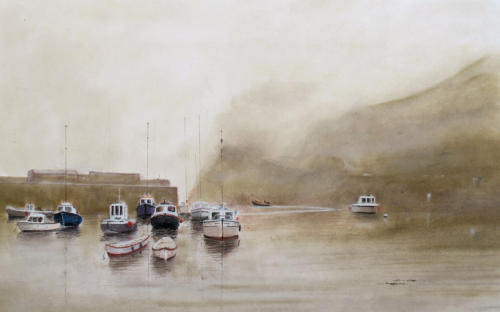
The misty Ilfracombe harbour (UK) scene below, used PanPastels for the background with wax pencils on top.
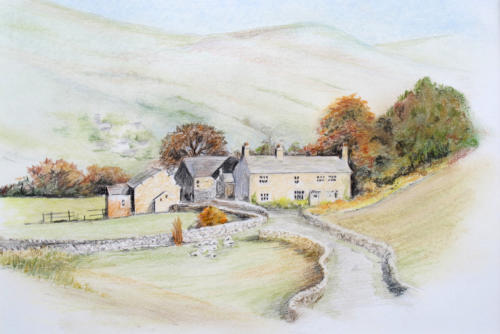
The next picture, features a Lake District farmhouse landscape. Peter built a pastel base and finished with coloured pencils, even though no clouds were present, the method delivered a luminous sky.
Bonus: What is the true colour of the sky?
There is no single answer to this question because the sky comprises many colours, depending on the time of day, the weather and the season. This variation of colour fascinates us.
The dust in the atmosphere affects sky colours, and this bounces back coloured light towards the blue sky. That is why the sky colour changes with the amount of cloud coverage. Artists know this as Aerial Perspective and therefore portray the sky as a deeper blue overhead than at the horizon.
Build your own reference library
Look at clouds and skies in real life and maybe take photos to build into your own personal library of images. In the meantime, study those below.
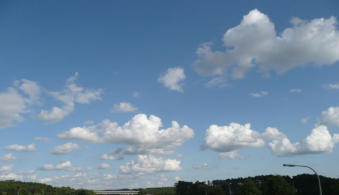
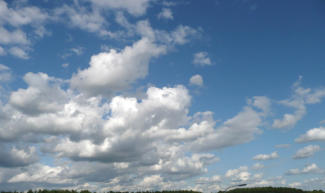
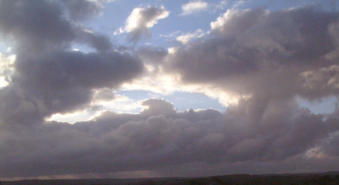
As you can see, skies come in a range of blues, and clouds come in all colours - especially at sunset (although I have never seen a green one!).
Lighting cues that make any sky believable
Keep the light direction consistent across the whole drawing (think where the sun is).
Clouds have form. The side facing the sun is lighter; the opposite side falls into shadow. Also ensure all cloud shadows align with those in the rest of your landscape.
Ready to try this?
Pick one method above and create a 10‑minute sky study today.
Note what worked, then repeat with a different paper or tool to compare.
Peter has shared some wonderful and varied approaches to drawing clouds. I hope his tips inspire you to look at the sky with fresh eyes and experiment with these techniques in your own artwork. Capturing a believable sky can truly transform your landscape drawings. Keep practicing, keep observing, and enjoy the process of bringing your scenes to life! – Carol

I'm Carol Leather, a coloured pencil artist for over 15 years. Most of my teaching comes back to the same idea: realistic coloured pencil starts with structure, light and observation long before the colour goes down.
My work has featured in Ann Kullberg's Color Magazine, CP Magic and Color Pencil Treasures (vol 7). I'm a member of the UKCPS and was a prize winner in the Nature section of their Annual Open Exhibition in 2020.
You might like these
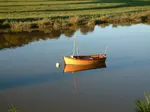
Drawing reflections in water with coloured pencils
Learn all about drawing reflections in water using coloured pencils | Your guide to discovering how they are affected by your viewpoint.
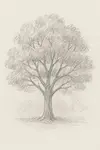
How to Draw Trees That Don’t Look Like Green Blobs on sticks
Learn how to draw realistic trees with a simple 5-step method based on shape, structure, branches, and leaf masses — not individual leaves.
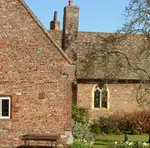
How to Draw Buildings in Coloured Pencil: Bricks & Stone Walls
Drawing buildings in coloured pencil by suggesting bricks, shaping mortar lines and building natural stone textures for stronger landscapes.
Copyright © 2009- pencil-topics.co.uk All rights reserved
Home | About Us | Contact Us | Privacy Policy