- Home
- Landscape drawing
- Drawing a boat
Why Your Boat Drawing Hovers Above the Water
In short
A boat drawing looks as if it floats when three things agree: the hull shape, the waterline, and the reflection. Start with a simple boat shape if you need to, but check where the water cuts into the hull before you add detail.
You are standing on a dock, watching the boats sit low in the water, yet every time you draw one, it ends up hovering awkwardly on top of the lake.
That usually is not because you cannot draw boats. It is because boats ask you to solve two problems at once: the structure of the hull and the behaviour of the water around it.
We will get to reflections, because they do a lot of the heavy lifting. But first, the boat itself has to make structural sense. The shape of the hull tells you where the waterline belongs, and if that is wrong, the boat will look pasted onto the surface no matter how carefully you shade the water.
If you want a quick boat sketch, start with the simple steps below. If you want a realistic boat that belongs in a landscape, keep going into the hull, perspective, waterline and reflection sections. That is where the drawing starts to look believable.
The three things that make a boat look as if it floats
A believable boat drawing depends on three linked decisions. They are simple to name, but easy to miss when you are busy adding planks, windows and ripples.
The hull tells you what kind of boat it is and how much of it should sit below the water. A deep sea boat and a flat river boat do not meet the water in the same way.
The waterline is where the boat disappears into the water. If this line sits too low or too neatly outside the hull, the boat starts to hover.
Reflections, shadows and broken ripples make the water feel as if it is holding the boat, not sitting behind it like wallpaper.
Before you draw details, look at where the hull enters the water. That line is what stops the boat hovering.
The principle: Do not draw the boat first and add water afterwards. Decide how the boat sits in the water, then let every detail support that decision.
A simple boat drawing still needs a waterline
A simple boat drawing is not a separate trick from a realistic one. It is the same problem with fewer distractions. If you can make a plain hull sit in water, you have already solved the part that matters most.
Try this as a quick diagnostic sketch before you work from a complicated reference photo. Keep it plain on purpose. No ropes, no windows, no clever detail yet.
Use the broadest shape you can see: a shallow river boat, a deeper dinghy, or a sharper coastal hull. Do not worry about decoration. You are deciding what kind of form has to enter the water.
Draw the waterline through the boat, not politely underneath it. Let the lower part disappear. This one decision does more for the illusion of floating than most of the details people add later.
Put a small broken reflection directly below the hull. It does not need to be pretty. It only needs to show that the boat and the water are affecting each other.
The point of the simple sketch: You are not making an easy version for its own sake. You are testing whether the boat is held by the water before you spend time on a finished drawing.
How to draw a boat on water
A boat on water needs overlap. The water must hide part of the hull, interrupt some edges, and reflect enough of the boat to make the two belong together.
Picture an iceberg. Most of it is hidden. A boat is not the same, of course, but the drawing problem is similar: you have to decide how much form is above the surface and how much has disappeared below it.
A boat built for a calm river looks different from one meant to cut through ocean waves. A flat-bottomed river boat may sit broad and low. A V-shaped coastal boat may show a sharper bow and deeper sides. If you ignore that difference, the whole drawing can feel a little off even if the outline is tidy.
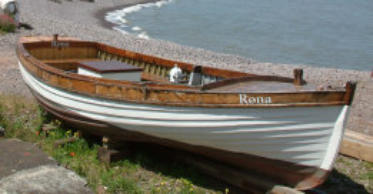
A clinker-built river boat has visible planks and a broad hull shape. Seeing the full bow and stern matters because the waterline has to make sense across the whole boat.
Coastal boats often have stronger bows, deeper hulls and sharper curves.
Before you shade the water, ask: where does the water cut across the hull? That is the line that makes the boat feel held by the water instead of balanced on top of it.
The next two construction methods are here for one reason: they help you place that waterline more convincingly. If the hull is twisted, too wide on one side, or unclear at the bow and stern, the waterline has nothing reliable to cut through.
Carol's check
If a boat looks as if it is floating above the water, cover the details with your hand and look only at the waterline. Very often the problem is there, not in the cabin, ropes or planks.
Keep the hull in perspective with a guide box
A guide box helps you keep the two sides of the hull balanced. It works especially well for simple river boats, but the principle applies to any boat where both sides need to relate to a centre line.
This matters because a twisted hull makes the waterline almost impossible to place convincingly. The water can only hold the boat if the boat itself has a clear structure for the water to cut into.
The box gives you fixed boundaries: the length, the width and the midpoint. Without those, one side of the hull often ends up wider or longer than the other, and you may not notice until the whole boat looks twisted.
A simple box gives the boat length, width and a centre line before you draw the curves.
Even when the boat turns at an angle, the hull still needs to balance around its centre.
Sketch a rectangular box around the space the boat will occupy. Add a centre line at the front and back.
The bow should not drift to one side unless your viewpoint demands it. Use the centre line to keep it controlled.
Let each side answer the other. If one curve changes, check whether the opposite curve needs to change too.
The box takes half a minute to set up and can save you redrawing the whole hull.
Use the figure-eight method for a dinghy or coastal boat
The figure-eight method is useful for drawing dinghies, rowing boats and small coastal boats because it gives you one connected guide shape for the opposing curves of the hull.
It belongs on this page because those curves decide where the waterline can sit. A dinghy with no believable taper at the bow and stern will still hover, even if the reflection is carefully drawn.
The figure-eight is not a magic boat shape. It works because boat hulls are made of opposing curves: port side and starboard side mirror each other, while bow and stern taper in different directions.
If you draw each curve separately, they almost always drift out of balance. The figure-eight gives you a single connected shape that keeps both sides working together before you commit to the final outline.
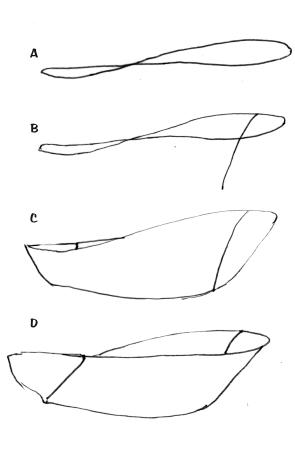
The flattened figure-eight gives you the opposing hull curves before you decide the final view.
Start with the basic outline of the flat figure-eight. Then decide where the bow and stern are. By erasing and redrawing selected lines, the same starting shape can become a boat facing left, right, towards you or away from you.
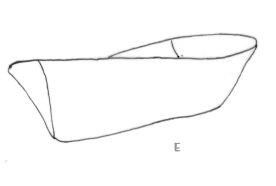
The same starting principle can create a different hull. That is the useful part: you are learning how the curves behave, not copying one outline.
Add construction details for a realistic boat drawing
Only add construction details once the boat is already sitting in the water. Planks, seams and cabin edges can strengthen the form, but they cannot rescue a misplaced waterline.
Boat construction only matters here because it changes the hull shape, and the hull shape decides where the waterline belongs.
A traditional clinker-built boat has overlapping planks that catch the light along each edge. Those thin highlight lines follow the curve of the hull, so they reinforce the three-dimensional shape you have already built.
A modern GRP boat is the opposite: smooth, seamless, with shape defined mainly by reflected light and shadow rather than surface texture. That makes your tonal work more important because there are fewer construction lines doing the job for you.

Side and rear views help you see how the hull curves, tapers and disappears below the waterline.
The point is not to memorise boat-building methods. It is to notice that different construction creates different light patterns on the hull, and that is what you are actually drawing.
Before adding detail: Ask whether each line explains the form. Planks, seams and cabin edges should support the hull shape, not distract from a waterline that has not been solved yet.
Use reflections and ripples to make water hold the boat
Reflections make the water feel connected to the boat. Without them, the water can look like a separate background, even when the hull is drawn well.
In drawing terms, displacement simply means the boat is pushing into the water, not resting on top of it. The waterline is the visible edge where that meeting happens. If the boat is carrying weight, that edge sits higher up the hull. If the boat is light, more of the hull shows.

A small fishing boat partly disappears into the water. Notice how the reflection starts from the hull, not from an invented edge below it.
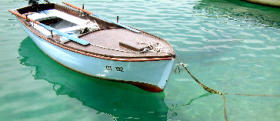
Clear water can show both submerged form and reflection, so the waterline still matters.
Before you think about colour, the boat has to sit correctly in the water. If the waterline is wrong, no amount of beautiful layering will make it feel believable. Get the structure right first, and your coloured pencil work has something solid to build on.
The angle of view
Water changes appearance with viewpoint. From high above, you may see down into clear water. At a lower angle, the surface becomes more reflective and starts mirroring the sky, banks, buildings or boats.
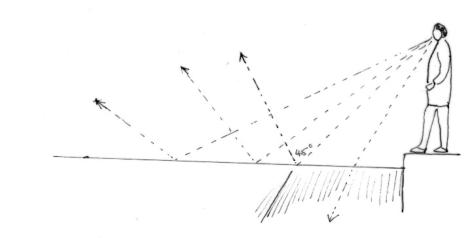
The angle of view changes whether you see into the water or across its reflective surface.
Ripples and broken reflections
Ripples break a reflection because each little wave catches light from a slightly different angle. Lower viewing angles often show darker reflections, while steeper angles may catch more light. It is not a hard rule, but it gives you something to look for in your reference photo.
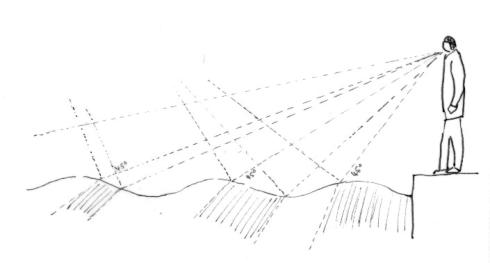
Ripples turn one reflection into a broken light-dark pattern. Draw the pattern first, not every separate ripple.
This is where coloured pencils have an advantage. You can build reflections gradually: light pressure for pale bands, heavier layering for the darks, and small adjustments as you go. If one strip of reflection is too strong, soften the next layer rather than forcing the whole passage darker.
Dark ripples can act like broken shadow.
Curved reflections follow the movement of the water.
Simple light and dark bands are often enough.
How motion and weather change boat reflections
A still boat on calm water may give you a fairly clear reflection. A moving boat, windy weather or choppy water breaks that reflection into fragments.
- Boat speed and wake: a moving boat disrupts the water behind and around it, so the reflection trails, bends or disappears.
- Wind: wind roughens the surface, breaking reflections into shorter marks.
- Light direction: reflected light may be stronger on one side of the boat than the other.
- Water colour: dark water, clear water and muddy water all change how much reflected shape you can see.
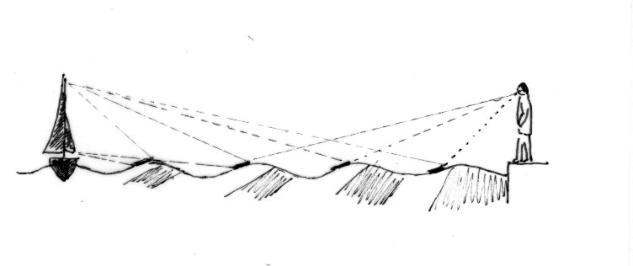
Windy water breaks reflected shapes into shorter, shifting marks.
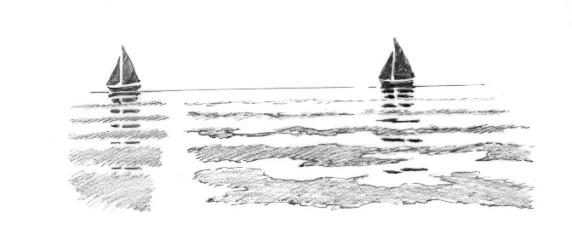
A broken reflection can still line up with the boat if you keep the main anchor points.
Broken reflections look complicated until you stop trying to draw every ripple. Look for the larger light-dark pattern first, then break it up with smaller marks where the water surface changes angle.
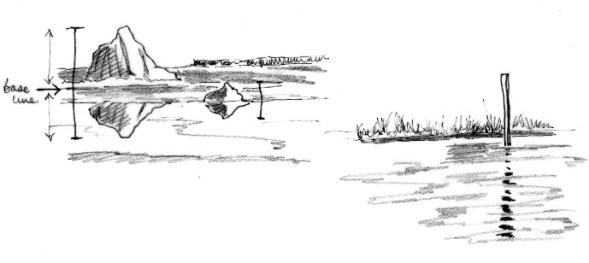
The same reflection logic applies to rocks, posts and boats. Start from the object's base, then let the water break and stretch the reflected shape.
What you are really drawing is the pattern of angles: where the water tilts toward you, where it catches light, and where the reflection is interrupted.
Final reflection check
When a reflection looks wrong, check where it starts, how far it drops, and where the ripples break it. Do those three checks before adding more pencil.
Quick questions about drawing boats
What is the easiest boat to draw?
A simple rowing boat or dinghy is usually easiest because the hull shape is clear. Keep it plain, then test the important part: does the waterline cut into the hull?
How do I draw a boat that looks like it is floating?
Check the waterline first. It should cut into the hull, not sit below it. Then add a broken reflection that starts from the boat and changes with the ripples.
How do I draw a realistic boat?
Build the structure before the detail. Use a guide box or figure-eight shape to control the hull, place the waterline, then add only the details that follow the form.
Do I need to understand boat building?
No. You only need enough observation to notice the hull shape, the widest point, the taper and the waterline. The building details matter only when they explain the form.
Should I draw every ripple?
No. Draw the larger light-dark pattern first. Then add selected smaller marks where ripples break the reflection. Trying to draw every ripple usually makes the water look fussy.
What to practise next
When a boat drawing goes wrong, do not redraw everything straight away. First check whether the hull is partly in the water, whether the reflection starts from the right place, and whether the ripples break it naturally.
Those three checks solve more floating-boat problems than extra detail ever will.
Choose your next fix: If the hull sits correctly but still looks pasted on, work on the reflection first. If the hull itself looks twisted or uncertain, strengthen the perspective before you add more water.
Fix the reflection under the boat
Go here if the hull is drawn well but the boat still looks pasted onto the water.
Strengthen the perspective before the detail
Use this if the boat shape feels lopsided, twisted, or difficult to place at an angle.
When you want to take the same principle into a fuller scene, these examples give you more context around water, buildings, reflections and composition.
Try a canal scene with reflections
A fuller scene where boats, water, buildings and reflections have to work together.
A complete water and reflections example using pastel pencils.
A full harbour scene in pastel pencil, where the glowing sky, the water and the boats all have to work together.
This is one part of landscape drawing where structure matters more than detail. You may also want to return to the main landscape drawing page to see how boats, water, trees and skies work together in a full scene.
Copyright © 2009- pencil-topics.co.uk All rights reserved
Home | About Us | Contact Us | Privacy Policy