- Home
- Fundamentals of Drawing
- Thumbnail sketches
How to Use Thumbnail Sketches (And Why They Change Your Compositions)
Here's a mistake I used to make constantly.
I'd find a reference photo I liked, transfer it carefully to my paper, and start laying down the first layers of colour. An hour in, I'd step back and realise something was wrong. The focal point was lost in a sea of similar tone. The composition was static, everything sitting in the middle. The sky felt too heavy, or too light, or too empty.
I'd already laid down layers I couldn't easily lift. The drawing was committed before I'd really looked at it.
Thumbnail sketches fix that. They're what I wish someone had told me about when I first came back to drawing.
What a thumbnail sketch is

A thumbnail sketch is a small, quick drawing, roughly the size of a thumb (though slightly larger works fine), done before you start the real thing.
Not detailed. Not careful. Just fast: the main shapes, the broad value areas, the basic composition. You're not trying to draw anything properly. You're thinking on paper.
They take five to ten minutes. They cost nothing. And they catch problems that would otherwise cost you hours.
Why they work (the principle behind them)
Most drawing problems are composition problems. And composition problems are almost impossible to see when you're looking at a reference photo, because you're too close to it. You see the subject, not the design.
When you reduce that photo to a small, rough sketch, you strip away all the detail that distracts you. You see the shapes. You see whether the big light areas and dark areas are balanced. You see whether the eye has somewhere to land, or whether it just slides around.
That's the point. A thumbnail isn't a small version of your drawing. It's a composition tool.
How to make a thumbnail sketch
You don't need anything special. A small piece of paper, a pencil or pen. I use a soft pencil. It forces me not to fuss.
Keep them small. Roughly 2–3 inches across. Small forces you to think in shapes, not details.
Work fast. Give yourself three to five minutes maximum. If you're spending longer, you're drawing, not planning.
Start with the format. Draw a small rectangle, landscape or portrait, and work within it. This is your picture plane.
Identify the big shapes first. In a landscape, where does the horizon sit? What's the largest dark area? What's the largest light area? Block these in roughly.
Mark the focal point. Where do you want the eye to go? Make sure that area has contrast: dark against light, or detail against simplicity.
Do several. Usually three to five. Try different crops, different horizon placements, different light source positions. The first one is rarely the best one.
What to look for in your thumbnails
Once you have two or three options, step back and ask:
Does it have a clear focal point? One area that draws the eye, not three areas competing with each other.
Are the value shapes varied? You don't want all mid-tones. A strong drawing usually has a clear light area, a clear dark area, and mid-tones connecting them.
Is the composition static? Everything dead-centre is usually a mistake. Try moving the focal point to roughly one third of the way in from one side.
Does the eye have a path? Leading lines, value contrasts, and open space can guide the viewer around the picture. Look for that in your thumbnails.
Using thumbnails with coloured pencils
For coloured pencil work, thumbnails have an extra advantage: they're where you decide your value plan before you commit to a single layer.
Coloured pencil is difficult to lift. Once you've built up layers in the wrong values, you're in trouble. A thumbnail, done in pencil or pen, lets you work out your darks and lights before they're permanent.
I'll often do a quick value study alongside my thumbnail: just the lightest, mid, and darkest areas blocked in. Takes another five minutes. Saves an hour of trying to recover a drawing that went wrong at the planning stage.
A practical starting point
If you've never used thumbnail sketches before, try this with your next drawing.
Before you transfer your reference to paper, spend ten minutes doing three quick thumbnails:
- The composition as it appears in your reference
- A tighter crop, bringing the focal point closer
- The focal point shifted to a different part of the frame
You'll almost certainly choose a different option than your original reference. That's the point.

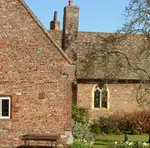
The example above illustrates the purpose of a thumbnail sketch.
It's not a polished drawing, but it helped me decide whether to include a window frame to "frame" the view. After 15 minutes of sketching I decided against the idea. I achieved my goal without wasting time or materials, and I could move on to explore other ideas.
By using thumbnail sketches, I can efficiently experiment with different compositions, saving time and energy in the long run.
This technique allows me to focus on the essence of the artwork, ensuring a stronger final piece.
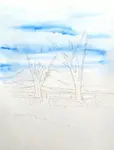
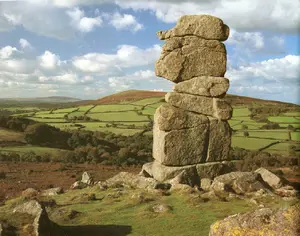
Rearranging the landscape in a thumbnail sketch
When planning a landscape in colored pencil, I experiment with different compositions by moving elements around in my thumbnails. A tall tree on the right in real life might look better near the middle or on the left in my drawing.
I start by placing the horizon line, deciding whether to emphasize the sky or the foreground. I often create thumbnail drawings for both options to see which I prefer.
Achieving balance is crucial, and I avoid crowding elements into one area. This is where drawing has an advantage over photography – I can reposition elements to create a more harmonious composition.
Trying to create a balance in my sketch without crowding everything into one area is important. This is one of the benefits of drawing over photography; just because a tree seeded itself in one position doesn't mean that is where it belongs in my artwork.
Indeed, thoughtfully placing (or repositioning) key elements like trees is vital for a harmonious outcome.
For a real-world example of an artist navigating these very decisions in a landscape, the resulting impact on compositional balance, and the important lessons learned, you might find our process study insightful: Lessons in Landscape: A Watercolour Pencil Background and Composition Study.
Sketching from different angles can be helpful, even if none of the individual sketches feel quite right. By combining elements from multiple sketches, I can create something better than each one on its own.
Thumbnails aren't about precise shapes or details; they're about capturing the essence of an element.
A long, thick line might indicate a tall tree, a rough rectangle a building, and a scribble a bush or hedge. These sketches aren't for transferring outlines to my drawing paper, but for exploring ideas and arrangements.
My thumbnails are private, a messy but essential part of my creative process. I rarely share them, but this page shares a rare glimpse into my sketchbook.
What is a thumbnail sketch for? - Balancing values
In art, values refer to the range of values from dark to light. Achieving a harmonious balance between these tones is crucial for a visually appealing image. To get it right, I rely on thumbnail sketches – a quick and effective way to experiment with different balances of light and dark.
Using a black marker, I block in the darkest areas, leaving the lightest areas as the white of the paper. This simple technique helps me visualize which coloured pencils I will use later to ensure a balanced composition. I might add a dark foreground element, like a river's edge, or extend a line of trees to create a dramatic background.
The area with the greatest contrast will naturally draw the viewer's eye, becoming the focal point. By creating thumbnail sketches, I can test and refine my composition, achieving a harmonious balance of values that guides the viewer's gaze.
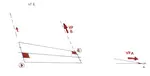
Adjusting Lighting in a Thumbnail Sketch
In addition to rearranging elements, I can also experiment with different lighting setups in my thumbnail sketch.
If my reference photo was taken at a different time of day than the scene I want to depict, I may need to reposition shadows and highlights.
For example, I might want to shift the shadows to a different wall of a farmhouse.
By testing this in my thumbnail, I can make notes and mark the ideal sun position with a symbol, refining my composition before moving forward.
Capturing Perspective with Thumbnail Sketches
Achieving accurate perspective in a scene can be challenging. To overcome this, I sketch the horizon, eye level, and vanishing point of a perspective line in my thumbnail sketch.
This simple step helps me create a drawing with depth, rather than one that looks flat and unconvincing.
When working on location, a thumbnail sketch serves as a valuable guide for the final piece. I use it to experiment with different viewpoints, often walking around to find the most compelling angle.
This process can reveal new and interesting elements, which I might incorporate into my final drawing.

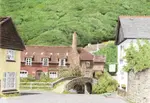
The thumbnail sketch above illustrates this process.
I stood under an arch to frame the view of the stables, adjusting the composition as I worked. I balanced the dark values of the arch with the trees and shadows behind the building, creating a sense of harmony.
This exercise also shows that I don't worry about erasing mistakes – the goal is to explore ideas, not create a perfect drawing.
Thumbnail sketches can benefit artists who work from imagination or create abstract art.
Starting with a small sketch can help develop design ideas and ensure a strong foundation for the final piece.
While I prefer to work from reference, I often transform the original image beyond recognition, demonstrating the flexibility and creative potential of thumbnail sketches.
The Time it Takes to Create a Thumbnail Sketch
A thumbnail sketch typically takes me around 10-15 minutes to complete. I stop once I've extracted the information I need, even if it's not polished.
If a sketch isn't working, I discard it and start anew.
The goal of a thumbnail sketch is to serve as a preparatory drawing for the final artwork, not a standalone project.

I'm Carol Leather, a coloured pencil artist for over 15 years. Most of my teaching comes back to the same idea: realistic coloured pencil starts with structure, light and observation long before the colour goes down.
My work has featured in Ann Kullberg's Color Magazine, CP Magic and Color Pencil Treasures (vol 7). I'm a member of the UKCPS and was a prize winner in the Nature section of their Annual Open Exhibition in 2020.
You might like these
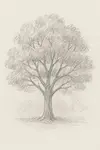
How to Draw Trees That Don’t Look Like Green Blobs on sticks
Learn how to draw realistic trees with a simple 5-step method based on shape, structure, branches, and leaf masses — not individual leaves.
How to Draw Clouds with Coloured Pencils: 3 Methods That Work
Pencils make lines, clouds don't. Learn 3 methods that actually work: felt transfer, watercolour pencils, and soft pastel. Step-by-step for each technique.
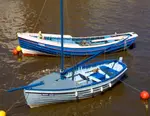
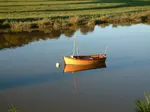
How to Draw a Boat That Actually Looks Like It Floats
Learn why boat drawings hover above the water and how to fix it. Hull shape, waterline placement, and reflections - the three principles that make boats float.


Copyright © 2009- pencil-topics.co.uk All rights reserved
Home | About Us | Contact Us | Privacy Policy