- Home
- Landscape drawing
- How to Draw a Roof
How to Draw a Roof: Tiles, Shingles & Realistic Texture
Before we go further into learning how to draw a roof in coloured pencils, let me ask you a question.
Have you ever looked up at the roof of a house as you walk by? As an artist creating landscapes you will likely find it an interesting exercise. The sheer variety of types, materials, shapes and colours is astounding, and each have their own challenges when it comes to drawing them.
Learning how to draw a roof with tiles (or shingles) is different from a thatched roof for example. Oh and did you know that roofs in different countries can differ for quite sensible reasons when you think about them?
Let's start with tiles.
Drawing different kinds of roof tiles
Take a look at the following six photographs...
 Modern concrete interlocking tiles
 Traditional clay baked tiles
 Hand cut quarried tiles
 Grey quarried tiles
 Mediterranean tiles
 More Mediterranean tiles
As you will have seen from the photographs above, tiles on one roof may look nothing like tile on another.
Obviously the colours differ, but look at the lines between them. The first photo of a modern roof shows tiles that are evenly spaced and arranged in lines (although the bottom edges have a distinctive shape). The clay tiles would have been laid in straight lines originally, but some have shifted and others have fallen off.
The shapes of the quarried tiles on the next two buildings vary but don't have straight edges. The Mediterranean tiles are different shapes yet again with hardly a straight line in sight.
Now can you see how getting those "lines of perspective" when learning how to draw a roog can be more difficult than you may have first thought?
Although I can't give you instructions for how to draw a roof that will apply to every type of material you might encounter, I can offer a guide on how to approach drawing roof tiles in terms of their proportions and perspective.
The first thing to consider is that a roof has tiles which appear larger the closer they are to the viewer and smaller the further they are away. This is a natural law of perspective. Tiles, therefore, obey perspective in two directions.
 Sketch showing the two vanishing points of a sloped roof
In the sketch here, you will see that there are two ‘vanishing points’ ...
- a horizontal on to the right at ‘A’ where the horizontal lines of the roof would vanish if they continued to the distance,
- and the much further away vanishing point at B, up in the sky, where the sloping surfaces would similarly disappear from sight if they went high enough.
As you will see, I have halved the vertical height of the roof and then marked the quarter points. I have then sketched in a single tile at each corner - upper right at C and lower left at D. These are in proportion to the scale of the roof and you can readily see how much larger the left hand and nearer tile is compared to the upper right hand one.
So how on earth do we make sure that we have correctly drawn in all the tiles when learning how to draw a roof? In a couple of words... we don't!
We give an impression of the tiles, making sure that they obey the basic laws of perspective.
Depending on the type of tiles and the height and slope of the roof, there will be a given number of rows of tiles, but we don’t need to go there. Our picture simply needs to give a close approximation of those rows.
Provided we get the shape of the roof correct, and observe the way the lines of tiles run, we can take a section of roof, and mark half way spots along the roof edge, then halve those sections and then halve again. As in the sketch below, the tiles will then observe correct proportion.
 Sketch showing tiles in correct proportion
Have a rough count of the actual number of rows of tiles and judge how to approach the task.
In the study above, I have shown there to be 8 rows of tiles. In fact there were many more, so your next option here would be 16 rows (by halving the spaces shown above).
If you measure 3 equal spaces at each end of the roof when you start - instead of two - and then halve those spaces and halve again, you will finish up with 12 rows (or 24). In fact you will probably only need to show an overall indication of the individual tiles so the essential ones are those nearer to the viewer - in the bottom right hand corner. Horizontal shadow lines and the colour and shading will then tell the viewer that he (or she) is looking at a tiled roof.
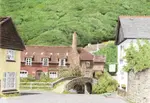
 Photo of Somerset tiled barn
If we are looking at shaped tiles - as in this tiled barn in Somerset UK (above), then there will be clearer shadow lines - which in the case of the image (below) - will show a ripple effect where they overlap. Make sure that your colours show the vertical shapes as well as you can see here the whites and reds.
 Tiles on a barn roof
In French Provence and other warmer climates, more unique shapes to tiles can mean that your shadow lines can run in both directions …..see the pictures below.

 Roofs from French Provence
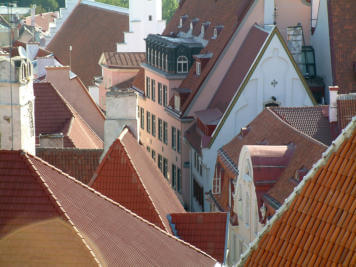
In more northern countries, such as Talinn in Estonia (below) the hard winters mean that roofs need to be steeper to shed snow more easily, so they tend to have more rows of tiles which are similarly ‘U’ shaped to provide a double layer of protection - this time from the cold rather than the heat.
To sum up, when learning how to draw a roof, take some care in working out the approximate number of rows of tiles you need. Then give an impression of the shape of the nearest tiles and the way the sizes and shapes change with perspective.
Put down a pattern in a dark/cool colour to show the shadow areas, then look at the overall colour the roof will display. That colour is important, so get a base coat down over the shadow pattern.
Next, work with the roof in a similar way to the approach you would use with fur on an animal. Keep your strokes going in the direction the tiles are laid. Keep the pencil strokes light and observe any areas where the roof shows up as being much lighter - as in that picture of the Somerset barn.
And above all … don’t get stressed about doing every tile.
A quick look at how to draw a roof that is thatched
Quaint English landscape paintings from the past often incorporated a house with a thatched roof. and you might like to learn how to draw a roof of this type.
Thatch can be created with reed or straw. The finished roof can look superb, keeping the occupants warm in winter and cool in summer. However, if not maintained, it can be attacked by birds and vermin for building materials.
For those of you who are outside the UK, thatch used to be common in England as well as in Brittany and Normandy in France. I have also seen thatch used in Scandinavia.
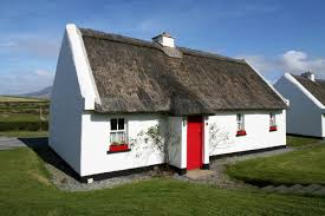
Thatch can still be seen on old cottage properties in rural England, although many thatched roofs have been replaced with modern roofing materials due to the fire risk.
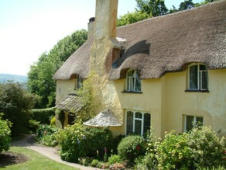
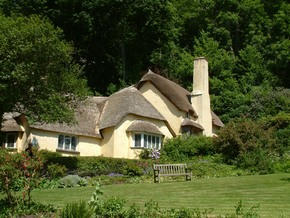
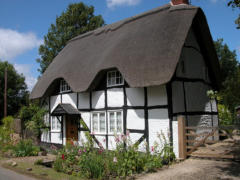
As you will see from the above images, thatch changes colour over time.
Be careful when drawing buildings with thatched roofs to ensure that the grain of the fibres is observed. Also note that thatch often overhangs windows and gives a much darker edge to your roofline.
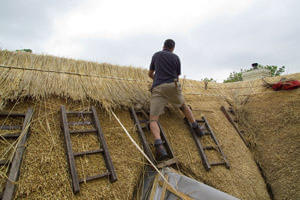
Thatch is laid in layers and the top layer is laid to shed rain, with a top line along the crown of the roof often laid in a pattern. Thatched cottages often have chimneys separated from the roof to keep the risk of fire down. Irish and Scottish thatch is often seen with solid end walls as shown below.
I hope this page has given you an introduction to how to draw a roof on a building.
You might like these
Drawing reflections in water with coloured pencils
Learn all about drawing reflections in water using coloured pencils | Your guide to discovering how they are affected by your viewpoint.
Why Your Trees Look Like Blobs — And What to Do About It
Most trees look like blobs because we try to draw the leaves. This 5-step method starts with shape and structure. It changes everything.
Colored Pencil Landscape Drawing: A Beginner's Guide
Break any landscape into simple sections and draw each one with colored pencils. Covers trees, skies, water, grass and stone using just your starter set.

You might like these
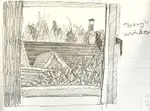
How to Use Thumbnail Sketches to Plan Better Drawings
Most drawings fail at the planning stage. Thumbnail sketches catch composition mistakes before you commit to a full piece. Here's how to use them.
Copyright © 2009- pencil-topics.co.uk All rights reserved
Home | About Us | Contact Us | Privacy Policy