- Home
- Fundamentals of Drawing
- Preparing your coloured pencil drawing
Preparing Your Coloured Pencil Drawing: Planning and Setup Guide
Why A Little Planning Goes a Long Way
You’ve picked your paper, pointed your pencils, planned your project… Wait what?
Yes 10-15 minutes planning can prevent you finding out the left eye is lower than the right when you come to add the nose.
Or that you mistakenly picked up the black pencil instead of the dark indigo.
This page will walk you through a few simple preparation steps you can take before starting your next coloured pencil masterpiece.
What to Consider Before You Start Drawing? (Your Simple Preparation Checklist)
So, you're convinced that taking a few moments to prepare before diving into your coloured pencil drawing is a worthwhile investment! But what exactly should you quickly check or think about during this brief planning stage?
Do a 90-second thumbnail or napkin doodle with no details, just a 2B scribble to block in the highlights, midtones and shadows. Squint - make sure your eye is drawn where you want it.
Time to start putting those fundamentals you learned in the previous hub into action by locking the composition.
1. Confirm Your Composition
- Revisit Your Thumbnail(s): If you created some thumbnail sketches (which I highly recommend!), now is the time to look at the one you liked best.
- Final Composition Check: Are you still happy with the overall arrangement? Have you clearly decided on your Focal Point? Are you comfortable with the Placement of the main elements? Does the overall picture feel Balanced in a way that pleases you? Making these final checks now helps ensure you start your main drawing with a strong, intentional compositional foundation, rather than changing your mind halfway through.
2. Think About Your Basic Value Plan:
- Map the Main Lights and Darks: Here’s a 30-second cheat to find your values: snap a phone pic, use its edit tools to make it greyscale, and squint at the B&W image (or just step 10 feet back and squint at the real thing!). It'll instantly reveal the three biggest zones: highlight, midtone, and dark.
- Learn more about value in drawing.
3. Consider Your Main Colour Ideas (A Rough Guide)
- Overall Colour Scheme: Don't choose every single pencil yet. Just pick your main colour, try it with a warm and a cool neighbour on a scrap of paper, and see which one 'sings' the loudest.
- Will the overall mood be warm (using reds, oranges, yellows) or cool (using blues, greens, violets)? Are there any key local colours you need to capture? Are there opportunities to use complementary colours perhaps in the shadows for more vibrancy?
- Need a refresher in colour basics?
4. Quick Materials & Workspace Check
- Paper: Have you chosen the right paper surface for the look you want and the techniques you might use? Is it securely fastened to your drawing board if necessary?
- Pencils: Are the key pencils you plan to start with nicely sharpened to the type of point you need?
- Tools: Are your essential tools nearby – particularly your erasers (a kneaded eraser is often invaluable!) and sharpener?
- Workspace: Is your drawing area reasonably clear, comfortable, and importantly, well-lit so you can see your colours and values accurately? Need some tips for setting up your workspace.
Taking literally just 60 seconds to ensure your basic materials are ready to go means you won't get frustrated by having to stop and hunt for something just as you're getting into the creative zone!
Doing these simple preparation steps – confirming your composition, thinking roughly about values and colours, and checking your materials are ready – really doesn't take much time at all, but I promise it builds so much confidence and sets you up for a much smoother, more focused, and ultimately more enjoyable coloured pencil drawing session.
Now that you've seen the simple steps that work for any coloured pencil drawing, let’s look at how this preparation plays out in a beginner-friendly subject: the still life....
Planning Example: Setting Up and Composing a Simple Still Life
One of the best ways to practice all the foundation skills we've talked about – basic drawing, value, colour, and especially composition – is by drawing a still life.
Why? Because unlike a landscape or a portrait, you are completely in control of the setup!
- You get to choose the objects,
- Arrange them exactly how you want,
- And control the lighting.
When you plan your still life setup carefully, you are actively planning your composition!
Here’s a simple step-by-step approach you can follow to set up and plan your own still life arrangement, putting those principles into practice:
Step 1: Choose Your Objects Wisely
Start Simple! Especially when you're first practicing setup and drawing, choose just two or three objects with relatively straightforward shapes.
Think fruits (apples, pears, lemons), simple pottery (mugs, bowls, jugs), maybe some blocky books, or simple vegetables (onions, peppers).
Avoid overly complex shapes or very shiny, reflective surfaces (like polished metal) for your first few attempts, as they can be quite challenging.
Add meaning? If you like, you can choose objects that have a personal connection or work together to suggest a simple theme or story – perhaps items related to baking, some favourite art supplies, or objects collected on a walk.
Just ensure the forms are ones you feel reasonably comfortable tackling.
Every choice you make at this stage — the objects, the viewpoint, the lighting — helps create the structure your drawing will be built on.
Step 2: Arrange Your Lighting Deliberately
Single Light Source is Best:
To create clear, easy-to-understand shadows that reveal the form of your objects, try to use a single, distinct light source. A simple desk lamp that you can move around to adjust the angle is often ideal. Alternatively, use strong light coming from a single window (but be aware that natural light changes position and intensity throughout the day!).
Aim for Side Lighting:
Remember our discussion about value and choosing photo references? Lighting coming generally from the side (e.g., top-left or top-right) tends to create the clearest pattern of highlight, mid-tone, and shadow, making the objects look nicely three-dimensional.
Avoid very flat front lighting or confusing multiple light sources hitting the objects from different directions when you're learning.
Step 3: Decide on Your Viewpoint
Where Will You Look From?
Before you finalize your object arrangement, think about where you will be sitting or standing to draw it.
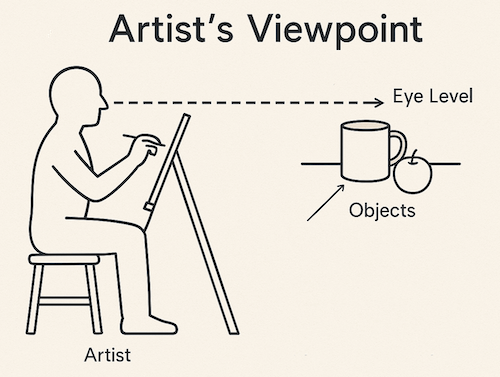
- Will you be looking straight across at the objects (at your eye level)?
- Will you be looking down from slightly above them (meaning you'll see more of the tops of things)?
- Or perhaps looking up from slightly below?
Consider Your Distance:
How close or far back will you be? A closer view creates a more intimate feel; being further back gives a broader overview. Your chosen viewpoint dramatically affects the perspective and how much of each surface you see.
Choose a viewpoint that gives you a clear and interesting view of your chosen objects.
 Choosing your viewpoint is a key part of planning your still life setup. Your horizontal line of sight establishes your eye level in relation to the objects, affecting perspective and what surfaces you can see.
Step 4: Arrange the Objects Thoughtfully (Apply Composition!)
Now, Compose Your Scene! Don't just place your objects down randomly. Consciously arrange them using the Composition Basics we discussed earlier:
- Focal Point: Decide which object is the 'star'. Arrange things so it naturally draws attention.
- Placement: Try placing the main object slightly off-centre, perhaps using the Rule of Thirds intersections as a guide.
- Overlapping: Make sure objects slightly overlap each other! Don't line them up like soldiers with space between them. Overlapping is crucial for creating a sense of depth.
- Grouping & Balance: Arrange the objects into a pleasing group. Often, groups of odd numbers (like 3 objects) feel more natural and dynamic than even numbers. Think about asymmetrical balance – does the arrangement feel stable and visually weighted correctly, even if the sides aren't identical?
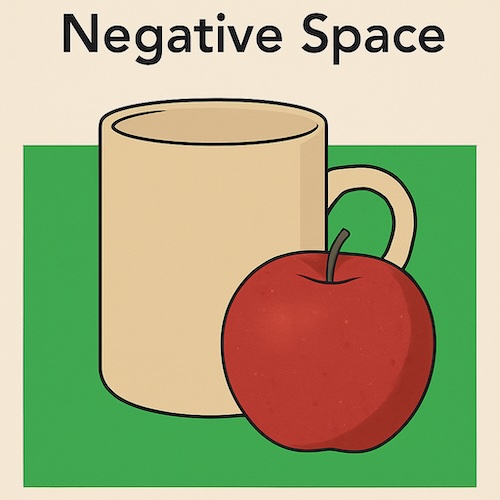
- Negative Space: Pay attention to the shapes of the empty spaces between and around your objects. Are these shapes interesting? Do they help define the objects themselves?
 Paying attention to the negative space around the objects is important when preparing your drawing, helping you with placement and proportion.
Step 5: Choose Your Background Purposefully
Keep it Simple:
Especially for practice pieces, use a simple, uncluttered background so it doesn't distract from your still life objects. A plain piece of fabric draped behind the setup (draping can create nice soft folds!), a simple piece of coloured card, or a plain wall often works best.
Consider Contrast/Harmony:
Think briefly about the colour and value of your background. Will a dark background make light objects stand out? Will a muted background harmonize nicely? Choose something that supports your main subjects.
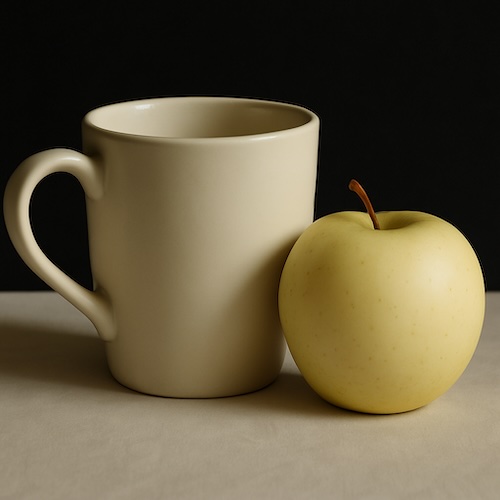
 Notice how the light-coloured mug and apple really 'pop' against the dark background? That's the power of contrast! It helps your main subjects stand out. Also, see how the creamy tones of the mug, the pale apple, and the light surface they're on create a sense of calm and unity? That's colour harmony at work – choosing colours that sit well together for a pleasing result. Both are simple but powerful tools for creating drawings that catch the eye!
Step 6: Do Your Planning Sketches!
Check the View:
Once you think you have a setup you like, look at it from your chosen viewpoint and do at least one quick thumbnail sketch. Does the composition work well in a small format? Does it feel balanced?
Map Values:
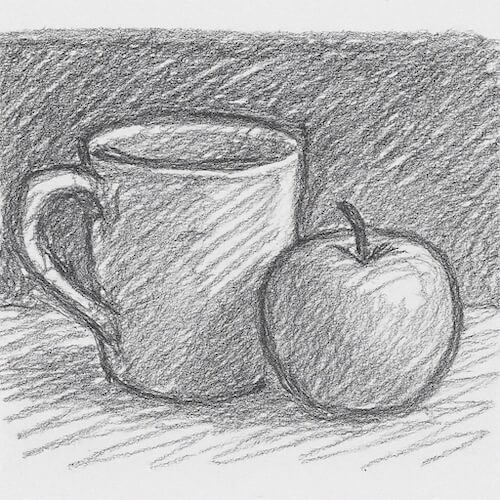
Maybe do another quick thumbnail focusing just on the main light and dark shapes (your value plan).
 Try a quick thumbnail sketch focusing on values, like this one showing our mug and apple. By roughly shading the main areas of light and dark, you create a 'map' for your coloured pencil work. This simple step helps you see the underlying structure of your composition and ensures your subjects will look three-dimensional.
(Optional) Snap a Photo:
As mentioned in the Using Photo References guide, it's often a very good idea to take a photo of your final setup, especially if you used natural light (which will change) or fresh items (which might wilt!). This gives you a consistent reference to work from over potentially many hours of coloured pencil drawing.
Now, Give It a Try!
Why not gather just two or three simple items right now – maybe an apple, a mug, and a book? Find a lamp, arrange them on a plain surface using these ideas, and do a few quick thumbnail sketches. It's fantastic practice in applying all these planning principles!
This careful preparation helps solve many potential problems upfront. But remember, even with the best plan...
A Plan is a Guide, Not a Prison!
Now, after all this discussion about planning your composition, thinking about values, considering colours, and checking your materials, you might be starting to wonder: "Does all this preparation mean my drawing process has to become totally rigid? What happens to spontaneity and just letting the creativity flow?"
That's a completely valid concern, and I really want to reassure you on this point!
Thinking through these planning steps is absolutely NOT about trying to stifle your creativity or lock you into a predetermined path with no room for change.
Think of your simple plan – your chosen composition, your basic value map, maybe your main colour ideas – as being like a helpful map for an enjoyable walk.
The map gives you a clear starting point, shows you the main route, helps you avoid getting completely lost, and ensures you have a general idea of where you're heading.
It gives you the confidence to set off knowing the basic structure of your journey is sound.
But... while you're on that walk, you might spot an interesting flower just off the path that you want to look at more closely! You might decide to take a small detour to admire a view. You might find the weather changes and you adapt your pace.
It's exactly the same with your drawing! Your initial plan is there to:
- Guide your main decisions.
- Solve the big structural problems early on.
- Give you a solid foundation to build upon.
But as you work, you should absolutely feel free to:
- Respond intuitively to how the coloured pencils are layering on the paper.
- Discover unexpected colour combinations that work beautifully.
- Decide to slightly adjust a shape or add a detail you hadn't initially planned.
- Let the drawing evolve organically based on your observations as you go.
That's not deviating from the plan in a bad way – that IS the creative process!
The plan provides the supportive framework; it doesn't put your creativity in a prison. It actually frees you up to be more creative and confident with the execution because you know the underlying structure is sorted.
So, please embrace planning as a helpful friend, not a strict rulebook! Prepare thoughtfully, but then allow yourself the freedom to adapt and enjoy the journey of bringing your coloured pencil drawing to life.
Which brings us perfectly to our final thoughts on preparing for your drawing...
Plan Smarter, Draw Happier!
So, we've seen how taking just a little bit of time before you start applying those beautiful coloured pencils to paper – doing some simple preparation and planning – can make a really significant difference to your results!
Considering your composition, mapping out a basic value plan, thinking briefly about colours, ensuring your materials are ready, and taking care with setting up subjects like a still life – these steps aren't about adding chores; they're about setting yourself up for success.
They help you tackle potential problems proactively, allow you to approach your main drawing work with more confidence, and ultimately, I believe, make the whole creative process smoother and much more enjoyable!
My encouragement to you is to try incorporating these simple planning habits into your own drawing routine.
You don't have to spend hours on intricate plans – often just those 10-15 minutes of thoughtful preparation we talked about can save you much more time and potential frustration down the line. See how it feels for you!
And with that... Huge Congratulations! You have now explored all the core topics within our Foundation Skills Hub!
From understanding the essential Basic Drawing Principles, delving into Value and Colour Basics, navigating Composition, using Thumbnails and Photo References effectively, understanding Perspective, and now thinking about Planning – you've covered the crucial bedrock knowledge needed to build strong, realistic drawings.
Taking the time to build this foundation is a massive step on your coloured pencil journey, and you should be really proud of the effort you've put in!
Now that you have this solid grounding in the fundamentals, you are perfectly prepared and ready to dive into the really exciting part – learning the specific Core Techniques that will help you apply all this knowledge and truly bring your coloured pencil drawings vibrantly to life!
Ready to dive into hands-on techniques?
Explore Core Coloured Pencil Techniques
FAQ
Q: Do I need to sketch before using coloured pencils?
Q: Do I need to sketch before using coloured pencils?
A: Yes. A light sketch helps map out your design and avoid mistakes later. Use an HB pencil lightly to prevent smudging.
Q: What paper is best for coloured pencil drawing?
Q: What paper is best for coloured pencil drawing?
A: It depends on your style. Smooth (hot press) paper works for detailed layering; textured (cold press) grabs pigment better for rich colour.
Q: Should I use a fixative before starting?
Q: Should I use a fixative before starting?
A: No. Fixatives are usually used after you're done. Instead, focus on prepping your surface and using clean, precise strokes.
Q: Can I transfer a sketch onto coloured pencil paper?
Q: Can I transfer a sketch onto coloured pencil paper?
A: Yes. Use graphite paper, a light box, or the "rub-back" transfer method for clean results.
Improve Your Pencil Art: Get Free Tips & Techniques
Sign up for our newsletter – just occasional emails packed with practical advice and inspiration for pencil artists like yourself