- Home
- Landscape drawing
- Drawing Reflections
- How to Draw Realistic Water
How to Draw Realistic Water (Part 2): Applying Expert Advice to the Swirls
Welcome to Part 2 of our series following Daryl Cogavin's inspiring journey in learning how to draw realistic water with coloured pencils!
In Part 1, we saw Daryl courageously share her initial progress and the 'mind-boggling swirl of colours' she faced when contemplating the water. Now, in this installment, we'll explore the expert advice she received from Peter Weatherill and watch as she begins to apply these techniques to her art.
If you missed the beginning of Daryl's story, you can catch up on Part 1: How to Draw Realistic Water: An Artist's Journey.
Peter's Guidance in Decoding the Swirls and Finding a Method
True to Daryl’s hopes, Peter stepped in with his characteristically helpful advice and a practical demonstration.
The approach I usually take with water - especially fast moving or tumbling water like this - is to look closely at the colours and patterns in the reference photo.
In this case, perhaps you might enlarge the tumbling water area of the reference photo to the point where the image starts to pixelate (break up into little boxes of colour). At that stage, come back a step or two and look at the colours closely as they swirl. This may give you the break you need to find the method of how to paint water that suits you.
My own approach is to take a set of very sharp pencils in closely related colours and apply small curving marks that 'squirm' on the paper. I think it might be easier to demonstrate than explain, so give me a little time and I will see if I can post an example here.
He followed up with a helpful sketch and further explanation:
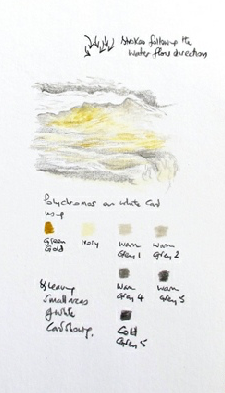 Peter's quick sketch demonstrating his 'squirming marks' technique for water, along with his chosen Polychromos colour palette.
This quick sketch may get you going in the right direction.
I have taken a group of warm greys and Ivory from the Polychromos box and added the universal cure for all ills - Polychromos Green Gold.
The choice for you will need to be matched to the colours available in the brand you are using. See the sample here and tell me if this gets you started. No guarantees, of course!
Actually the green gold has come out a bit bright in the photo - must be down to the bright sunshine outside the window (or the glare off the snow!)
My Notes on Peter's Actionable Insights
Peter’s advice here is golden for anyone struggling with complex textures like water. Let’s break down some of the key takeaways:
- The Pixelation Technique: This is a brilliant practical tip for simplifying an overwhelmingly detailed reference. By enlarging the image until it breaks into colour blocks, you can more easily identify the dominant underlying colours and shapes without getting lost in tiny details. It helps to train your eye to see the bigger picture first.
- 'Squirming Marks' for Movement: Peter’s description of applying 'small curving marks that squirm on the paper' is a wonderfully evocative way to think about capturing the chaotic, energetic movement of tumbling water. It encourages a less rigid, more organic approach to mark-making. The instruction for 'strokes following the water flow direction' on his sketch further clarifies this.
- The Power of Demonstration: Recognising that some techniques are 'easier to demonstrate than explain' is key. Peter’s willingness to provide a quick sketch is a perfect example of effective teaching. Visual examples often bridge the gap where words alone might not suffice.
- Limited Palette for Harmony: His choice of a few warm greys, Ivory, and the versatile Green Gold (Polychromos Green Gold 168, Ivory 103, Warm Grey I 270, Warm Grey II 271, Warm Grey IV 273, Warm Grey V 274, and Cold Grey V 234 are shown in his swatch) demonstrates how a limited, curated palette can create a harmonious and realistic effect. It prevents the colours from becoming chaotic and helps unify the water elements.
- Adaptability is Key: Peter rightly points out that the specific colour choices need to be 'matched to the colours available in the brand you are using'. This empowers you to understand the principle behind the colour choices (e.g., a range of warm greys, a light cream, a versatile green-gold) and adapt it to your own pencil collection, rather than feeling you need to own specific pencils.
- Honest Observation: His candid comment about the Green Gold appearing brighter in his photo due to lighting conditions is a valuable reminder. It highlights that photos (even of our own artwork or swatches) aren't always perfect representations of colour and that we should always trust our direct observation when possible.
Peter’s approach is all about breaking down the complexity into manageable observations and actions, encouraging a thoughtful yet intuitive response to the subject. It’s not about a rigid formula, but about finding 'the method of how to paint water that suits you'.
Peter's thoughtful advice and practical sketch were clearly well-received. Daryl responded:
Oh, thank you for taking the time to do that, Peter, it looks like just the kind of recipe that I need.
I don't have time to give it a go now as I have a sackful of school work to do, but roll on next weekend and I'll give it a go.
Daryl’s enthusiasm to try out Peter’s 'recipe' is a wonderful illustration of how targeted advice can spark fresh motivation. That feeling of ‘Aha! This might be the solution I’ve been looking for!’ is a powerful moment in any learning journey.
It’s also a realistic reflection of how life works for most of us who are pursuing art alongside other responsibilities.
The 'sackful of school work' is a familiar story – whether it’s a job, family commitments, or other studies, finding dedicated time for our creative passions often means looking forward to the next available slot, like Daryl’s 'roll on next weekend.'
This anticipation, however, can also be a valuable part of the process, allowing ideas to percolate before pencil even touches paper.
Group Encouragement and Shared Learning
Other members of the group added their thoughts:
Lynn wrote: This is looking fabulous so far, Daryl. Fascinating as well as I want to learn how to paint water also.
MT Lisa commented: Thank you for the tips, Peter, its very helpful!
Nancy added: Hey Daryl! Love this picture and your progress! I can see I will learn a lot here just by watching. Its looking wonderful so far, keep up the good work!
Daryl then shared an update on her progress and future plans for the piece:
Thanks Nancy. School finished yesterday for a two week break so I managed to get a bit more done today. I’ll get another picture on tomorrow when its daylight.
Next Wednesday we have an appraisal evening at my art group when Jean Canter is coming to give a critique of our work. I'd like to get this finished to hear what she has to say about it.
She's a past president of the SGFA and a member of the UKCPS. A google image search will show the kind of work she does. She does some amazing miniatures amongst other things, often of scenes in the Surrey countryside near where I live.
Nancy responded, familiar with the guest critiquer:
Your'e right, Daryl, Jean has done some fabulous work! I especially love her piece called "The Thames at Remenham". The way she renders skies and water is just incredible.
My notes on The Power of a Supportive Network and Setting Goals
This exchange beautifully illustrates several important aspects of being part of an artistic community and developing as an artist:
- Mutual Encouragement: Positive comments like those from Lynn, MT Lisa, and Nancy provide a real motivational boost. Knowing others appreciate your efforts and are interested in your progress can make all the difference when tackling a challenging piece.
- Learning by Observation: Lynn and Nancy's comments about wanting to learn and learning by watching highlight how sharing your process, even the unfinished stages, can be beneficial to others in the group. It turns an individual effort into a collective learning experience.
- Dedicated Art Time: Daryl’s relief that 'School finished yesterday' and her plan to 'get a bit more done' is a familiar refrain for many artists. We often have to carve out dedicated time for our passion amidst other life commitments. Those focused periods, like Daryl's two-week break, become precious opportunities for progress.
- External Motivators and Deadlines: The upcoming appraisal evening with Jean Canter serves as a clear goal for Daryl. Having an event like this, where a respected artist will be offering a critique, can provide excellent motivation to push through and complete a piece. It adds a sense of purpose and a (gentle) deadline.
- Seeking Expert Critique: Daryl’s decision to get the painting finished for Jean, shows a desire to learn from established professionals. Seeking critique from artists whose work you admire is a valuable step in refining your skills and gaining deeper insights. Nancy's familiarity with Jean's work further underscores the respect Jean commands.
- Shared Knowledge and Appreciation: Nancy’s recognition of Jean's work, even recalling specific pieces like 'The Thames at Remenham,' shows the interconnectedness and shared knowledge within the broader art community. This shared appreciation enriches the experience for everyone.
This snapshot of the group discussion really shows how an art community can function at its best – offering support, sharing knowledge, and providing gentle nudges to keep growing.
Making Headway: Daryl Tackles the Water
Armed with Peter's advice and the encouragement from the group, Daryl ventured into painting the challenging water sections. She shared her experiences of this next stage
I made a bit of progress yesterday, but I am still finding it hard working out what colours to put where, and I can only manage short sessions at a time.
It's getting a bit easier though. Here's yesterday's photo...
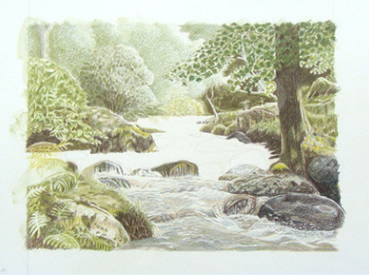 Daryl's painting showing her initial layers and development in the water areas, reflecting her recent progress
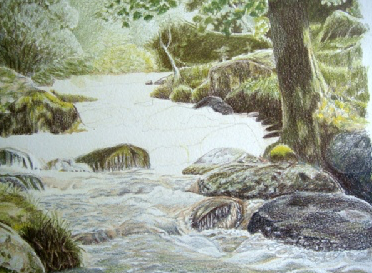 A closer look at Daryl's progress as she moves into the 'tweaking' phase, with initial layers applied across the water and surrounding elements.
My Notes On The Reality Of The Artistic Process
Daryl’s update here really speaks to the day-to-day reality of creating art, especially when tackling something new and complex:
- The Challenge of Colour Interpretation: Her comment about 'still finding it hard working out what colours to put where' is something we all grapple with. Translating the myriad of colours seen in a reference (or in life) into effective pencil strokes requires careful observation, experimentation, and often, a bit of trial and error. There's rarely a single 'right' answer, which can be both freeing and daunting.
- Working in Bursts: The ability to 'only manage short sessions at a time' is a very common scenario. Life often dictates that our art time comes in smaller, focused bursts rather than long, uninterrupted stretches. The key, as Daryl demonstrates, is consistency and returning to the piece regularly, even if it's for shorter periods.
- Acknowledging Small Victories: That little phrase, 'It's getting a bit easier though,' is so significant. Progress isn't always linear or dramatic. Sometimes it's these subtle shifts in understanding or confidence that signal real learning is taking place. Recognizing and valuing these small breakthroughs is crucial for maintaining motivation.
- Persistence Pays Off: Even when finding it hard and working in short sessions, Daryl is persisting and making visible progress. Comparing this image to her previous one, we can now see the initial stages of the water taking form, which clearly shows her dedication.
This stage is all about patient application, learning as you go, and trusting that even small, consistent efforts will build towards the final vision.
Daryl has now successfully applied Peter Weatherill's expert advice, making significant headway in capturing the challenging essence of the water. She's navigated those initial 'swirls' and her painting is truly taking shape!
But what happens when an artist has laid down all their initial layers and it's time for deeper critique and those crucial final refinements?
In the next and final part of this series, we'll see Daryl take her developed piece through this vital stage, act on further feedback, and discover the inspiring outcome of her dedicated work.
Continue to Part 3: Critique, Refinements & A Successful Finish

I'm Carol Leather, a coloured pencil artist for over 15 years. Most of my teaching comes back to the same idea: realistic coloured pencil starts with structure, light and observation long before the colour goes down.
My work has featured in Ann Kullberg's Color Magazine, CP Magic and Color Pencil Treasures (vol 7). I'm a member of the UKCPS and was a prize winner in the Nature section of their Annual Open Exhibition in 2020.
You might like these
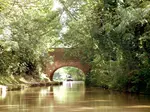
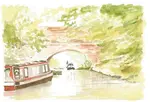
Canal Scene Pt 3: Finish with Coloured Pencil Depth & Detail
Bring your landscape to life! Part 3 of our guide reveals final techniques for a stunning canal scene. Master composition & create art you'll be proud of.
Landscape Composition Painting & Prep (Pt 1): Coloured Pencil Guide
Start your coloured pencil landscape! Part 1: Learn to analyse photo references, improve composition with artistic license & choose your art supplies.
Watercolour Pencil Underpainting (Pt 2): Landscape Guide
Learn watercolour pencil underpainting for landscapes! Part 2 of our guide covers washes, textures & base colours for a coloured pencil art foundation
Copyright © 2009- pencil-topics.co.uk All rights reserved
Home | About Us | Contact Us | Privacy Policy