- Home
- Colour basics
Understanding colour basics for coloured pencil artists
In short
Practical colour theory for coloured pencil: the colour wheel, complementaries for shadows, warm and cool for depth, layering for optical mixing. No formal jargon, just what makes a real difference when you sit down with your pencils.
When I first tried to use colour properly, rather than just picking the pencil that looked closest, I realised I'd been guessing for years. If that sounds familiar, this page is for you.
The term "colour theory" can sound formal and intimidating, but understanding just a few simple basics makes a massive difference in coloured pencil art.
What you'll take away from this page:
- How to pick shadow colours that look natural, not flat or muddy
- Why some layered mixes go wrong, and how to test before you commit
- A simple way to create depth using warm and cool colours
- How to spot the reflected colours that make realistic drawings convincing
No formal theory jargon, just the practical basics that make a real difference. Everything here is specifically about how colour works with coloured pencils, because it doesn't always behave the way paint-based tutorials suggest.
The colour wheel: your colour map
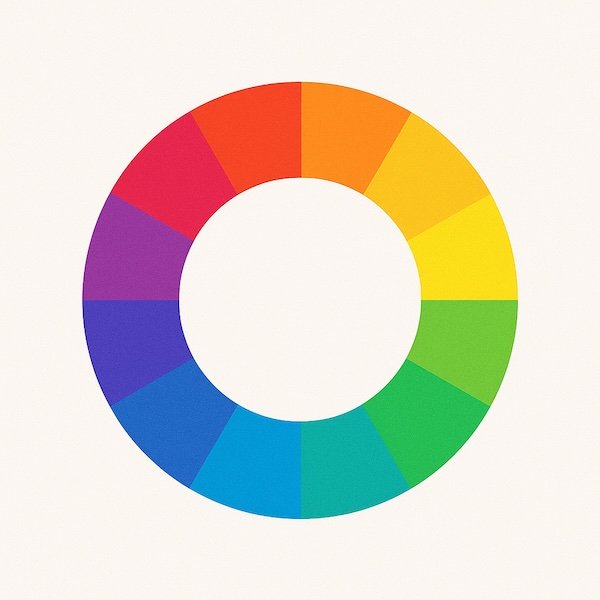
The basic colour wheel
At the heart of understanding colour is the colour wheel. Think of it as a handy visual map showing how colours relate to each other. It's built from three types of colours:
Primary colours are the three "parent" colours: red, yellow, and blue. You can't create them by mixing other colours together. All other colours are derived from these three.
Secondary colours are what you get when you mix two primary colours:
- Yellow + blue = green
- Red + yellow = orange
- Blue + red = violet (or purple)
Tertiary colours are the "in-between" colours, made by mixing a primary colour with a neighbouring secondary colour (red-orange, yellow-green, blue-violet). They fill out the rest of the wheel.
You'll notice your pencil set is mostly tertiaries. Pencils labelled "Burnt Sienna", "Olive Green", or "Blue Violet" are all variations sitting between the main colour wheel positions, and that's exactly what gives you the subtle colours you need for realistic work.
Getting specific: hue, value, and saturation
To really talk about colour like an artist, it helps to know these three key terms:
Hue: the pure colour name we traditionally use, like red, blue, green, yellow. It's the colour's basic identity.
Value: how light or dark a colour is. Think of a pale lemon yellow versus a deep navy blue. Understanding value is crucial for making objects look solid and three-dimensional (we explore this fully on the Understanding Value page). Even with a single coloured pencil, you can create many different values just by changing your pencil pressure or by layering.
(Quick terms: adding white or a lighter colour creates a tint; adding black, a darker colour, or a complementary colour creates a shade.)
Saturation: the intensity or brightness of a colour. Is it a vibrant, intense fire-engine red, or a dull, muted brick red? High saturation means vivid colour; low saturation means the colour is more greyed-out or muted.
Here's why this matters in practice. If you're drawing a red apple, the highlight isn't just lighter red. It's a higher-value, lower-saturation version of the red, often with some warm yellow in it.
And the deep shadow isn't just darker red. It's lower-value, lower-saturation, often with the complementary green or violet layered in.
Understanding these three properties helps you see what's actually there in your reference, instead of guessing.
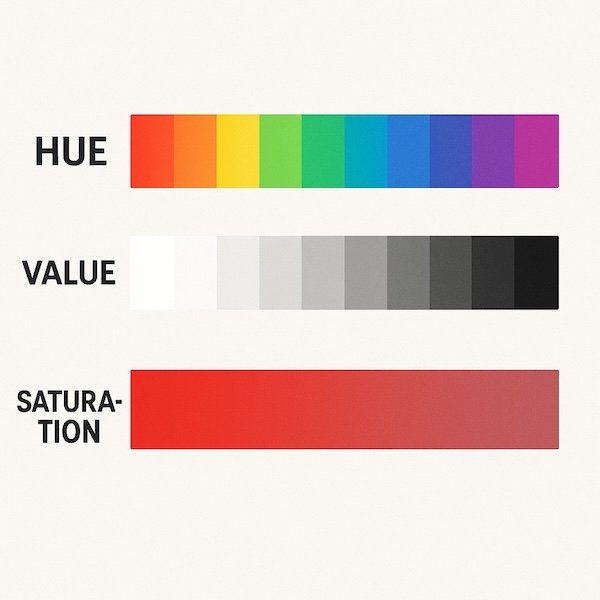
Hue, value and saturation, side by side
How coloured pencils mix: it's all in the layers
This is important. Unlike paint, we can't usually mix coloured pencil pigments before putting them on the paper. Instead, we create new colours and subtle blends through optical mixing.
Layering is key. We apply light layers of different colours one over the other. Because the pencil layers have some transparency, your eye visually blends the colours together where they overlap. The full layering guide covers the technique in detail.
Tinting strength means some colours are stronger than others when layered. Blues and some reds, for example, often have high tinting strength and can easily overpower lighter colours like yellows if you're not careful. This often means it's better to apply your lighter colour first when layering to create a mix.
This catches everyone out at first. If you layer a strong Ultramarine Blue over a soft Cream Yellow expecting green, you'll likely get blue with a faintly warmer cast. But layer that Cream Yellow first, then build the blue over it gradually, and you'll see a believable green emerge. The order you layer matters as much as the colours you choose.
Studio tip
Always test your colour layer combinations on a scrap piece of your drawing paper before applying them to your actual artwork. Different pencil brands behave differently and colours interact in sometimes surprising ways. This simple step saves so much frustration later.
To see these ideas in action, try this limited palette tutorial and notice how optical mixing helps you create more with fewer pencils.
If you use more than one pencil brand, a colour comparison chart can help you choose the closest substitutes before you start testing your layers.
Complementary colours: how to use them for realism
Look directly across the colour wheel from any colour, and you'll find its complementary colour. These pairs are special. The main ones are:
- Red and green
- Blue and orange
- Yellow and violet (purple)
This is the single thing that changed my colour work the most. Once I understood complementaries, I stopped reaching for grey and black every time I needed a shadow.
Mixing rich darks and neutrals
What happens when you layer complementary colours? They neutralise each other, cancelling out brightness and creating muted browns, greys, or rich, deep shadow colours.
I remember the first time I layered violet into a yellow area for shadow and it actually worked. It felt like a magic trick. It isn't, of course. It's just how colour behaves. But after years of defaulting to grey, it genuinely changed what my drawings looked like.
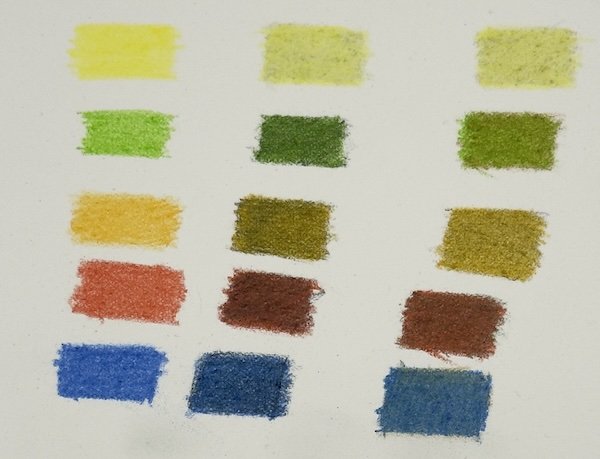
The centre swatch in each pair uses grey or black for shadow. The right swatch uses the complementary colour instead. Notice how much more life the shadows have when you use complementaries. This is the single change that made the biggest difference to my own work.
If you want to explore this further, see What colour is a shadow? for a more detailed look at choosing realistic shadow colours.
Instead of just reaching for a black or grey pencil to shade, try lightly layering the complementary colour into your main colour. It creates much more natural and vibrant results.
Examples: To shade a yellow object, gently layer in some violet. To shade green foliage, layer in some red or red-violet. For orange or brown areas (like skin tones or fur), try layering in blue for the shadows.
Underpainting for depth
Applying a very light layer of the complementary colour underneath your main local colour can make the top colours appear richer and add subtle depth. Learn more about underpainting techniques when you're ready.
Creating contrast
Placing complementary colours next to each other makes both appear more vibrant and creates visual excitement. Use this effect carefully — too much can be jarring.
Warm and cool colours: mood and depth
Colours also have a "temperature". They can feel warm or cool, and this affects both the mood and the sense of space in your drawing.
- Warm colours: reds, oranges, yellows. Associated with sun, fire, energy. Warm colours tend to feel like they advance or come forward toward the viewer.
- Cool colours: blues, greens, violets. Associated with water, sky, shade. Cool colours often feel calmer and tend to recede or move back visually.
Using this for depth
This was one of those things I'd read about and nodded along to, but didn't really use until I tried it deliberately in a landscape. The difference was obvious enough that I wondered why I'd been ignoring it.
To make something look further away (like hills in a landscape), use slightly cooler, less intense colours.
To make something jump forward, use warmer, brighter colours. This is called "atmospheric perspective".
Look at any landscape reference and you'll see this happening naturally. The trees closest to you are vivid greens with visible warm yellows. The hills further back are bluer, greyer, softer.
You're not inventing this effect. You're just noticing what's already there and using your pencils to recreate it.
Mixing matters too
Even within a single colour like red, you can have warmer (more orangey) and cooler (more purplish) versions. Mixing these different-temperature primaries will give you different secondary colours. Worth experimenting with.
Seeing colour realistically: local and reflected colour
This is the hardest habit to break, and I still catch myself doing it.
You know a banana is yellow, so you reach for yellow. But look at a real banana under real light and you'll see greens, browns, cool shadows, warm highlights.
Drawing what's actually there, not what you "know", is what makes the difference between something that looks coloured in and something that looks real.
Local colour: the object's basic colour in neutral light. An apple is red, a leaf is green.
Affected colour: the colour you actually see is rarely just the pure local colour. It's influenced by:
- Light: bright light might make it look lighter and warmer; shadows make it look darker and often cooler.
- Reflected colour: objects pick up subtle reflections from things nearby. A green apple sitting on a blue cloth might have faint bluish tints in its shadow. Look closely at your references for these subtle colour shifts — capturing them adds a huge boost to realism.
Once you start looking for reflected colour, you'll see it everywhere:
- A white cup on a wooden table picks up warm brown undertones on its lower edge.
- An orange sitting near a lemon throws a faint warm glow onto the yellow skin.
These tiny colour shifts are surprisingly satisfying to capture.
Seeing it all together: a green apple on a blue cloth
Let's put these ideas to work with something simple. Say you're drawing a green apple sitting on a blue cloth, lit from the left.
The local colour is green, so you might start with a mid-green like Prismacolor Apple Green or a Polychromos May Green. But that's just the starting point.
Where the light hits on the left side, the green is warmer and lighter. You'd layer in some warm yellow, maybe Cream or Light Chrome Yellow, keeping your pressure light so the green still shows through.
On the shadow side, the green is cooler and darker. This is where complementaries come in. Instead of reaching for a grey or black pencil, layer in a little red or red-violet. It neutralises the green just enough to create a convincing shadow without killing the colour.
Now look at the bottom of the apple, where it sits on the blue cloth. You'll see a subtle cool blue creeping into the green. That's reflected colour. A light touch of the same blue you're using for the cloth, layered into the apple's underside, ties the two objects together and makes the whole thing look like it belongs in the same space.
And the cloth itself? Right next to the apple, it picks up a faint greenish cast from the apple's reflected light.
None of this is guesswork. It's the colour wheel, complementaries, warm and cool temperature, and reflected colour, all working together in one small drawing. Once you start seeing these relationships in your reference photos, you won't be able to unsee them.
Quick win: analogous colours for harmony
Want a simple way to create a pleasing, harmonious colour scheme? Try analogous colours, the ones that sit right next to each other on the colour wheel (like yellow, yellow-green, and green). They naturally feel calm and cohesive together.
This is especially useful when your subject lives in one colour family. Autumn leaves sit naturally in the yellow to red-orange range. A woodland floor in spring is all yellow-greens and greens. Pick three or four analogous pencils, work within that range, and the drawing holds together without you having to think hard about harmony. You get it for free.
Try this
Grab a warm red, a cool red, a warm blue, a cool blue, a warm yellow, and a cool yellow from your pencil set. Create little swatches showing what happens when you layer combinations like: warm red + warm yellow vs cool red + warm yellow. You'll quickly see how temperature affects your mixed oranges, greens, and violets.
Where to go next
Colour theory comes alive when you use it. The moment you see violet neutralising yellow with your own eyes, something clicks that reading alone can't do. Grab a scrap piece of paper and actually try some of these combinations.
From here, the path that works best for most people goes in this order:
- Understanding value in drawing. Value (how light or dark things are) is the single biggest factor in making a drawing look real. Get this right and your colour choices become much easier.
- The essential guide to layering coloured pencils. Now that you understand how colours relate to each other, layering is where you put that knowledge into practice, building richness one transparent layer at a time.
- Blending methods for coloured pencils. Once you're comfortable layering, blending lets you create smooth transitions and subtle shifts between colours.
- What colour is a shadow? Where colour theory really starts to transform your work. You'll use complementaries, temperature, and reflected colour to create shadows that look alive.
- Composition basics. How you arrange your colour choices within the drawing matters just as much as the colours themselves.
For a dramatic way to test how colour, contrast and layering behave, see coloured pencil on black paper. If you use water-soluble pencils, the colour mixing with watercolour pencils guide shows how the same colour relationships play out in practice.
Copyright © 2009- pencil-topics.co.uk All rights reserved
Home | About Us | Contact Us | Privacy Policy