- Home
- What Colour Is a Shadow
What Colour is a Shadow? Painting Realistic Shadows in Coloured Pencil
If you're learning coloured pencils, you've likely wrestled with shadows.
It’s tempting to reach straight for the grey or black pencil, assuming shadows are just… dark. But have you ever stopped to really look?
One of the biggest leaps forward you can make in creating realistic art is understanding that shadows are rarely just grey – they are full of subtle, surprising colour.
Getting shadows right is crucial. They define form, create mood, and make your subjects look solid and believable, rather than flat.
Understanding how light behaves is essential; shadows aren't just an absence of light, but areas receiving less light or light from different sources, often reflecting the colours of their surroundings.
This means shadows have their own colour story to tell.
In this guide, we'll explore exactly what colour a shadow is and how you can paint them realistically with coloured pencils. We'll cover:
- Why shadows have colour in the first place.
- The crucial influence of light sources and reflected light.
- Practical coloured pencil techniques for rendering shadows effectively (including using complementary colours!).
- How to use darks like Payne's Grey and black strategically.
- And, because they are two sides of the same coin, we'll even touch on how highlights contain colour too!
Ready to transform your shadows from dull patches into areas rich with colour and depth?
Let's get started!
Understanding Why Shadows Have Colour
Think back to art class basics. An object appears a certain colour because it absorbs some wavelengths of light and reflects others.
A red apple reflects red light.
But what happens when that apple is partially in shadow?
The area in direct light is illuminated primarily by the main light source (e.g., the sun, a lamp). The shadowed area, however, receives less direct light. Instead, it’s primarily illuminated by indirect light – light bouncing off other surfaces in the environment, and ambient light from the sky (if outdoors).
This indirect, bounced light carries colour information from the surfaces it reflects off.
For instance, if our red apple sits on a vibrant green leaf, the shadows on the apple might pick up a subtle greenish cast from light reflecting off the leaf.
Or, if the apple is placed near a warm, yellow wall, the shadows could take on a faint yellowish or orange hue from the reflected light.
This is why simply adding black or grey to the apple's red colour often looks flat or "dead" – it doesn't account for the complex interplay of reflected light.
The Influence of Light and Environment
Two main factors dictate the colour you'll see in a shadow:
- The Colour of the Light Source(s): Sunlight on a clear day is relatively cool (bluish). Light from an incandescent bulb is warm (yellowish/orange). A fluorescent light might be cool (greenish/blue). The dominant light source will influence the overall colour temperature of the lit areas, and by contrast, affect how we perceive the shadows.
- Reflected Light from Surroundings: This is often the biggest contributor to shadow colour. Objects pick up light bounced off nearby surfaces. Grass reflects green light into the shadows of objects sitting on it. A warm wooden table reflects warm tones. Even the colour of the walls in a room subtly influences the shadows on objects within it. As artists striving for realism, we need to train our eyes to spot these subtle colour differences.
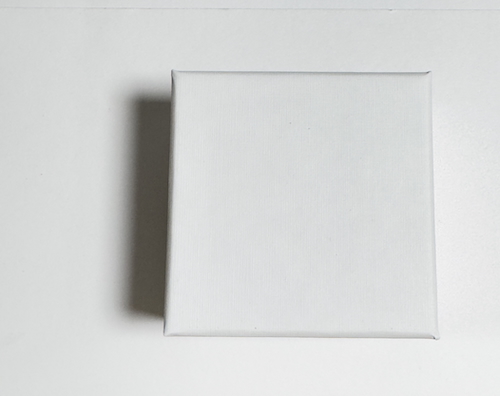
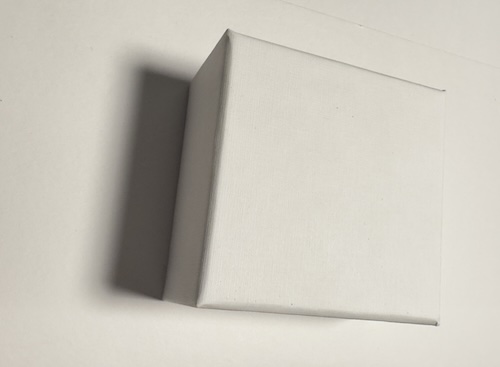
Train your eye! These two photos show the identical white object under different lighting conditions. See how the shadow colour shifts from cool blue to warmer grey-brown? Observation is essential when determining shadow colours in your art!
The "Blue Shift": Why Shadows Often Appear Cool
You might hear artists talk about shadows being "cool" or leaning towards blue. There are a few reasons for this common observation, especially in outdoor scenes:
- Skylight: On a sunny day, areas in direct sunlight are lit by the warmish-yellow sun. Areas in shadow, however, are primarily lit by the cool, blue light scattered from the sky. Our brains perceive this difference, making shadows appear cooler (bluer) relative to the sunlit areas.
- Colour Temperature Contrast: Warm light creates cool shadows, and cool light creates warm shadows (relative to each other). Since daylight is often perceived as warm, the shadows naturally appear cooler by contrast.
- Atmospheric Perspective: In landscapes, distant objects appear cooler and lighter due to atmospheric haze scattering blue light. Shadows on these distant elements will also be affected, reinforcing the cool tendency.
This doesn't mean all shadows are blue, but it's a common tendency worth looking out for, especially outdoors. What's most important, as always, is observation!
Moving Beyond Black and Grey
So, why not just use black or grey? While these have their place (which we'll discuss), relying on them solely for shadows has drawbacks:
- Flatness: Black and grey desaturate colour, making shadows look like holes in the drawing rather than areas with form and subtle colour variations.
- Loss of Vibrancy: Adding black directly to a local colour (like the red of an apple) deadens it, creating a muddy, dull appearance instead of a rich, believable shadow tone.
- Ignoring Reality: It misses the opportunity to depict the beautiful, complex reality of how light and colour interact in the environment.
Learning to mix shadow colours using blues, purples, greens, browns, and complementary colours adds immense depth, realism, and vibrancy to your work – exactly what aspiring realists are aiming for.
Coloured Pencil Techniques for Realistic Shadows
Understanding the theory is one thing; applying it with coloured pencils is another.
Here are some practical techniques I use in my own work:
Using Complementary Colours for Depth
This is a cornerstone technique for creating rich, natural-looking shadows without resorting to black or grey.
Complementary colours are those opposite each other on the colour wheel (red/green, blue/orange, yellow/purple). To learn more check out my guide to colour basics.
When layered lightly, complementary colours neutralize each other, creating muted tones, greys, and browns.
This is incredibly useful for shadows:
- Underpainting: Before adding the object's main colour (local colour), lightly layer the complementary colour in the shadow areas. For example, under a red apple's shadow, layer a bit of green. Under an orange object, layer some blue.
- Building the Shadow: Apply the object's local colour over the complementary underpainting. The colours will optically mix, creating a shadow that looks like a natural darkening of the local colour, rather than a separate grey patch.
- Maintaining Vibrancy: This method prevents the "deadening" effect of black. By using the complement, you retain colour relationships and vibrancy while still indicating shadow.
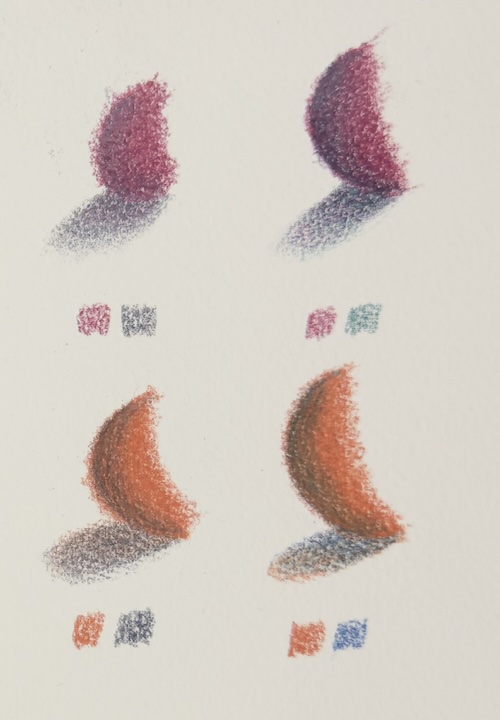 Complementary colours in action! See how using green on red and blue on orange (right) builds more natural shadow depth compared to the flatter look of grey shading (left).
Remember to layer lightly!
Pop back to the layering coloured pencil page in the core techniques hub if you need a refresher.
Heavy application of complements can lead to muddy results.
Plan for your deep shadows from the start by applying these complementary layers with appropriate density where needed.
Since we work on white paper, we can't easily add light back in; we must build our darks convincingly to make the light areas shine.
Choosing Your Shadow Palette (Blues, Purples, Complements)
While complements are key, other colours frequently appear in shadows and work well in coloured pencil. (I use colour names from the Prismacolor Premier and Luminance ranges below).
- Blues: Especially useful for outdoor scenes or where cool skylight dominates (e.g., Ultramarine, Cobalt Blue, Cerulean Blue). Light Cobalt Blue can be great for subtle shadows on lighter surfaces.
- Purples/Violets: Often seen in shadows, especially where warm light hits an object (e.g., Dioxazine Purple, Manganese Violet). They can add richness and depth. Dahlia Purple is useful for deep darks.
- Greens: Reflected light from foliage often introduces greens (e.g., Sap Green, Olive Green). Pale Sage or Dark Green can work well in specific contexts, like animal fur or eye details.
- Browns/Earth Tones: Dark browns like Raw Umber or Sepia are excellent for adding depth to shadows without using black, especially in natural subjects. Burnt Sienna variations can depict warm reflected light.
- Greys: Cool Greys or French Greys can be useful, but layer them with other colours rather than using them alone. Payne's Grey (often a dark blue-grey) is specifically designed to simulate a cool shadow colour and can be very effective when used thoughtfully.
The best approach? Study your reference photo or real-life subject intensely.
Squint your eyes – this helps minimize detail and see the broad shapes of colour and value. Then, mix and layer colours on a scrap piece of paper to find the best combination before applying it to your artwork.
Want a quick recap on values in art, check out this dedicated page.
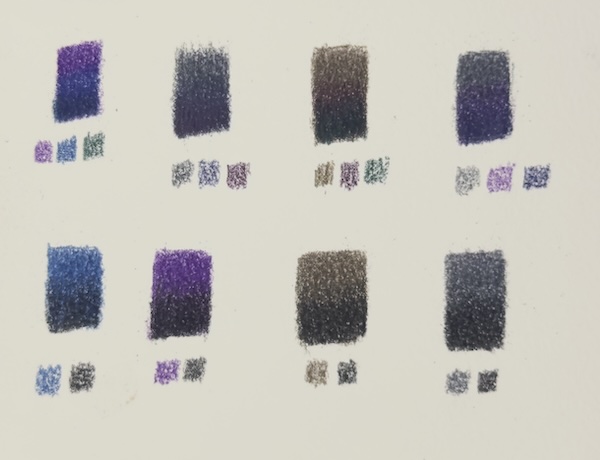 Mix your darks for better shadows! These swatches show how layering colours like blues, purples, dark greens and sepias (top) creates richer results than relying only on black (bottom).
Layering Techniques for Shadow Gradations
Shadows aren't usually flat blocks of colour; they have soft edges and transition smoothly into lighter areas. Coloured pencils excel at this through layering:
- Light Pressure: Build shadows gradually with multiple light layers. This allows colours to mix optically and prevents premature flattening of the paper tooth.
- Vary Strokes: Use small circular (scumbling) strokes or directional strokes that follow the form of the object. Varying direction can help blend layers smoothly.
- Gradual Darkening: Apply more layers or slightly increased pressure in the darkest parts of the shadow (the core shadow) and fewer layers towards the edges where it meets the light (the half-tones).
- Blending (Optional): If needed, use a colourless blender pencil, solvent (carefully!), or a lighter pencil in the shadow colour family to gently blend transitions. Burnishing (heavy pressure blending) should generally be saved for the final stages, if at all, as it seals the paper.
The Role of Payne's Grey and Using Black Effectively
Many artists avoid black altogether, but I find it has its place when used sparingly and strategically. The same goes for pre-mixed darks like Payne's Grey.
- Payne's Grey: As mentioned, this dark blue-grey simulates cool shadow tones effectively. It can be useful layered lightly over other colours or mixed into shadow palettes. Don't use it as your only shadow colour, though.
- Black: I reserve black for the absolute darkest accents in a drawing – think deep crevices, pupils of eyes, the space under an object where almost no light reaches. Adding it as a final layer over other dark colours (like dark blues, purples, or browns) can intensify the deepest shadows and push the contrast, making highlights pop. Never use black on its own to shade a coloured object; it will look flat and unnatural.
Seeing the Colour in Highlights (The Opposite of Shadow)
Just as shadows aren't simply dark, highlights aren't simply white. They are the areas receiving the most direct light, and they often pick up the colour of that light source.
Highlights Aren't Just White
Think about it:
- Sunlight can cast warm, yellowish or golden highlights.
- Cool light from an overcast sky might create cool, slightly bluish highlights.
- A candle flame will cast very warm, orange highlights.
- Highlights can also reflect intense colours from very nearby, bright objects.
Leaving highlights as pure white paper can sometimes look stark or unfinished.
Learning to see and add these subtle hints of colour makes highlights integrate more naturally into the drawing and enhances the overall realism.
Case Study: Finding Colour in Snow
Snow is a fantastic example of how "white" surfaces are full of colour from light and reflections.
Many beginners just see white, maybe adding some grey for shadows.
But look closer!
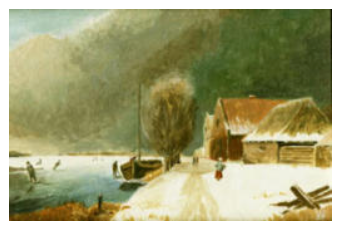 Observe the subtle blues and purples in the shadowed snow and the warm golden light hitting the lit areas in this acrylic scene.
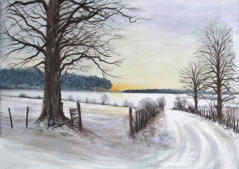 This pastel snow scene clearly shows warm yellows/pinks where the sun hits and cool blues/violets in the shadows, demonstrating the influence of light temperature.
As seen in these examples (one acrylic, one pastel, but the principle applies directly to coloured pencils), snow in shadow often reflects the blue of the sky, appearing cool blue or violet.
Snow touched by direct, low sunlight takes on warm yellow, gold, or even pinkish hues. Observing these shifts is fundamental to painting believable snow – or any white/light object.
Tips for Rendering Highlights in Coloured Pencil
Capturing subtle highlight colours requires careful technique:
- Preserve the White: The easiest way is often to carefully draw around the highlight areas, leaving the white paper untouched initially.
- Lightest Touch: Apply highlight colours (pale yellows, pinks, blues, creams like Buff Titanium) with extremely light pressure. You just want a whisper of colour.
- Layering: You can sometimes layer a very light highlight colour over an initial base layer, but be cautious not to muddy the area.
- Indentation: For sharp, linear highlights like whiskers or strands of hair, you can gently indent the paper with a stylus or blunt tool before adding colour. The pencil pigment will skip over the indentation, leaving a fine white line.
- Lifting Colour: A kneaded eraser or sticky putty can gently lift some pigment to reclaim highlights, but it rarely gets back to pure white on heavily worked areas. A detail or electric eraser can sometimes create sharper highlights.
- White Pencil/Paint: Using a white coloured pencil or a white paint marker/gel pen should be a last resort for the brightest, sharpest highlights. Apply it carefully right at the end. White pencil over dark colours often looks greyish or weak unless heavily burnished.
Conclusion: Observing Light and Colour
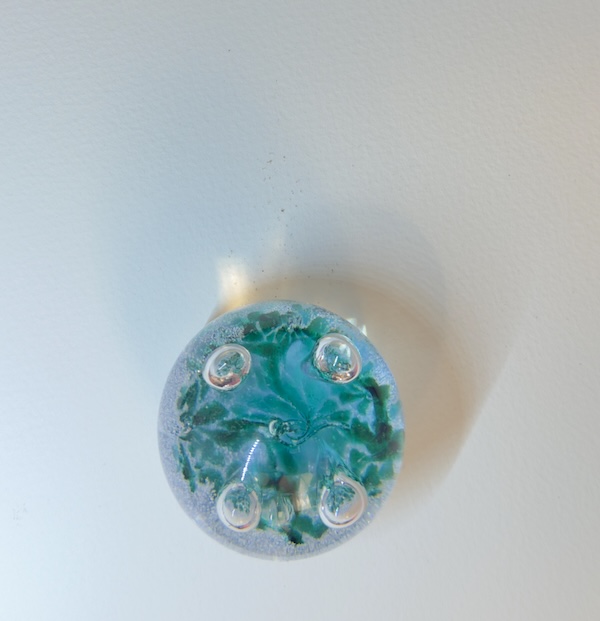 Shadows aren't simple! Notice how the cool bluish light on this glass paperweight results in complex shadow colours – hints of blue above, and warmer tones to the right.
So, what colour is a shadow?
The answer is: it depends! It's rarely just black or grey. Shadows are filled with colours influenced by the light source, the surrounding environment, and the object itself.
Often, they lean towards cool blues and purples, especially outdoors, but warm reflected light can introduce yellows, oranges, or reds. Likewise, highlights pick up the colour of the light hitting them.
The most important skill you can develop as a realistic artist is observation.
Stop assuming, and start truly looking at the colours in the shadows and highlights around you – in real life and in reference photos.
- Practice Exercise: Take a simple object (like a piece of fruit) and place it near different coloured surfaces under various light sources. Spend time just observing how the colours in the shadows change. Try quick sketches to capture these observations.
By understanding and applying these principles, you can move beyond flat, lifeless shadows and create coloured pencil drawings with depth, realism, and vibrancy – work you can be truly proud of!
Ready to explore colour further?
Check out our guide to basic colour theory, or see how shadows play a role in composition.


