- Home
- Beyond Basics
- Watercolour pencils
Using Watercolour Pencils for Beginners: Complete Guide
If you love the control of coloured pencils but secretly envy the loose, fluid look of watercolour, watercolour pencils are the bridge between those two worlds.
They handle like familiar coloured pencils when dry, yet with a touch of water they dissolve into luminous washes - without the mess, toxicity worries, or smelly solvents of traditional paints.
You may notice they feel a bit drier and firmer than your usual wax or oil-based pencils, but that’s simply part of how their water-soluble binders are designed to behave.
In this guide, we’ll look at what makes watercolour pencils different from traditional coloured pencils and how you can start using them confidently in your existing pencil practice.
Using Your Watercolour Pencils Dry - Building Control First
When using them dry, it's often best to apply your strokes with a light hand, especially initially. This gives you more control and makes it easier to build up colour gradually.
A great way to get a feel for this is to try creating a gradient scale on a piece of scrap paper: start with a very soft touch at one end, then gradually increase the pressure as you move across the paper. This will quickly show you the range of intensity each colour has when used dry.
You can also use familiar coloured pencil techniques like cross-hatching (layering lines in different directions to build up tone and texture) or scumbling (using small, circular strokes for a softer, more blended effect) to add depth to your dry work.
Using Your Watercolour Pencils Wet - Turning Lines Into Paint
This is where the real magic happens!
Gently brush a little water over your dry pencil marks to witness their beautiful transformation into lush, painterly washes.
Despite any difference in their dry feel compared to other pencils, you can achieve lovely levels of transparency with watercolour pencils once they are wet.
It's best to use a moist (not soaking wet!) brush, as this gives you better control and helps prevent colours from bleeding unintentionally or becoming muddy.
As with dry use, it’s a good idea to test on scrap paper first to see how your colours intensify and flow when water is added.
Using Watercolour Pencils With Other Media - Underpaintings and More
Looking for ways to integrate watercolour pencils into your coloured pencil workflow?
Using them for an underpainting is an excellent technique to add depth and vibrancy. Learn more by exploring Peter Weatherill's method for a watercolour pencil underpainting in his country lane tutorial
Color Shifts & Derwent Inktense - Why Colours Change With Water
One of the fascinating (and sometimes surprising!) aspects of watercolour pencils is that the colours can change in tint and intensity once they come into contact with water.
This is due to the way the water-soluble pigments behave.
To get ahead of any surprises, I always recommend creating a dry/wet swatch chart for your pencil set. This simple step allows you to clearly see and predict these shifts, understand which pigments might be more transparent or opaque, and plan your artwork more effectively.
One brand that particularly benefits from this testing is Derwent Inktense.
These pencils are unique as they contain water-soluble ink rather than traditional watercolour pigment. The dry colours often bear little resemblance to the incredibly vibrant result once water is added. Crucially, once this ink is wet and then dries, it becomes permanent.
This means you can’t easily re-wet and lift or move the colour, which can be a fantastic advantage for layering washes without disturbing underlying colours, or a point to be very mindful of if you like to make adjustments as you go.
Lightfastness - Making Sure Your Artwork Doesn’t Fade
If you're new to art materials, 'lightfastness' might be a new term, but it's very important for ensuring your beautiful artwork remains vibrant over time.
It refers to the resistance of the pigments in your pencils to fading when exposed to light, particularly ultraviolet (UV) light.
This is especially crucial for watercolour pencils, which often come in bright, vivid colours that could lose their intensity over the years if they aren't lightfast.
When you're choosing your pencils, look for those with a high lightfastness rating.
This is usually indicated on the pencil itself, the packaging, or in the product description, often using a scale (e.g., ASTM ratings I-V, or a star system, or Blue Wool scale 1-8, where higher numbers generally mean better lightfastness).
By selecting pencils with good lightfastness, you can create art that stays true to its original colours for many years to come – which is exactly what you want, especially if you're displaying your work or creating pieces for others.
Choosing Your Supplies - Pencils, Paper, and Essential Tools
Having the right tools when you're starting out with watercolour pencils can really help you enjoy the process and achieve results you're proud of. You don't need a huge amount of kit to begin, but here are my recommendations for the essentials:
Pencils
I'd suggest starting with a good quality brand. Artist-grade pencils like Faber-Castell Albrecht Dürer or Caran d’Ache Supracolor are excellent.
For a good student-grade option, Derwent Watercolour Pencils are also very capable.
Investing in quality generally means better pigment, lightfastness, and smoother application, which really helps your learning.
On a budget? A small set of around 12-24 colours is perfectly fine to start – you can mix a vast range of hues by layering them dry or blending them with water.
Paper
Use good quality watercolour paper, ideally 140lb (or 300gsm) or heavier, as this will handle water applications much better and reduce buckling.
You'll generally find two main surface types:
- Hot-pressed (HP) paper has a smooth surface, which is wonderful for detailed work, like botanical art.
- Cold-pressed (CP or Not) paper has a more noticeable texture, which can add lovely organic effects, especially for things like landscapes.
Other Tools
- Brushes: A good starting point is a synthetic round brush in a medium size (like a size 6 or 8). For more detailed advice on selecting the best brushes for watercolour pencils, please see our choosing brushes page.
- Water Container: A simple jar or pot for water.
- Eraser/Lifting Tools: A kneaded eraser is great for gently lifting dry pigment. For more stubborn areas, low-tack masking tape or a sticky putty like Blu Tack (or the white version, often called WhiteTac) can also be effective for lifting dry colour.
A Helpful Tip: If you already use traditional coloured pencils, you might find it useful to know that some brands, like Faber-Castell (with their Polychromos oil-based pencils and Albrecht Dürer watercolour range) and Caran d’Ache (with their Pablo permanent pencils and Supracolor watercolour range), offer many of the same colours across their different pencil types.
This can make it easier to combine techniques or transition between mediums if you're already familiar with their colour families
Preparing Your Watercolour Paper Surface - Preventing Warping and Buckling
When you're working with watercolour pencils and introducing water, proper preparation of your paper is a step I really recommend you don't overlook.
It’s the way to preventing your paper from warping or buckling, which helps maintain the smooth, flat surface you need to create your best work. The most common way to do this is by stretching your watercolour paper.
Here’s a quick overview of the stretching process:
- Soak your paper: Submerge your sheet of watercolour paper in clean water for about 5 minutes, or until it feels pliable.
- Mount it on a board: Carefully lift the wet paper and place it flat onto a sturdy, waterproof board (like a drawing board or a piece of plywood).
- Secure the edges: Use strong masking tape or gummed paper tape to firmly tape down all four edges of the wet paper to the board.
- Let it dry completely: Allow the paper to air dry flat on the board. This can take 1-2 hours, or sometimes longer depending on humidity. It will shrink as it dries, creating a lovely taut surface.
Once it's fully dry, you'll have a beautifully prepared surface that’s much less likely to buckle when you apply your watercolour pencil washes.
For more comprehensive instructions and tips, please see our detailed guideon on stretching watercolour paper.
Essential Techniques – Core Dry And Wet Exercises To Practice
These foundational skills will help you build confidence and explore the lovely possibilities of your watercolour pencils right from the start.
These essential techniques will give you a great start. When you're ready to explore a wider array of creative methods and dive deeper into how to use your watercolour pencils, see our comprehensive Guide to Watercolour Pencil Techniques.
Dry Techniques:
These are methods you can use before any water is added, drawing on traditional coloured pencil skills.
Gradient Scale:
This is a wonderful exercise for control. Start with very light strokes on your scrap paper, then gradually increase the pressure as you draw a small band of colour. This helps you see the full range of intensity your pencil holds and master smooth transitions.
Layering:
Gently apply one colour over another to build up rich, complex hues. Using light pressure for each layer is key, as it keeps the paper surface open and makes blending easier, whether dry or wet.
Dry Blending:
You can soften edges and mix colours even without water. Try using a paper blending stump, a tightly rolled cotton swab, or even (very carefully with clean hands!) your fingertip for small areas to gently merge your dry pencil marks.
Cross-hatching:
This involves drawing sets of fine parallel lines and then layering more sets at different angles (for example, vertical lines, then horizontal, then diagonal). It’s a classic way to build up areas of tone and create a sense of texture.
Scumbling:
Another useful dry method where you apply colour using small, irregular circular or scribbled marks. This can create soft, broken textures or be used to gently blend adjacent areas of colour.
Wet Techniques:
This is where you'll see your pencil marks transform into paint!
Creating a Light Wash:
This is often your first magical step into the painterly world of watercolour pencils!
Gently brush water over your light dry pencil strokes to see them dissolve into a soft, translucent, and often beautifully even wash of colour.
Using a moist (not soaking!) brush gives you the best control, allowing you to create delicate and luminous effects.
Blending Colors with Water:
Watch your colours mingle and flow! Draw two different colours side by side on your paper, perhaps overlapping them slightly.
Then, with your moist brush, gently coax the water from one colour area into the other.
You’ll see them merge beautifully, creating smooth, flowing gradients and new, subtle hues, much like traditional watercolour paints.
Tissue Dabbing for Texture:
For a different kind of effect, apply your dry pigment as usual, then take a piece of tissue or kitchen paper, moisten it very lightly, and gently dab it onto the dry colour.
Some pigment will lift, leaving behind soft, dappled textures. This can be wonderful for creating effects like distant clouds, soft foliage, or textured walls.
Always test on scrap paper first to get a feel for how much moisture you need on your tissue.
Quick Exercise: Your First Blend (Simple Leaf)
Let's try a simple leaf:
- Lightly sketch a leaf shape.
- Colour one half with a yellow pencil and the other half with a light green, letting the colours meet in the middle.
- Now, take your moist brush and gently stroke along the length of the leaf, starting from the yellow and moving into the green. Watch them blend! This little exercise helps you practice layering, controlling your wet brush, and seeing how the colours merge
Your First Projects - Putting Your Skills into Practice
Ready to see what your watercolour pencils can do? Starting with a guided project is a wonderful way to build your confidence and get a real feel for the techniques.
Ready to paint your first picture? Try our step-by-step pears tutorial.
This exercise is specifically designed for beginners.
You’ll get to practice the essential skills of layering colours (we suggest starting with simple greens and yellows for the pears) and then experience blending them with water.
It’s a simple, enjoyable project that really helps build confidence in handling both the dry and wet aspects of your watercolour pencils.
Tips and Troubleshooting - Common Beginner Problems
Muddy Colours
Often caused by too much water or overworking an area. Try using less water on your brush and lighter pencil strokes.
If an area becomes too wet, you can gently blot the excess with a clean piece of kitchen paper or a soft tissue before it dries.
Harsh Lines
If your original pencil lines are too hard to dissolve, it usually means the pigment was applied with a bit too much pressure.
Next time, apply your dry colour more lightly. If lines persist, try gently coaxing them with a moist (not wet) brush, working along the line to soften it.
Mistakes (Dry)
Before you add water, dry watercolour pencil marks can often be lifted. Try a kneaded eraser first (dabbing rather than rubbing).
For more stubborn pigment, carefully press low-tack masking tape or a piece of Blu Tack (or WhiteTac, which is often stickier) onto the area and lift gently.
Mistakes (Wet)
If you make a slip with wet paint, try to blot it quickly with a clean, absorbent tissue.
Note: Derwent Inktense pencils are permanent once dry.
With most other watercolour pencils, however, you may find you can often re-wet and lift or move some colour even after it has dried, though this varies by brand and how heavily the pigment was applied.
Test on scrap first!
Limited Colours
Don't feel restricted by a small set of pencils!
You can create a vast array of new shades by layering different colours when working dry, or by blending colours together with a wet brush on your paper or a separate palette.
More Handy Tips - Habits That Improve Every Drawing
Test First, Always
Before committing to your main artwork, quickly try out your colours, your water application, and any new techniques on a scrap piece of the same watercolour paper. This can save a lot of surprises!
Adjust Later with Layers
Once your watercolour pencil washes are completely dry, you can often add further layers to refine your work. Try applying more dry watercolour pencil for subtle adjustments, or you can even use your traditional wax or oil-based coloured pencils over the top to add finer details, deepen shadows, or introduce different textures.
Good Brush Control is Vital
Always aim to use a moist brush rather than one that's soaking wet – wipe any excess water on the side of your water pot or a piece of tissue. This gives you much more precision.
And a practical note
if you find you need to "scrub" at pigment to get it to dissolve (which can happen with some pencils or papers), it's best to use an affordable synthetic brush for this, reserving your delicate sable brushes for more gentle work.
Paper Texture Matters
As you practice, you'll notice how different paper surfaces affect your work.
As we mentioned in "Choosing Supplies," Hot-pressed (smooth) paper is excellent for fine lines and detail, while Cold-pressed (textured) paper can enhance washes and add more organic effects.
It's well worth testing both to discover your preference for different subjects.
Next Steps and Continued Learning - Where to go From Here
This guide has given you a fantastic foundation in watercolour pencils, but your creative journey doesn't stop here!
Here are a few ways to keep growing your skills and exploring this versatile medium:
Experiment with Different Surfaces (When You're Ready)
Once you're very comfortable working on watercolour paper, you might find it exciting to see how your pencils behave on other prepared surfaces, like specially primed canvas or sealed wood panels.
These can offer unique textures and lead to some really interesting artistic effects.
Always remember to test a small area for water absorption and how the pigment interacts with the surface first
Dive Deeper into Techniques
Ready to expand your repertoire?
Explore a wider range of methods, including more advanced applications like shaving pigment for unique textures or creating a paper palette, on our creative watercolour pencil techniques page.
Ready for a more challenging project?
Learn to compose and paint a hillside landscape where you can apply these watercolour pencil techniques to create convincing outdoor scenes with multiple trees and natural depth.
Connect with Fellow Artists
Joining online art communities or local groups can be a wonderful way to share your work, get helpful feedback, find inspiration, and connect with others who share your passion.
Remember, the key to progress is practice and experimentation.
With each piece you create, you’ll learn something new. Keep exploring, keep creating, and soon you’ll be producing vibrant, lasting art that truly showcases your unique style
You might like these
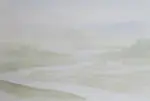
Watercolour Pencil Background Study & Lessons | Pencil Topics
Learn to paint atmospheric watercolour pencil backgrounds. A unique process study covering technique, composition, and learning from artistic challenges.
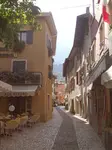
Watercolour pencil tutorial - Italian Street Scene
A step-by-step demonstration showing how to create an Italian street scene using watercolour pencils from Caran d'Ache
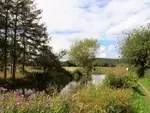
Watercolor Pencil Painting Of Coventry Canal - Step By Step
Watercolor pencil painting techniques used to depict an English canal scene. Step by step tutorial for water soluble pencils
Copyright © 2009- pencil-topics.co.uk All rights reserved
Home | About Us | Contact Us | Privacy Policy