- Home
- how to use watercolour pencils
How to Use Watercolour Pencils: Creative Techniques and Expert Tips
Welcome! If you've enjoyed learning the basics of watercolour pencils with our Beginner’s Guide to Watercolor Pencils primer page and are now ready to explore the amazing versatility of this medium in more depth, you're in the right place.
This guide is designed to walk you through a variety of creative techniques, from core brushwork methods to more experimental ways of applying and manipulating your water-soluble colours.
We'll explore how to achieve different effects, manage your materials for the best results, and troubleshoot common challenges, helping you to unlock even more of the artistic potential held within your pencil set.
So, grab your pencils, some stretched watercolour paper, and let's explore the wonderful world of watercolour pencil techniques!
Quick Reminders Before Tackling Wet Techniques
Before we dive into the various ways you can apply water and create beautiful effects, let's quickly revisit two foundational habits.
These are especially important for getting the best results from the techniques we'll explore on this page:
Confirm Your Colours' Wet Appearance
As you'll know from our Primer page - Section 1: Understanding Your Pencils, specifically the Color Shifts part, watercolour pencils can transform quite dramatically when water is added – colours can intensify and even shift in hue.
Before starting a piece using the techniques below, especially if you're aiming for precise colour combinations or layered washes, it's always a valuable habit to quickly re-test your chosen palette on scrap paper.
This ensures you have their wet appearance fresh in your mind and can anticipate how they'll interact.
 See the transformation! Testing your watercolour pencils, like these swatches (using Caran d'Ache Museum Aquarelle), is a vital step before you begin your main piece.
Light, Even Dry Application is Key for Wet Effects
We touched on the importance of a light hand in the Primer.For the wet techniques we're about to explore, this becomes even more important.
Applying your dry watercolour pencil pigment lightly and evenly allows the water to fully dissolve the colour, leading to smooth, beautiful washes and seamless blends.
If the dry pigment is pressed too hard into the paper fibres, it can be very difficult for the water to lift and move it all, potentially leaving those original pencil lines visible even after wetting.
So, for best results with the methods on this page, always aim for that gentle initial application.
Working Dry: Preparatory Techniques and Corrections
Before you even think about reaching for your water brush, there are several useful techniques you can employ with your watercolour pencils in their dry state. These can help you lay a good foundation, create subtle blends, or make adjustments to your initial drawing.
Many of these build on standard dry coloured pencil skills, and they are invaluable for getting your artwork just right before committing to wet application.
Dry Blending Your Watercolour Pencils
While the main allure of watercolour pencils is their ability to be blended with water, you can certainly achieve some lovely soft blends and transitions while they are still dry.
This is particularly useful for creating subtle gradations, softening areas before a very light wash, or for effects where you want to maintain a more traditional pencil texture
Because watercolour pencils often have a slightly harder or drier core than many purely wax-based coloured pencils (due to their water-soluble binders), dry blending might yield a more subtle effect, but it's definitely a technique worth exploring in your watercolour pencil work.
- Using a Paper Blending Stump or Tortillon: These are essentially tightly rolled paper tools that you can use to gently rub over your dry pencil marks. Use a light touch and a circular or back-and-forth motion to smudge and blend colours together or to soften distinct edges. Remember to keep your stumps clean for the best results by rubbing the used tip on a piece of scrap paper or a fine sandpaper block to remove excess pigment.
- You can learn more about paper blending stumps here.
- Cotton Swabs (Buds): A simple, clean cotton swab can also be used for gentle blending, especially in smaller or more delicate areas. It will generally create a softer, more diffused blend compared to a paper stump.
- Fingertip Blending (with caution!): For very small areas or if you've applied the pigment very lightly, you can sometimes use a clean, dry fingertip to gently smudge the colour. However, always be mindful that oils from your skin can transfer to your paper, which might affect how subsequent water applications behave or how the paper ages. If you choose to use this method, do so sparingly and always ensure your hands are impeccably clean and dry.
Lifting and Correcting Dry Pigment (Before Water!)
One of the significant advantages of working with watercolour pencils is that you often have a good window of opportunity to make corrections, lift colour, or make adjustments while the pigment is still in its original dry state.
This is crucial because once water is added, the pigment behaves much more like paint and can be significantly harder (or, in the case of ink-based pencils like Derwent Inktense, impossible) to remove completely without affecting the paper.
So, addressing any issues before wetting is always my first recommendation.
- Kneaded Eraser (Putty Rubber): This is probably your most versatile tool for gently lifting dry watercolour pencil pigment.
Instead of aggressive rubbing (which can damage your paper surface), try dabbing, rolling, or pressing the kneaded eraser onto the area you want to adjust.
You can shape the eraser to a fine point for lifting out precise details or highlights, or use a broader area for lightening larger sections.
- Low-Tack Masking Tape or Artist's Tape: If you need to lift a larger area of dry pigment, or if the colour is a bit more stubborn than a kneaded eraser can handle, low-tack tape (like painter's masking tape or specific artist's tapes) can be very effective.
Gently press a piece of the tape onto the pencil marks you want to remove, and then carefully peel it away. Much of the loose pigment should lift off with the tape.
It's always a good idea to test the tape on a scrap piece of your specific paper first, just to ensure it isn't too strong and won't tear or damage the paper surface when removed. - Blu Tack or WhiteTac (Sticky Putty): Reusable sticky putties like Blu Tack – or even better, the often stickier WhiteTac – can also be excellent for lifting dry pigment.
Simply press a small, clean piece firmly onto the area you want to correct and then lift it straight up. It's often more effective than a standard eraser for pulling pigment out of the paper's tooth without smudging.
You can usually find WhiteTac online if it's not readily available in your local shops.
Remember, these dry correction methods are your best friends for making changes cleanly.
Once water touches the pigment, you're moving into the realm of watercolour painting, and corrections, while sometimes possible, become a different challenge altogether!
Core Technique: Activating Pigment with a Brush
Perhaps the most fundamental and widely used method for transforming your dry watercolour pencil marks into paint is by activating them with a brush and water.
It’s where the true "watercolour" aspect comes alive, allowing you to create smooth washes, blend colours beautifully, and achieve a range of painterly effects.
While seemingly straightforward, there are a few key approaches and tips that will help you learn this core skill.
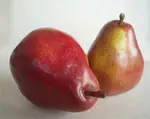
See these techniques in action in our Beginner Pears Tutorial.
Direct Application: Wetting Pigment on Your Paper
This is often the first method artists try. It’s beautifully simple:
- First, you apply your watercolour pencil colour to your paper as you normally would for a dry drawing.
- Then, take a damp (not soaking wet!) brush and gently stroke it over the dry pencil marks. You’ll see the pigment dissolve and begin to flow like watercolour paint.
- You can use your brush to spread the colour, blend it into adjacent areas, or create soft washes.
Key Considerations for Brushwork with Watercolour Pencils
No matter if you're wetting pigment directly on your paper or working from a palette, learning a few key aspects of brushwork will significantly improve your results with watercolour pencils:
Brush Moisture is Crucial - Think Damp, Not Soaking
Always aim for a brush that is moist rather than soaking wet. Too much water can quickly lead to colours bleeding out of control, creating puddles, or making your colours look diluted and washed out.
A good habit to get into is to dip your brush in your water pot, then gently wipe any surplus water on the rim of the pot or on a piece of clean kitchen paper or a soft cloth before you touch it to your pencil marks or your palette.
This gives you much more control over where the water goes and how the pigment dissolves.
(Don't forget, we have a dedicated guide on choosing brushes for watercolour pencils if you need more advice on brush types!)
Managing Excess Pigment and Creating Effects While Wet
- Blotting Away Too Much Colour: If you've applied a wet wash and find it’s a bit too dark, too intense, or there's simply too much water sitting on the surface, you can often lift some of it while it's still damp.
Gently blot the area with a clean, absorbent piece of kitchen paper or a natural sponge. Be gentle – dabbing is usually better than rubbing.
- Creative Lifting For Effects (Clouds): You can use this blotting technique to create lovely soft effects. For instance, after laying down a blue wash for a sky, while it's still glistening wet, try gently lifting out soft cloud shapes using a wadded-up piece of tissue. This can create beautifully subtle and natureal-looking cloud formations.

When a Little "Scrubbing" Might Be Needed (and when to be cautious!)
Depending on the brand of your pencils, how heavily you applied the dry pigment, or even the texture of your paper, you might find that some colours need a little more encouragement from your brush to dissolve fully and smoothly.
You may need to gently "scrub" or agitate the area with your brush to help loosen and spread the pigment.
A Word of Caution: If you do need to scrub, it's best to use a sturdy, synthetic brush. Repeated scrubbing, especially on softer papers, can damage the paper surface and your more delicate brushes (like sable).
This is why I often recommend having some more affordable synthetic brushes on hand for more robust techniques.
Understanding Rewetting, Lifting, and Layering
As we discussed in the Primer, most standard watercolour pencils (excluding permanent ink-based ones like Derwent Inktense) can be rewet to some extent even after they have dried.
This is a fantastic property, as it means you can frequently go back into a dried area with a damp brush to soften edges, lift a little colour, or blend it further if you feel it needs adjusting.
Be Mindful When Layering: However, this re-wettable nature also means you need to be a bit careful when applying fresh layers of wet watercolour pencil over already dried passages.
If you agitate the underlying layer too much with your brush, it can lift and mix with your new layer.
Sometimes this is exactly what you want for soft, gradual blending, but if you're aiming for clean, crisp overlying layers, use a lighter touch and try not to overwork the area.
Staining Power of Some Colours
It's also good to be aware that some pencil colours (often the very vibrant reds, blues, or phthalocyanine-based colours) may have more staining power than others.
This means they might be harder to lift completely once they've been applied and wetted, even if they are not permanent inks.
As always, if you're unsure how a particular colour will behave, a quick test on your scrap paper is your best friend!
Creative Tissue Techniques: Beyond Basic Dabbing
In our Beginner’s Guide to Watercolor Pencils - Section 4: Essential Techniques, we touched upon the basic method of using a damp piece of tissue to gently dab dry watercolour pencil pigment, creating soft, dappled textures ideal for effects like clouds or distant foliage. It's a wonderfully simple yet effective technique.
Now, let's explore a couple of further ways you can use tissue and minimal water to achieve unique results and even work on surfaces that might not traditionally be suited for very wet applications.
Creating Textured Effects with a Fine Mist Spray and Tissue
This variation is excellent for producing convincing, slightly random textures, such as those you might find on a gravel path, a rough stone wall, or even certain types of bark.
How to do it:
- Start by applying your dry watercolour pencil pigment to the area where you want the texture. You can vary the colours and the intensity of application. For a gravel path, for instance, you might use a mix of greys, browns, and perhaps a touch of earthy yellow or green.
- Instead of dabbing with a pre-moistened tissue, take a small fine mist spray bottle (the kind you might use for plants or even an empty, cleaned perfume atomizer can work) and very lightly spritz a small amount of clean water directly onto the dry pigment. You don't want to soak the paper, just introduce a light, uneven misting.
- Immediately afterward, take your piece of kitchen paper or tissue and gently dab or press it onto the misted area.
- When you lift the tissue, you'll find that some of the pigment has dissolved and transferred to the tissue, while other areas of pigment might have only partially dissolved or remained dry. This creates a lovely, broken colour effect with a convincing, slightly granular texture.
Why it works well: The fine mist distributes water unevenly, allowing for that random activation which is key to natural-looking textures.
Using Tissue Techniques on Lighter-Weight or Non-Traditional Papers
One of the significant advantages of using tissue-based techniques (both basic dabbing and the misting method) is that they generally require much less water than full brush-activated washes. This makes them particularly useful if you're experimenting with:
- Lighter-weight drawing or cartridge papers: These papers might buckle or pill if you apply too much water with a brush. Tissue methods, by minimizing water, can allow you to introduce watercolour effects more safely.
- Some non-traditional surfaces: If you're exploring using your watercolour pencils on surfaces that aren't specifically designed for wet media (always test first!), tissue techniques can be a gentler way to activate the colour without over-saturating the surface.
By controlling the amount of moisture on your tissue or in your mist, you can achieve beautiful watercolour-like effects with a reduced risk of paper warping.
Remember, applying your dry pigment softly (perhaps using the side of the pencil lead for broader, lighter coverage) before dabbing can also contribute to a more successful outcome on these less robust papers.
Alternative Ways to Create Liquid Colour and Apply It
Using a "Paper Palette" to Lift Your Colours
Here’s an ingenious method that allows you to create a pool of usable watercolour pigment from your pencils while also helping to keep your pencil points relatively sharp – it’s like creating a temporary, disposable palette on a separate piece of paper!
What is a Paper Palette?
Instead of applying your watercolour pencil directly to your artwork and then wetting it, or lifting pigment from the pencil tip with a wet brush (as we discussed in the "Creating a Liquid Palette" method), you first transfer dry pigment from your pencil onto a spare piece of suitably textured paper. This spare piece then acts as your palette.
Suitable Papers for Your Paper Palette
You'll need a paper with enough "tooth" or texture to grab the pigment from your pencil. Good options include:
- A scrap piece of rough or cold-pressed watercolour paper.
- A piece of sanded pastel paper (this has a fine gritty surface).
Peter Weatherill, from whom this site originated, often recommended using a fine grit waterproof abrasive paper, like a P400 grit Hermes paper (often found in DIY stores, usually light grey). If you try this, ensure it's clean and that no unwanted residue transfers to your brush.
How to Use the Paper Palette Technique
- Take your chosen watercolour pencil and firmly rub the tip or side onto your selected paper palette surface. This will deposit a patch of concentrated dry pigment. A bonus here is that this action can also help to shape and maintain a sharp point on your pencil as you work!
- You can create several patches of different colours on your paper palette. You can even lay colours close together or slightly overlapping if you intend to mix them.
- Now, take your clean, damp watercolour brush and dip it into one of the patches of dry pigment on your paper palette. The pigment will lift onto your brush, creating liquid colour.
- Apply this colour to your main artwork as you would with traditional watercolour paint.
- You can also pre-mix colours directly on your paper palette by lifting one colour with your damp brush and then dabbing it into another colour patch before applying it to your artwork.
Benefits of this Method
- Control over pigment consistency: Like working from a traditional palette, you can control how much water you mix with the pigment you lift.
- Clean pencil tips: It avoids directly wetting your pencil cores.
- Maintains pencil points: The act of rubbing pigment onto the textured paper palette can help keep your pencils nicely shaped.
- Easy mixing: You can visually mix colours on your paper palette before committing them to your main piece.
This 'paper palette' technique is wonderfully versatile for creating controlled washes.
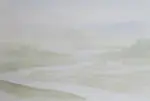
To see it used extensively for building up an atmospheric landscape background, and to follow an artist's complete thought process, compositional decisions, and the valuable lessons learned from a real project, take a look at our Lessons in Landscape: A Watercolour Pencil Background and Composition Study
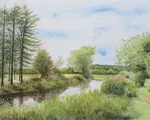
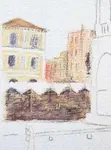
 Watercolour pencil sketch of Welsh farm 5.5 ins square
 Hermes P400 grit paper used as a palette for pencil pigment
Creative Techniques: Working with Shaved Pigment
Beyond drawing directly with your watercolour pencils, you can achieve some fascinating effects by carefully shaving pigment from the pencil core.
This opens up possibilities for creating your own liquid washes, unique textures, and more painterly applications.
Important Safety Note: These techniques involve using a sharp craft knife or scalpel. Please always exercise extreme caution, cut away from your body and fingers, and work on a protected surface. If you're not comfortable using a sharp blade, it's best to explore other techniques.
Creating Liquid Washes on a Palette from Shavings
This method allows you to create a pool of liquid watercolour from a specific pencil, giving you great control over your washes, much like using traditional pan watercolours.
How to do it:
- Ensure your chosen watercolour pencil has a nicely exposed point (you might want to sharpen it first to have plenty of pigment accessible).
- Carefully, using a craft knife or scalpel, gently scrape or shave small amounts of the exposed coloured pigment from the pencil tip into a clean dish, palette well, or even an old saucer. Try to avoid getting any wood shavings mixed in with the pigment.
- Add a few drops of clean water to the pigment shavings and mix gently with a brush until the pigment dissolves and you have a liquid wash of colour. You can adjust the intensity by adding more pigment or more water.
- You can then apply this wash to your paper with a brush, just like watercolour paint.
Why use this method instead of traditional paints?
One great advantage is colour consistency for specific hues.
Have you ever mixed the perfect shade with traditional paints, only to find you didn't mix quite enough to complete an area like a large sky or background, and then struggled to match it perfectly?
With this method, if you need more of that exact colour, you simply shave a bit more from the same pencil – ensuring a perfect match every time!
Example – Aged Wood Effect
For an aged wood effect, I once shaved a brown pencil into a palette well, added water, and painted it onto the paper to create base planks.
While it was still damp, I drew in some plank lines and wood grain texture with the dry tip of the same brown pencil.
After it had completely dried, I sprinkled a few green pencil shavings onto the "wood" and then used a damp brush to gently push and dissolve them into the surface, giving a lovely hint of moss or aging.


Creative Texture and Application Techniques (with Shaved Pigment directly on paper)
Direct Application of Shavings onto Paper for Textures
You can also apply shavings directly to your paper and then activate them for interesting textural effects.
Creating Soft Floral or Distant Foliage Textures:
For creating the impression of distant flower beds, soft foliage, or textured ground cover.
- Gently shave small amounts of pigment from your chosen pencil(s) directly onto the area of your dry paper where you want the texture.
- Take a slightly damp brush (a filbert brush can work well for pressing) and gently press or stipple the pigment shavings into the paper surface. The shavings will partially dissolve and create a lovely, somewhat random and organic texture.
- Once this layer is dry, you can glaze over it with other colours or add further details if desired.

Tip for Control: If you only want the shavings in a specific area, it’s a good idea to protect the rest of your drawing with clean scrap paper, removing it only once the shavings are applied and the area is dry.
Creating Rock Textures:
This technique is wonderful for suggesting the rough, varied surface of rocks.
- Start with dry paper and sprinkle shavings from grey and/or brown pencils where you want your rocks.
- Using a damp filbert or round brush, gently press and "squash" the shavings into the paper. Try rotating your brush as you do this to avoid creating a repetitive pattern and to encourage a more natural, uneven look.
- You can then add more shavings – perhaps some green for a suggestion of moss – and repeat the damp brush technique to integrate them.
- Once dry, you can further enhance the effect by using the dry tip of a dark pencil to emphasize shadows or crevices, and a light grey or white pencil to pick out highlights or fill in any overly blank areas on the top surfaces of the rocks.


Using a Makeup Applicator with Shavings
For a very soft, almost unpredictable blended effect with shavings.
- Lightly wet the area of your paper where you want the effect.
- Sprinkle your chosen pigment shavings onto this pre-wetted surface.
- Take a clean, soft sponge makeup applicator (the little wedge-shaped ones can work well) and use it to gently move the shavings around on the wet paper. They will start to dissolve and blend softly and somewhat randomly.
This can be a really fun technique, as you never quite know what sort of beautiful, diffused texture you're going to end up with!


Further Exploration: Working on Different Surfaces
While watercolour paper is undoubtedly the ideal starting point and a wonderful surface for your watercolour pencils, once you feel confident with the core techniques, you might find it exciting to explore how your pencils behave on other types of prepared surfaces.
This can open up new creative possibilities, unique textures, and is often a stepping stone into mixed-media work.
Why Explore Other Surfaces?
- Unique Textures: Surfaces like treated canvas, wood panels, or even specialized pastel papers (though test their water-holding capacity) can offer textures that interact with your watercolour pencils in ways that are quite different from standard watercolour paper.
- Durability and Display: Working on a sturdy panel or canvas can provide a more robust final piece, sometimes suitable for different display methods.
- Mixed Media Applications: If you enjoy combining watercolour pencils with other media (like acrylics, pastels, or inks), working on a surface prepared to handle multiple types of materials can be very advantageous.
Some Surfaces to Consider (with preparation in mind)
- Treated Canvas or Canvas Board: You can use watercolour pencils on canvas that has been appropriately primed for wet media (e.g., with gesso suitable for watercolour or absorbent ground). The weave of the canvas will give a distinct texture.
- Wood Panels: Wooden panels, when properly sealed and primed (again, with a ground that accepts watercolour), can provide a lovely rigid surface. The smoothness or grain of the wood can also influence the final look.
- Illustration Board or Heavy Cardstock: Some heavier cardstocks or illustration boards might take light washes, especially if tissue techniques (with minimal water) are used.
Key Considerations for Non-Paper Surfaces
- Preparation is Key: Most non-paper surfaces will require some form of preparation (sealing, priming with gesso, or applying an absorbent ground) to ensure they can accept the watercolour pencil pigment and water appropriately, and to prevent the pigment from sinking in too much or the surface from deteriorating.
The specifics of surface preparation are a large topic in themselves and often depend on the surface material.
Test, Test, Test!: This is even more crucial than on paper. Always test a small, inconspicuous area of your prepared surface first. Pay close attention to:
- How the dry pencil applies.
- How the surface absorbs water.
- How the pigment behaves when wetted – does it spread, sink in, lift easily?
- How the surface holds up to wet applications – does it buckle, warp, or does the surface layer break down?
Water Control: You may find you need to adjust your water control even more carefully than on paper, as absorption rates can vary wildly.
Experimenting with different surfaces can be a really fun way to push the boundaries of what you thought was possible with your watercolour pencils and can lead to some truly unique and personal artistic expressions.
Just remember to approach it with a spirit of discovery and lots of testing!
Special Considerations for Watercolour Pencils
While most traditional watercolour pencils share common characteristics, there are a couple of specific areas worth highlighting that can significantly impact your techniques and results: understanding the unique nature of ink-based pencils like Derwent Inktense, and being aware of potential variations with some budget-friendly brands.
Understanding Derwent Inktense Pencils: Ink-Based and Permanent
You'll often hear Derwent Inktense pencils and blocks mentioned in the world of water-soluble media, and it's essential to understand that they behave quite differently from traditional watercolour pencils.
We touched on this in our Beginner’s Guide to Watercolor Pencils Primer Page, but it's worth reiterating and expanding upon here as it affects how you use them with various techniques.
- Ink, Not Watercolour Pigment: The crucial difference is that Inktense products contain water-soluble ink rather than traditional watercolour pigment.
- Vibrant Transformation: When you add water to dry Inktense marks, the colour transforms dramatically, becoming incredibly vibrant and translucent, often much more intense than the dry application suggests.
- Permanent When Dry: This is the most significant characteristic to remember: once Inktense ink has been activated with water and then dries, it is permanent. Unlike traditional watercolour pencils which can often be re-wetted and lifted or moved to some extent, dried Inktense ink forms a fixed, insoluble layer.
What This Means for Your Techniques
Advantages:
- Excellent for Layering: Because dried layers are permanent, you can apply subsequent washes of Inktense (or other water-based media) over the top without disturbing the underlying colours. This is fantastic for creating rich, complex glazes and layered effects.
- Underpainting: Their permanence makes them suitable for creating a vibrant underpainting that won't budge when you work over it with other media (including more Inktense, traditional watercolours, or even dry pencils).
- Use on Fabric (with care): Because they are ink-based and permanent, Inktense can sometimes be used on fabrics (always test thoroughly and follow manufacturer's guidelines for heat setting if required for washability). This is a more specialized application but highlights their versatility.
Cautions and Considerations
- Mistakes are Harder to Correct: Once activated and dried, you won't be able to lift or significantly alter Inktense marks. This means your initial application and colour choices need to be more deliberate. The dry lifting techniques we discussed earlier (erasers, tape) must be used before water is applied.
- Test Extensively: Always create test swatches on your chosen paper to see the true wet colour and to experiment with how they behave before committing to an important piece.
Inktense pencils are wonderful, powerful tools, but understanding their unique ink-based and permanent nature is key to using them successfully and avoiding frustration
A Note on Some Budget-Friendly or Cheaper Brands
While there are many excellent student-grade watercolour pencils available that offer good quality at an affordable price, it's worth being aware that with some of the very cheapest or lesser-known brands, you might encounter more variability in performance.
- Potential for Unexpected Behaviour: For instance, I once experimented with shaving pigment from a particular budget-friendly pencil (it was a Sapphire Blue from Arteza at the time) directly onto wet paper. Interestingly, the different colour components that made up that single pencil core separated when they hit the water, creating a very pretty, but entirely unintended, mottled multicoloured effect.

What to Look Out For
- Pigment Load: Cheaper pencils might have less pigment and more binder/filler, resulting in less intense colour when wet.
- Dissolvability: Some may not dissolve as smoothly or completely, potentially leaving behind gritty or streaky marks.
- Lightfastness: Lightfastness ratings are often less reliable or absent on very cheap brands, meaning your work could fade over time.
- Consistency: You might find more inconsistency between colours within the same range.
The Importance of Testing: This doesn't mean you can't achieve lovely results with more affordable pencils, but it does highlight (again!) the absolute importance of testing your specific pencils thoroughly.
Get to know how your pencils behave – how they lay down dry, how they transform with water, how they mix, and how permanent they are.
This is true for all art materials, but perhaps even more so when you're exploring brands at the lower end of the price spectrum.
Ultimately, understanding the specific characteristics of the pencils you own, whatever their price point, is the best way to get the results you desire.
Bonus Technique: Watercolour Pencils for Ultra-Light Travel
Do you enjoy sketching or painting en plein air (outdoors), or perhaps you simply want an incredibly lightweight and compact kit for creating watercolour pencil art when you're travelling?
This clever adaptation of the "Paper Palette" technique we discussed earlier is perfect for just that!
Instead of carrying a full tin of paints or a large selection of pencils, you can prepare a very portable "paintbox" using just your watercolour pencils and a few other minimal supplies.
Preparing Your Travel Palette
- Before you head out, take a sturdy piece of textured paper that you can use as your palette (as described in our Using a 'Paper Palette' to Lift Your Colours section). Good options include a piece of rough watercolour paper, sanded pastel paper, or fine grit waterproof abrasive paper.
- Select the watercolour pencil colours you think you'll need for your outing and rub generous patches of each dry pigment onto this paper palette. You can arrange them just like pans of paint.
- This prepared paper, with its patches of dry pigment, now becomes your ultra-light "paintbox"!
What Else to Pack for Your Ultra-Light Kit:
- Your Prepared Paper Palette: The star of the show!
- A Small Sketchbook or Painting Surface: A small pad of watercolour paper or a few loose sheets.
- A Small Watercolour Brush: A travel brush or a small round synthetic brush will do nicely.
- A Small, Lidded Tin or Container: This is a brilliant multi-tasker! You can carry your brush, a graphite pencil for initial sketching (if needed), and perhaps a small eraser inside it. Then, once you're on location, you can empty the tin and use it as your water container. An old mint tin or small tobacco tin can be ideal.
- A Small Water Bottle (optional): To fill your tin, or you might find water on location depending on where you are.
- A Piece of Kitchen Paper/Cloth: For wiping your brush.
Painting on Location
Once you've found your spot and are ready to paint:
- Fill your lidded tin (or other small container) with a little water.
- Dip your damp brush into the patches of dry pigment on your prepared paper palette to lift the colour.
- Paint onto your sketchbook or paper surface just as you would with traditional watercolours.
This method allows you to enjoy the full range of watercolour effects with an incredibly minimal and easy-to-carry set of supplies. It’s perfect for capturing quick sketches, colour notes, or more developed small paintings when you’re out and about.
Your Watercolour Pencil Adventure Continues!
We've journeyed through a wide array of techniques in this guide, from mastering core brushwork and understanding your materials, to exploring more creative applications like using shaved pigment, tissue effects, and even venturing onto different surfaces.
I hope this exploration has shown you just how wonderfully versatile watercolour pencils can be, offering a delightful bridge between the precision of drawing and the expressive freedom of painting.
The real key to unlocking the full potential of these methods, and indeed your own artistic style, lies in practice and experimentation.
Don't be afraid to try things out, to mix techniques, or even to have a few "happy accidents" along the way – that's often where the most exciting discoveries are made!
Each technique you explore and master will become another valuable tool in your artistic toolkit, helping you to translate your vision onto the page with greater confidence and skill.
So, keep those pencils handy, revisit these methods often, and most importantly, enjoy the process of learning and creating.
I'm excited to see how you take these techniques and make them your own, producing beautiful and impressive watercolour pencil art that you can be truly proud of.
Happy painting!
You might like these
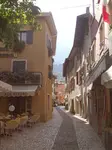
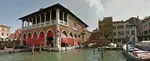
Watercolour pencil tutorial - Italian Street Scene
A step-by-step demonstration showing how to create an Italian street scene using watercolour pencils from Caran d'Ache
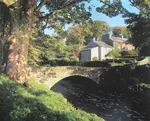
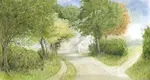
Watercolour Pencil Landscape Tutorial – Brokken Bridge
A complete step-by-step watercolour pencil tutorial. Paint an English packhorse bridge using washes, scribbles, and layering techniques. Includes free outline.
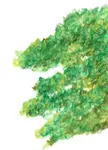
Draw Trees with Watercolour Pencils (No Green Blobs)
Draw realistic trees with watercolour pencils: sketch structure, scribble foliage masses, add a light wash, then glaze dry layers for texture

Improve Your Pencil Art: Get Free Tips & Techniques
Sign up for our newsletter – just occasional emails packed with practical advice and inspiration for pencil artists like yourself
Copyright © 2009- pencil-topics.co.uk All rights reserved
Home | About Us | Contact Us | Privacy Policy