Watercolor pencil painting of Coventry Canal
Peter Weatherill created this watercolor pencil painting and kindly took notes of his process so that you could follow along. I will let him tell you all about it.
by Peter Weatherill
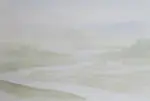
For my example, I have taken a photograph of the Coventry Canal close to Tamworth in Staffordshire. Hopwas Woods are to the left and in the distance, and the canal towpath winds its way on the right. This canal still gets a lot of boat use, with narrow boats using it to link Coventry with the Trent & Mersey Canal at Fradley Junction.
 Coventry canal reference photo
The materials I used
Don’t use too thin a paper and most certainly use a paper manufactured for watercolours.
I usually select a 300 gsm hot pressed watercolor paper for fine detail in colored pencil based pictures, however for this watercolor pencil painting I picked a heavier paper with some surface texture.
The 500 gsm watercolor paper from Hahnemuhle, branded as ‘Andalucia’ has a good surface without too regular a pattern. It doesn't need stretching and take considerable work with a wet watercolor brush without buckling and distorting. The resulting picture will be closer to a watercolor than a detailed colored pencil picture.
I am using colors from the Derwent Watercolour Pencil range (the full tin of 72) and for the first step, I have taken four colors...
- May Green (the lightest),
- Grass Green (another light green),
- Cedar Green (a good dark green)
- Terracotta (a dark red)
I picked Terracotta for the purple tops of the flower area near the walkers. This is because I don’t want to use a purple in the distant colour.
I also added...
- Ultramarine blue
- Rose
- Black
Watercolor pencil painting using line and wash
Applying pressure when placing a line of watercolor pencil to a piece of paper results in a slight indentation. When you add water, some pigment will stay in that dent, while some will create a wash of color that spreads beyond the line.
For this watercolor pencil painting I will take advantage of this to create a line and wash effect.
We can ‘pull away’ pigment from one side of the line to give a pale wash where we want it and leave the paper untouched on the other (this needs a steady hand and a good brush).
If we want a simple wash with no line, we can apply the dry pigment direct from the pencil as light shading, and then manipulate it with the water and brush.
We can also use other watercolor pencil techniques, such as the use of a pigment palette, to add a small amount of color to a wet surface, which will enable us to get the light blue of the sky and the shadows in clouds.
Once one layer of color has been applied and is dry, we can introduce further layers of pencil pigment to build the tones and contrasts.
Starting the base layer of the painting
The first step is to draw out the basic shape of the picture on the paper. I used an olive green watercolor pencil for this, as it will blend in to the predominant greens of the picture as it develops.
I have already applied brush and water to the lower part of the watercolor pencil painting in this first image.
 Drawing and first wash
Below is a close up detail of the work so far so you can see more clearly what is going on,
 Closeup of first wash
I now have the general shapes of the painting in position.
You can see that the canal is where it should be. Those tall trees to the left are in place, and the splash of contrasting light from the field of corn will supply the impact needed against the dark of the left hand tall trees and the darkness of the bank of trees behind the field in the distance.
The reflection of light from the sky in the canal also provides interest to the centre of the picture.
The two figures walking ahead down the tow path add a note of scale - I have drawn them a little larger than in real life.
 Base drawing in place now
Beginning to add color to the foliage
There are several ways I can approach the picture now.
- I can complete the sky and the clouds.
- I can work along the foreground where there are plants that will overlap the water of the canal which will have to be done first (as they are lighter than the water).
- I can complete the cornfield to the left, so that the trees on the left (which are darker) can be worked over the top).
- Or I can do an experimental bit of foliage on the right hand side along the path.
I have decided on the latter, as the picture will be used as a demo piece at a forthcoming Knuston Hall Open Day. It will be good to have a small area well advanced, to show the visitors at the event the way the sky is worked and the foreground constructed.
This makes it a little more difficult to work the watercolor pencil painting. The ideal course would be to do the sky first, as the trees all need to be worked up to and over the sky. However, the sky nearest to the right hand tree is cloudy so I will be able to work around the problem as there will be no need to add blue here. I should be able to leave the paper surface to represent the cloud.
Let’s see how the color goes down ...
The relatively rough paper is working well to take the pigment from the watercolor pencil. We will have areas of white left from the grain of the paper and may wish to leave some of this white when we apply water to the pigment.
The picture is approximately 12 inches wide by 10 inches high (33 x 24 cm).

 Scribble stroke close up
See how I have used my usual interlocking ‘scribble’ stroke of the different greens for the areas with leaf. On this paper, the color hits and misses. the pencil stroke seems even more random with broken areas of white paper still showing. I may well leave some of this as dry watercolor pencil.
None of the areas are shaded with straight lines. Once water is added to the pigment the structure of the image will be formed by the point of the brush, but for this part of the picture I want to avoid any clear lines which are at risk of remaining after brushing in. I will leave that until I get to the left-hand trees and their branches.
I am going to work a little more dry color into the left hand side and then we will discuss the addition of some water.
I am using a No. 8 Nylon type watercolor brush with a good point. The aim is to have a springy bristle which will manipulate the color. It is not necessary to use an expensive sable type watercolor brush! This brush cost under £2!
As you can see below, more dry watercolor pencil has been added and I have now started with the water process.
Using a DAMP brush containing just enough water to soften and move the dry pigment, I have started at the top edge of the tree and deliberately left small patches of white to mimic the sky appearing through the foliage.
The darker area of tree nearer the trunk will come with the next stage. At the moment only the tree and the line of woods in the distance have been worked with water.
 Adding color to the foliage
Reviewing the progress
Let us have a closer look at that area of our watercolor pencil painting which has been worked.
Note that nearer the edge of the tree, the damp brush has merely softened the pigment. The darker green still appears as a mark. As we move down and to the right, more energy has been put into the brush and more water added, so that the colour has become more even.
Those distant trees have had the dry colour moistened and merged so that we can see a darker line of colour along the top of the far trees and also a darker shadow area along the bottom edge where the nearer trees stand forward.
The light is catching the tops of those near trees but we see the shadowed green near the bottoms.
When the brush is applied to the dry pigment, the wash becomes mobile and can be pushed into areas where we want darker values, and moved from other areas to make them lighter.
This is a basic watercolor pencil technique and is worth practicing.
Remember the color you see above, is not the final picture - there will be further dry pigment and more water added yet.
 Brushing the foliage
When you add water to pencil based pigment and it dissolves, there may well be a change in the actual color you see, as well as greater strength in the color. This is because the dry pigment bonds with the white paper and becomes a true watercolor rather than a layer of pigment bound in a soluble wax carrier sitting on the top of the paper surface.
Some colors may change dramatically depending on the brand and the combination and amount of pigments included. You should get to know the brand of pencils you are using both wet and dry.
It is useful to have a piece of kitchen towel handy to dab off excess water from the brush and also excess color from the paper before it dries and becomes locked to the paper surface. A screw of clean kitchen paper can be very useful to manage or remove excess color.
Working on the bottom right section
I can now move ahead and apply water to most of the rest of that bottom right hand corner of the watercolor pencil painting.
I am working my brush in the direction that the scenery goes with the aim of re-drawing the color with the brush as it comes off the surface. If I press lightly, the lines of darker color will remain.
If I press hard, I can lift and merge all the color in the area being worked.
When I get a strong single colour appear (as in the area of rosebay willow herb to the left of the walkers ) I can adjust this by bringing up some green from the area underneath. I have also pushed up some dark green into that area to represent the area of darker shadow under the flowers.
Don’t forget, this is just the under layer.
More dry color can be introduced later using those same pencils, and more definition can be put into the details of the picture.
I want to restrict the colors to the four I have chosen for the moment, to get some uniformity across the whole of the picture being completed in relatively small sections.
 Continuing with the right hand side of the picture
Beginning the sky
The next step of the watercolor pencil painting is the sky. I am finding that the very heavy paper is responding well to the water - there has been no buckling of the paper at all. I have applied a layer of clean water to the sky in those areas where blue is required between the clouds.
Whilst the water is still glossy on the paper surface, I have then dabbed in a very small amount of Ultramarine blue watercolor pencil pigment with a brush into those areas and let the color spread naturally.
I have encouraged some movement and also used some kitchen tissue to remove some excess blue. The aim is to make areas of sky between clouds - they don’t have to be identical to the reference, but I have used that as a guide. I will add shading to the underside of the clouds later, and this will give them more of a cloud shape.
Following the addition of the sky I have worked more dry pencil into the right hand side using the same four colors, plus a dot of blue on one of the walkers.
As I commented earlier, this exercise was a demonstration piece for an all day event, and there needed to be a selection of areas visible to visitors - some nearly finished and some just at the start. This is why I have been doing so much to the right hand corner.
 Adding the sky
After the college open day
This image, below, is the result of a days work at the College Open Day (with interruptions to explain what I was doing).
Unfortunately, it was not possible to scan or photograph the stages during the day, so I will now do a tour of the picture and explain what has been done.
There is also a more detailed image further down, showing the central area.
 After the open day
Starting on the right hand side we can see that I have darkened the shadows in the right hand tree foliage down to the pathway. I have added dry cedar green watercolor pencil and then softened it with a damp brush, working in circular strokes with the brush to build the dappled dark you see.
I have added Terracotta to the walker who was previously white. This will blend in better with the flowers on the river bank. I have added more green along the path so that the path edges are showing shadow.
I introduced another layer of cedar green to the bushes just below the walkers and the light grasses have been retained.
Coming down to the bottom right hand corner, more dark green has been added to provide a line of shadow in the grass at the immediate front of the picture. This is always a good move in landscapes (if you can get away with it) as it provides a step of darker colour to lift the viewer's eye into the picture. It is a useful foundation or base for the overall picture.
As I work along the bottom of the picture, I will take the opportunity to add more dark shadow, even though it may not be there in the original reference.
As you come across the centre you will see that there are light grasses showing in front of the dark shadow in the water. These were done much later and I will explain that process when we get to it.
The grass on the bottom left hand side is still quite light, and I experimented with how best to complete those red flowers. My first idea was to leave small patches of red representing the flowers and then apply the green. This didn’t work too well as the softening process with water, made the colours merge with the green making the red a dark grey.
I put in some of that dark shadowed water while working back towards the right and to the centre, and I think it may help you to see a more detailed image of the centre area, with a description of that process.
 Detail of centre
I added the central tree with my usual light green scribbled watercolor pencil for the leaf cover. I know the reference shows a tree which is more brown. I will see later if the leaf cover needs adjusting, but for now it is light green!
See how the reflection in the water partly mirrors the scene above it? I have been careful not to add too much colour in the water at this stage. It is easier to add, and more difficult to remove, if it is not wanted.
The tree has some structure to indicate where the main branches are. I will not put every branch seen in the reference photo into the watercolor pencil painting.
That yellow ochre field is essential to the structure of the composition. It provides a foil for the trees behind it and also for the tall trees on the left, which have yet to be completed. Some ripples have been added to the water just to establish the broken surface.
Making corrections to the watercolor pencil painting
Now let us look at those light grasses over the water shadow and also the solution to the flowers against the dark water and green grass.
The answer lies in the heavy grade of paper used. 500gsm paper is very thick and although this one has a soft surface and needs careful handling, it will take an attack with a craft knife and come up smiling. Once the water on the softened pigment has dried, we can scratch into the paper surface, and draw the grass stems in with a knife. Likewise the red flowers both against the green grass and the dark water. This will pull up the surface of the paper and leave small pits with small bits of paper raised from the surface.
I have then taken a white WAX based pencil (NOT a watercolor pencil) and pressed dry wax into the paper to preserve the white of the grass and the red of the flowers. If I do have to go over these areas again with wet pigment later, there is a real chance that the wax will act as a resist and protect the lighter color from pollution. We will see ……
Working on the trees
There has been a two week gap between the work above and picking up this watercolor pencil painting again. Fortunately the colors chosen for the earlier sessions were still identifiable in the box, as they were all turned upside down when put back last time.
I have spent a morning developing the lower left hand side of the picture. You can see below how the balance of the picture is greatly improved by the addition of those tall trees which provide a slope for the eye to follow down into the body of the picture …. See the arrow inserted over the image.
If you refer back to the reference image you will see I have lightened and opened out the area between the trees to add more light to the left hand centre. At the moment, I am just adding dry watercolour pencil and building up colour and lines both to the trees and to the far side of the canal bank.
 The diagonal tree line draws the eye to the centre
Look at the detail of the pencil work and see how the strokes build up. Once water is added, the lines will soften, but if the brush strokes are kept very light, the lines will be left. Some color will be merged and developed giving a watercolor effect.
 Dry pencil pine trees
Below, is the result of that brushing in process with a damp brush.
Make sure that you work all your brush strokes in the direction the element of the picture goes. Grass and tree trunks have almost entirely vertical strokes. Any water must have horizontal strokes. Any foliage can be dabbed, pushed, and generally shaped into position, leaving areas of light and darker pigment.
Remember, once the wet surface has dried, you can go back in again with dry pencil and add shadows, change colours. etc.
What you cannot usually do, is move dried paint once it has bonded to the paper surface.
For those more used to layering wax pencil pigment, creating a watercolor pencil painting can be a revelation - the number of layers that the paper can take are almost without limit.
 Trees washed with water
Completing the pine trees
As you will see, the main change in the next photo is the work to the pine trees on the left.
Most of this work is done with entirely dry pencil point - and a good fine point on the pencil too. We need to take account of the shape the branches take and allow for that curve in the outward facing branches.
The foliage cover is still pretty light, but this can be developed and where necessary the pigment can be lightly softened into position to fill areas with darker green.
 Shadows added
Keep track of the light and how the tree trunks will cast shadows on the grass. Not every tree, or every branch, needs to be included. We need to give an impression of the scene that someone familiar with the walk down that canal bank would recognize. However, I'm aiming to create a great looking watercolor pencil painting, than a photo-realistic result.
The major change you will notice in the photo below, is in the left hand side pine trees. The Cedar Green watercolor pencil is giving the tree foliage quite a different look and also balancing out all those lighter greens in the foreground.
You may have spotted that I have punched in some darker areas of shadow all over the picture using the black pencil.
This will simply darken colours when used over the top (unless used too much), and some small areas of dark now show along the bottom edge of the picture and within the grasses.
 Finishing touches
I have scratched out some small spaces of white in the foreground to put in more flowers (Terracotta and Rose colours) trying to get them into random position (not easy). I may look at it for a few days now to decide if more flowers are needed, and if so, where.
The picture isn’t finished, but it isn’t far off. I will now put away the reference and spend time over the next few days, considering the progress of the watercolor pencil painting.
Actions considered
After a week I had the following thoughts.
- Those flowers need to be different sizes. I will add some larger blooms to the foreground.
- That blue shirt on the walker may be too bright. I can either darken it with a darker blue, or lift some colour with an eraser to reduce the color strength. This may not work as the color may be too locked to the paper, but it might be worth a try.
- I had thought I might do some more work on the water, but am now having a re-think. The water may be fine as it is.
- Not sure that I want to add any shadow to the cloud bases. They are not perfect, but tinkering with them now could easily ruin the picture.
- The areas of dark shadow need to be defined better. Perhaps some more black will help. It won’t read as black when layered on top of other colours and will tend to simply darken the existing colour.
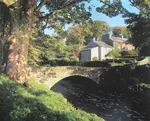
Final watercolour pencil painting
The picture is just about good to go. It only needs a signature.
 Final painting
Coventry Canal at Hopwas, Staffordshire.
Derwent Watercolour Pencil Painting on Hahnemuhle Andalucia 500gsm paper
Copyright Peter Weatherill
You might like these
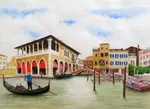
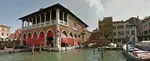
Derwent watercolour pencils tutorial
Derwent watercolour pencils are used for this tutorial featuring Venice Grand Canal and the Rialto Fish Market
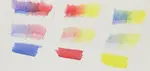
How to Pick Watercolour Brushes for Your Watercolour Pencil Art
Improve your watercolour pencil art with the right brushes! Explore essential types, sable vs synthetic pros & cons, and expert advice on choosing.
You might like these
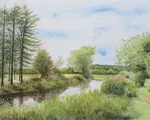
Learn watercolour pencil underpainting from Peter Weatherill
Discover Peter Weatherill's technique for using watercolour pencil underpainting to create a vibrant country lane. Learn how to add depth to your art
Stretching Watercolour Paper When Using Watercolour Pencils
Why stretching watercolour paper before using watercolour pencils is important for the best results. Also learn what NOT to do!
Derwent watercolour pencils tutorial
Derwent watercolour pencils are used for this tutorial featuring Venice Grand Canal and the Rialto Fish Market

Improve Your Pencil Art: Get Free Tips & Techniques
Sign up for our newsletter – just occasional emails packed with practical advice and inspiration for pencil artists like yourself
Copyright © 2009- pencil-topics.co.uk All rights reserved
Home | About Us | Contact Us | Privacy Policy