- Home
- Watercolour pencils
Watercolour Pencils
What this covers
A starting point for watercolour pencils: techniques, supply guides, project tutorials in roughly difficulty order, plus an honest look at when this medium suits you and when to stick with dry coloured pencil.
Watercolour pencils sit between drawing and painting. They look and feel like ordinary coloured pencils until you touch them with a damp brush, at which point the pigment dissolves and behaves like paint. Then it dries back to a layer you can draw over with more pencil if you want to.
That hybrid is what makes them useful. You get the control of a pencil for fine work, and the looseness of a wash for backgrounds and skies. You can use them entirely wet, entirely dry, or any mix of the two on the same piece.
This hub is the starting point. Below you'll find supply guides, the core techniques, project tutorials in difficulty order, an honest look at when watercolour pencil suits you and when it doesn't, and the three mistakes most people make on their first attempt.
Three things to know before you buy anything:
- Use watercolour paper. Hot-pressed feels lovely under a pencil. Ordinary drawing paper buckles the moment water touches it.
- Brands behave differently. Inktense and Inktense-style pencils go wildly strong when wet; Derwent Watercolour and Faber Albrecht Dürer stay more subtle.
- Treat them as a hybrid medium, not as watercolour. They aren't pans or tubes. The painterly bits come and go as you want them.
Start Here
Four short reference pages that the rest of the hub will lean on. The Primer is the friendliest if you've never picked up a watercolour pencil before.
What watercolour pencils are, how they behave, and what to expect when you make your first marks.
Flat and graded washes, lifting colour, edges, and how to add dry detail back on top once the paper has dried.
The shapes and fibres that work best for activating coloured pencil pigment without overworking the paper.
When stretching matters and when it doesn't. Worth the five minutes if you're working larger than a postcard.
Project Tutorials
Eight tutorials in rough difficulty order. The scribble tree is a fifteen-minute warm-up; the Italian street scene is a proper afternoon. Pick one that suits where you are.
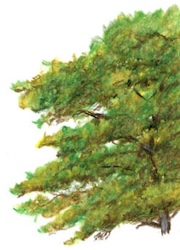
Scribble Tree (Quick Exercise)
A fifteen-minute exercise for blending greens and building convincing tree texture with a scribble stroke. The fastest way to feel what activating a watercolour pencil actually does.
A good first wet exercise.
Open the exercise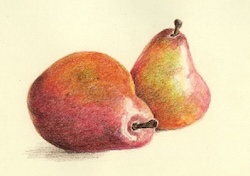
A Pair of Pears
The simplest possible first project. Draw, activate with water, refine. Pears forgive a lot, which is exactly what you want on your first finished piece.
Start here if you want one finished piece behind you.
Open the tutorial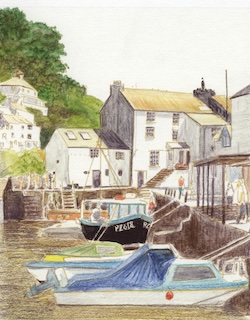
Polperro Harbour (Line and Wash)
A Cornish harbour scene where the line drawing carries half the work and the washes do the rest. A more relaxed approach than full painting.
Easier than it looks. The line drawing is the framework.
Open the tutorial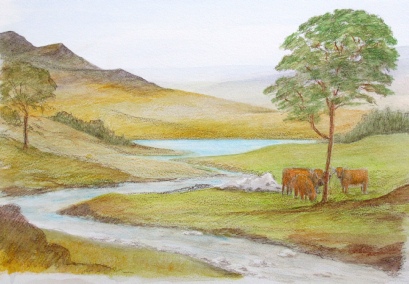
Scottish Hills
A soft, atmospheric background study. Layering and colour choices that push the distant hills back and bring the foreground forward.
Useful for any landscape with real depth.
Open the tutorial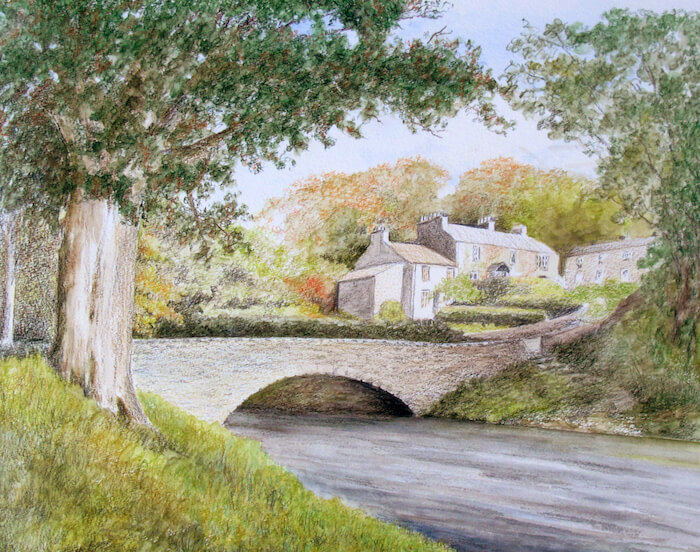
Yorkshire Bridge (Brokken Bridge)
A stone packhorse bridge in the Yorkshire Dales. Several techniques brought together into one finished piece: washes, scribbles, layered detail. Free outline available.
Open the tutorial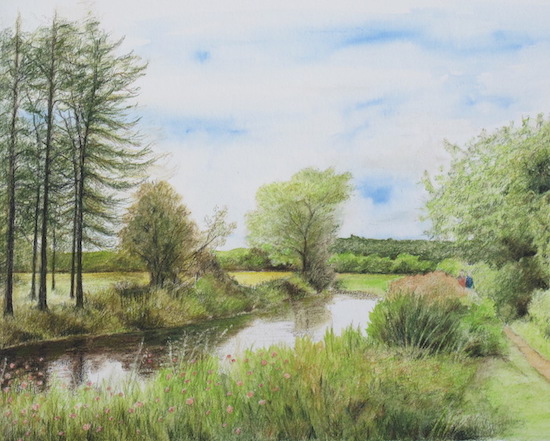
Coventry Canal
Trees, foliage and reflections on a rural Staffordshire canal. Quietly more challenging than it looks, especially the foliage.
Open the tutorial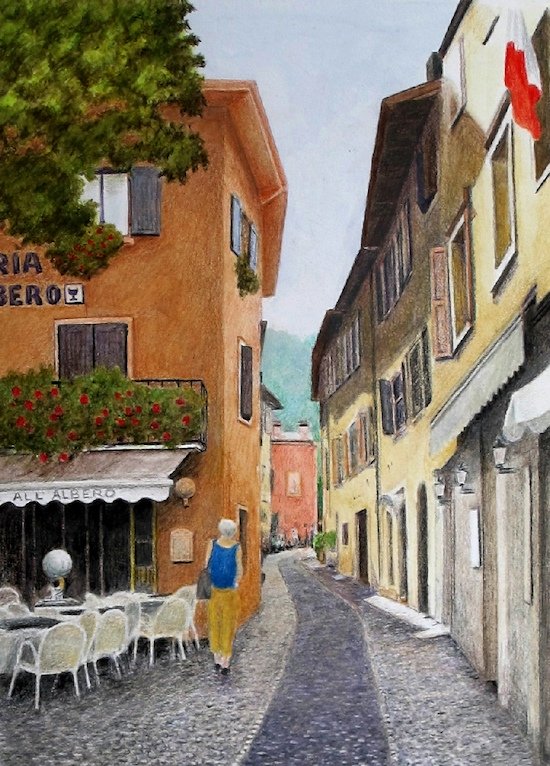
Italian Street Scene
Perspective, architecture and street-level atmosphere in Caran d'Ache watercolour pencils. The largest project on this hub.
Don't start here. Come back when you've done two or three of the others.
Open the tutorial
Country Lane (Underpainting Method)
Peter Weatherill's underpainting approach: pigment scraped from a watercolour pencil, dissolved with water, then worked over in dry coloured pencil. Adds depth fast.
A different approach. Worth knowing once you're comfortable with the basics.
Open the tutorialIs Watercolour Pencil Right for You Right Now?
Try watercolour pencils if you want to:
- Add soft washes and painterly effects to your pencil drawings.
- Build vibrant underpaintings for ordinary coloured pencil work.
- Cover larger background areas faster, then refine with dry pencil on top.
- Have a flexible medium that sits between drawing and painting.
Stick with dry coloured pencils for now if you:
- Are still building confidence with basic layering and blending.
- Want maximum control for photorealism and ultra-fine detail.
- Prefer to master one medium properly before mixing water into your process.
Either way, you'll be fine. If you're curious, start with the Primer above and try the scribble tree exercise before you commit to a full piece.
Three Common Mistakes (and How to Avoid Them)
A little preparation saves a lot of frustration. These are the three I see most often on a first attempt.
The colour went wildly dark when I added water
Start with very light dry layers. Water intensifies pigment fast. You can always add more once it's dry.
The paper buckled, pilled or tore
Use proper watercolour paper. Around 300gsm / 140lb handles water well, often without stretching for lighter work.
Everything looks muddy
Use two water jars: one for rinsing the brush, one kept clean for activating lighter areas. It sounds fiddly. It changes everything.
Essential Supplies
A small set of watercolour pencils, a sheet of decent paper, and one brush. That's the whole starter kit.
Watercolour Pencils
If you'd like help choosing a brand, four short guides:
Faber-Castell (includes Albrecht Dürer)
Subtle when wet, beautiful for layering. Good if you want a more controlled painterly result.
A long-established British range. Reliable, mid-strong activation, good for landscapes.
Behaves more like ink than watercolour: dries permanent, goes wildly strong when wet. Vivid.
A more affordable option that handles well for everyday use.
Paper
Hot-pressed (HP) watercolour paper if you like a smoother pencil feel. Cold-pressed (NOT) if you like a bit more tooth. Around 300gsm / 140lb is a solid all-round weight that handles light washes without stretching.
Brush
One small round brush is enough to begin with. A size 4 or 6 in synthetic fibre will do everything you need on small studies. You can add to the kit later, once you know what you actually use.
If you want a clear route through this page, start with the Primer. If you'd rather learn by doing, jump straight to the pair of pears. Either route works. The page will still be here when you come back.
Copyright © 2009- pencil-topics.co.uk All rights reserved
Home | About Us | Contact Us | Privacy Policy