Draw a garden archway in coloured pencil
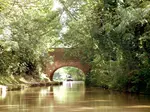
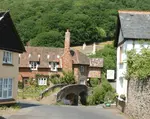
On this page you can watch Peter Weatherill draw a garden archway scene featuring the Rectory garden in Tiffield, Northamptonshire, using Polychromos coloured pencils on 300gsm Daler Rowney Langton hot pressed watercolour paper.
Peter invites you to have a go yourself, and supplies an outline drawing and the original reference photos for you to download below.
Keep in mind that when he drew this, he was demonstrating during a two-day workshop, so he created a loose interpretation of the scene.
While you may have more time to work on the drawing, you control the level of detail through your skills and effort.
If you are a total beginner to drawing with coloured pencils, you may prefer to try one of our step-by-step tutorials before tackling this demonstration, as it presumes some prior knowledge.
Why not treat it as a fun exercise, without worrying about creating an exact replica of Peter's work?

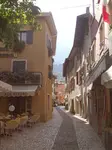
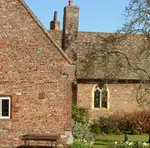
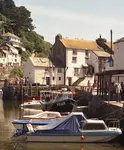
The pictures Peter used as reference material are below.


Download the outline to trace.
We have also supplied a large version of the merged photo for you to download.
Working from multiple reference photos
I made a few changes to the main reference:
- I removed the visible building from the background.
- I replaced the bit of visible wall to the left of the arch with some bushes.
- I added a flagstone in the foreground to draw you into the scene.
The original archway didn't have any flowers beside it. I imported the flowers from two other photographs. You can either replicate the creamy white flowers shown in my example or choose to depict different flowers.
Begin by adding colour to the hedge
Transfer the outline to your drawing paper. My page on using tracing paper may help here.
NOTE: Preserve the white paper where the tall grassy plants in front of the hedge are growing along with the white painted edge of the doorway.
To create a textured, blended appearance for the hedges within the archway, use a tight, circular scribbling motion with olive green, moss green, and sepia coloured pencils, applying 3-5 overlapping layers.
Add the lawn

For the worn pathway across the lawn, use short, horizontal pencil strokes with an Ivory coloured pencil. This will protect the area and keep it light even when you work the green over it later.
Then begin building up the shadow near the arch with short vertical strokes of green. Keep your pencil strokes random in length and change direction slightly to give a natural appearance.

Above is a close up of part of the scene viewed through the archway.
Add your lighter greens to the white areas you left previously to form the tall spiky plants. Then scratch back into the green to reveal the light grass details.
The area under the edge of the lower light coloured hedge will be shadowed. Look for places where you can play light against dark and dark against light. Avoid drawing a solid straight line, instead break it up unevenly so it looks natural.
Completing the details of the garden view visible through the archway can provide motivation and a sense of progress if you find the process of drawing the brickwork tedious or monotonous.
Begin drawing the garden arch

You can now start to look at the brickwork.
Due to the perspective, ensure that bricks below eye level slope downwards as they get nearer, and those above eye level slope upwards.
For more detail on drawing bricks see this page.
Aim to keep the lines of mortar consistent on both sides of the arch, as my example may not be perfect.
Bricks will be shadowed at the bottom edge and light at the top edge as the light comes from above and the bricks protrude slightly from the mortar.
Use a varied selection of reds, browns, purples, ochres, and light greens in layers to the bricks, as each has a unique colouring that will tone together.

I have started at the top of the arch, and I suggest you do the same. I have used a combination of natural reds and browns leaving the mortar line white and also being careful to leave that white strip around the arch edge.
Leave the creeper branches white for the time being.

For the initial leaf shading, use various light green pencils, incorporating some gold tones into the colour mixture. You will darken the leaves later.
Time to add the flowers

The flowers are my version of what is shown in the original photo. Watch the lines of brickwork they can easily go adrift.
I've simplified the yellow flower bush to the left of the arch. Since the flowers are in the foreground and need more detail, I've carefully outlined the blooms with a dark green pencil to define the edges. This really makes the flowers pop!
I darkened the edges of the creeper leaves and added shadows behind them to create the illusion of them being in front of the wall.
I darkened the bricks' lower edges where the sun doesn't hit them. I was also careful to darken the arch's interior - it helps to beautifully frame the garden scene.
My first version of the garden archway
 Garden Arch version 1
To make your painting look sunny and bright add dark shadows in the flowers and behind the vine leaves. This will help the bright colours stand out, giving an impression of sunshine.
The main focus is where the dark hedge on the left side of the background meets the white wooden arch frame.
The image above shows my first version of this scene. Your picture may differ from mine due to several factors:
- Color choices: You might select different colours than I did.
- Stroke techniques: Your strokes and shading methods could vary.
- Pencil brands: Using a different brand of pencils can affect the final result, as each brand has its own layering capabilities.
- Paper choice: Working on smooth or rough paper will make a big difference to the end result.
Remember, your unique style and materials will make your artwork one-of-a-kind!
V2 of the garden archway drawing
The photo below shows another attempt to draw a garden using the same photo reference.
This time, I used Caran d'Ache Pablo pencils instead of Polychromos. The Pablo set has different shades of red and green compared to the Polychromos set.
In this new drawing, I made a few changes to...
- the creeper leaves on the right-hand side
- the flowers in the bottom left
These adjustments create a slightly different look from the previous drawing while still depicting the same garden scene.
 Garden Arch version 2
I hope this demonstration has shown that even using the same base reference images your picture will have its own personality, just like you.
Remember there is no right or wrong way to create art.
The beauty is in your individual expression. So have fun with it! Experiment and let your creativity flow. I'm excited to see what you come up with.

I'm Carol Leather, a coloured pencil artist for over 15 years. Most of my teaching comes back to the same idea: realistic coloured pencil starts with structure, light and observation long before the colour goes down.
My work has featured in Ann Kullberg's Color Magazine, CP Magic and Color Pencil Treasures (vol 7). I'm a member of the UKCPS and was a prize winner in the Nature section of their Annual Open Exhibition in 2020.
You might like these
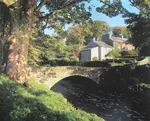
Watercolour Pencil Landscape Tutorial – Brokken Bridge
A complete step-by-step watercolour pencil tutorial. Paint an English packhorse bridge using washes, scribbles, and layering techniques. Includes free outline.
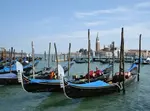
Creating a Venice Gondola Scene: An Artist's WIP & Tips
Follow artist Daryl Cogavin's process creating a Venice gondola scene in mixed media (ink, watercolour, coloured pencil). Insights & tips from a real project.
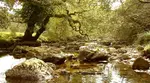
How to Draw a River: Rocks, Water & Reflections Step by Step
Draw a realistic river scene step by step with Peter Weatherill. Rocks, water, reflections and foliage in Faber Castell Polychromos coloured pencils.
Copyright © 2009- pencil-topics.co.uk All rights reserved
Home | About Us | Contact Us | Privacy Policy